Save Your Favorite Ideas


Magnet Experiment

Make leaves or other shapes float with this fun and easy magnet experiment for kids! Using only a paper clip, some string and a magnet, kids will love trying this science experiment!
RELATED: Grow a rainbow experiment

Magnet Experiment for Kids
In this experiment, you’ll use the power of a magnet to a get a leaf, butterfly or another shape to float in the air! Make the leaves look like they are falling from trees. You can even test this out with just a paper clip!

And you don’t have to only do leaves – you can do butterflies, a ghost, a rocket ship and more!

We adapted this idea from an activity from Super Simple Science Experiments.
For more simple science experiments, also see our rain cloud in a jar , walking water , dancing corn , grow a rainbow , and oil and water experiments !
Supplies Needed to do a Floating Magnet Experiment
- Small paper clip
- Tissue paper
- Leaf templates (you can get them at the bottom of the post) or get a butterfly template here
- Thin string
- Magnet – we like these magnet wands
Note: your magnet must be strong enough to hold up the paper clip without it immediately falling. We find it works best using a strong magnet wand. It also takes a little bit of practice to find the right spot, see our tips below.

Watch the Video Tutorial Here!

What is the Science?
The leaves float due to the magnetic attraction of the paper clip and magnet. The paper clip and tissue paper shape is very light, so the force of the magnetic pull is stronger than the force of gravity which would pull the shape to the ground.
How to do the Floating Magnet Experiment
1. Cut out the tissue paper shape.
You will need 2 tissue paper shapes.
You can make your own or you can use our free leaf templates. Get the leaf templates at the bottom of the post.
We also have a butterfly template.
You also need a paper clip. We matched the leaf colors to the paper clip, but any colored paper clip will work.

2. Tie a thin string around the paper clip.
You can also use a piece of clear fishing line.
Trim the string so it is approximately 12 inches long. You can make it any height, however the shorter the better.

3. Glue the other tissue paper shape on top of the bottom shape.
Gently glue around the bottom tissue paper leaf with a glue stick. Because tissue paper is fragile, be careful with this step or you may rip the tissue paper.

4. Tape the string down to the table.

Now kids can hold the magnet wand on top of the leaf and get it to float! See how long you can get the leaf or butterfly to float for.
To get the shape to float initially, start by holding the leaf up in the air and then bring the magnet wand towards it. Slowly pull the magnet wand away and see how long you can keep it floating!

Get the Leaf Templates Here
Be sure to check out our kids craft books also. See our craft for kids books!
More Science Experiments

Grow a Rainbow Experiment

How to Make Oobleck

Oil and Water Experiment

Rain Cloud in a Jar
Related ideas:.

Fluffy Slime Recipe

How to Make Slime With Contact Solution

Share a Comment!
We LOVE hearing from you! Submit your question or comment here.
Your email address will not be published. Required fields are marked *
Cancel Reply
2 comments on “magnet experiment”.
Do you have a video showing how to get the leaf to float initially? I’m having trouble getting this to work.
Are you using a magnet wand? Those seem to be the strongest and work the best. Bring it to the magnet first, then slowly pull away.

Sign up for my FREE newsletter and get new ideas to your inbox!
- Privacy Policy
- Science Experiments
- Colouring pages
- Group Games
Posted by in Science Experiments | Comments Off on Magnetic paper clip experiment
Magnetic paper clip experiment

Magnetic paper clip experiment Science experiments are fun to do and great for children to learn. This magnetic paper clip experiment is simple to do and will teach your kids about magnetic forces. What You Need:
Magnet Paper clips Activity:
Hang one paperclip from the magnet.
Use the hanging clip to pick up other paper clips.
See how many paper clips you can pick up using only one magnet.
You can also try this with different sizes of paper clips or paper clips that have plastic coating.
Comments are closed.
Copyright © 2013 creativechilds.com

The Happy Scientist
Error message, magnetizing and demagnetizing a paperclip.
I wanted to do an experiment about demagnetizing magnets, and the simplest way was to begin by magnetizing some paperclips. Once we do that, then we will explore ways to get rid of the magnetism.
To make a magnet, you will need:
- a strong, permanent magnet
- several paper clips
- a sheet of paper
One of the easiest ways to make a magnet is with another magnet. Straighten out the paper clips.
Hold a straightened paper clip by one end. Hold the magnet in your other hand Bring one end of the magnet to the paper clip at the point where you are holding it and then slide the magnet away from you, along the paperclip. Move the magnet away from the paper clip when you reach the end, and repeat the process several times. Be sure that you only move the magnet along the paper clip in one direction, away from your hand.
After doing that several times, put away your permanent magnet and get out the paper and the steel wool. You put away the permanent magnet because if the tiny bits of steel wool get stuck to it, they are almost impossible to get off. If you want to use your permanent magnet to play with the steel wool, put it in a plastic bag first. That will keep the bits separated from the magnet.
Place the sheet of paper on a flat surface and hold the steel wool over it. Rub two pieces of steel wool together and you will see lots of tiny bits falling on the paper. Bring the end of one of your non-magnetized paperclips near the steel wool. The bits probably won't react. Then bring the end of your magnetized paper clip near the steel wool. This time you will see it stick to the paper clip. Your paper clip is now a magnet.
What happened to magnetize it? Inside a piece of iron or steel are tiny groups of atoms called domains. Each of these domains is a tiny magnet, with a north and south pole. In unmagnetized iron, they domains are arranged randomly with their north and south poles pointing in different directions. The magnetic fields cancel each other out, and so the entire piece is not a magnet. When you move the magnet along the steel of the paper clip, the magnet pulls on each domain and shifts the north and south pole, so that most of them wind up pointing in the same direction. That magnetizes the paperclip. The more domains you get lined up, the stronger the magnet will be.
While you are playing with your magnet, check to see which parts of your magnet have the strongest magnetic field. You can also notice how much of the steel wool the magnet will pick up when it is straight and then bend it into a horseshoe shape, where the two ends are near each other and try again. Does a horseshoe magnet pick up more than a straight, bar magnet?
Now that you have made a magnet, we will try to demagnetize it. Can you think of something to try?
Think about it, and when you think you know the answer, then continue.
What about reversing the process? If you rub the magnet in the opposite direction, will it undo what you did? Try it and see. If it demagnetizes the paperclip, remagnetize it again.
What if you try using the other end of the magnet to move along the paperclip? Try it and see. Once again, remagnetize the paperclip, if necessary.
What if you broke the magnet in half? Lets try that too. Hold one end of the paperclip in each hand and bend it back and forth a couple of times. This should cause the magnet to break in half. Test each half with the steel wool. This time, you probably should magnetize a new paperclip.
What if instead of breaking it, you just beat it up a bit? Hold one end of the paperclip and whack the other end on the table a few times. Does that have an impact on how magnetic it is?
What happened? Moving the magnet the opposite direction or using the other end of the magnet will lessen the magnetism with each stroke, until it is mostly demagnetized. If you continue past this point, you will remagnetize the paperclip with the opposite alignment. The end of the paperclip that was the north pole will now be the south pole. Continued stroking will make the magnet stronger, just as it did the first time you magnetized it.
Breaking the magnet does not demagnetize it. Instead, each half will be a complete magnet, each with a north and south pole. Inside the paperclip, the domains are still lined up.
Banging the paperclip on the table will demagnetize it. Each time you hit the paperclip on the table, you move some of the domains out of line. This is why it is important not to drop or bang your permanent magnet. Each time you do, it becomes a little weaker.
Please log in.
Search form
Search by topic, search better.
- Life Science
- Earth Science
- Chemical Science
- Space Science
- Physical Science
- Process of Science
Subscribe to stay updated
She Loves Science
A Mom Inspiring with Science
Defy Gravity with Magnets
September 26, 2018 by Tracy Leave a Comment

Of all the science experiments we’ve done over the years nothing can be more fun than magnets. The kids love exploring north and south poles of magnets, which poles attract and repel each other, and what sticks to the magnet. (Honestly, I love magnets because it requires minimal mess to clean up and I can quietly watch them doing their own experiment independently while I’m cooking dinner – ha! #momgoals)

The kit comes with several magnets of varying strength, iron filings in a box, a compass, and a great experiment book to lead the kids in experiments. After about a week the kids had left the magnets in a pile along with a bunch of paper clips so I started doing a few experiments of my own.
I took one of the paper clips, tied it with a string, and tested how far away a magnet could get from the paperclip and still magnetize it. Check this out:
I think we’ve found our next favorite magic trick! You can try this simple experiment at home too!
What you need
- Thread about 12″ long
- a paper clip
How you do it:
- Tie a piece of string around a paper clip
- Hold one end of the string and with the other lift the paper clip up
- Then release the paper clip from the magnet and see if you can hold it up with just the magnetic force.
- How far away can you get? How long can you hold up the paper clip with the magnet?
What’s the science? Magnetism can pass through the air! The iron in the paperclip is attracted to the magnet and when held at the right distance, the magnet appears to “magically” defy the gravity of the paperclip.
Try this activity with other items. Will this work with something as heavy as a pair of scissors? Could it work with a thumb tack? Have fun experimenting!
Magnetic Levitation: Magnetic Science Kits

Ever since I was a kid, magnets have been a source of endless fascination for me. The invisible force of attraction and repulsion, the ability to manipulate metal objects without even touching them – it all seemed like magic. I remember wondering if I could make a magnet levitate, but all my attempts would end with the magnets snapping together, poles flipping at the last second.
Today, we’re diving into the world of magnetic levitation , or ‘maglev.’ This isn’t just a childhood fantasy; it’s a real and mesmerizing scientific phenomenon. Maglev isn’t confined to high-tech labs or sci-fi movies – it’s something you can experience and explore right at home.
Let’s explore the mysteries of magnetic levitation. From its intriguing scientific principles to real-world uses that’ll make your head spin, and DIY experiments that bring the magic right into your hands – we’ve got it all covered. These were the adventures that captivated my imagination as a kid, and now, they’re here for us to explore and enjoy. So come along, let’s defy gravity and delve into the awe-inspiring world of maglev!

The Science Behind Magnetic Levitation
First off, let’s talk about magnets. At their core, magnets are pretty straightforward. They have two poles, called the north pole and the south pole. When you bring two magnets close to each other, opposite poles attract and the same poles repel. This push and pull is the essence of magnetism. It’s this invisible force field around the magnet that makes metal objects like paper clips jump towards it.
Now, magnetic levitation, or ‘maglev,’ takes this concept to the next level. It’s about using that repelling force, the push between like poles, to do something really neat – make objects float in mid-air. Imagine lining up two magnets with their like poles facing each other; they push away, and under the right conditions, this repulsion can lift one of the magnets off the ground. That’s levitation!
But getting an object to float isn’t just about stacking magnets. It needs a bit of finesse. Especially when we talk about maglev trains, the technology gets a bit more complex. These trains use a combination of superconducting magnets and electromagnets – magnets powered by electricity. By carefully controlling these electromagnets, the train can hover above the tracks without any friction, gliding smoothly and quickly.

Simple Magnetic Levitation Experiment: The Floating Paper Clip
Now, let’s have some real fun with a magnetic levitation experiment you can do right at home – the classic floating paper clip. This is a simple yet fascinating demonstration of magnetic forces at work, and it’s perfect for a bit of science magic in your own living room.
For this experiment, you’ll need a strong magnets – neodymium magnets work great – some thread, tape, paper clip, a ruler, and blocks. The idea is to suspend the paper clip in mid-air using the magnetic field of the magnet. It’s a neat trick that shows how magnetism can counteract gravity, making the paper clip appear to defy the laws of physics.
- Secure the Magnet: First, attach the magnet to the ruler using tape. Make sure it’s firmly attached so it doesn’t move during the experiment.
- Create a Bridge with the Ruler: Use the blocks to build two supports, like little piers, on the table. Place them far enough apart so you can rest the ruler on top of them, creating a bridge-like structure.
- Attach the Paper Clip: Tie one end of the thread to the paper clip. Ensure it’s securely tied to prevent the paper clip from slipping off.
- Secure the Thread to the Table: Tape the other end of the thread to the table surface. Adjust the length of the thread so the paper clip can reach the magnet on the ruler.
- Find the Levitation Point: Gently lift the paper clip towards the magnet under the ruler. Carefully adjust its height until you find the perfect spot where the paper clip seems to float in mid-air. This is the sweet spot where the magnetic force balances with gravity, creating the levitation effect.
With a bit of patience and fine-tuning, the paper clip will hover magically in the air, demonstrating the fascinating principle of magnetic levitation!
The Best Kits for Magnetic Exploration
As we continue our exploration of magnetic levitation and the fascinating world of magnets, let’s take a look at some of the best kits available. These kits offer an engaging and hands-on way to learn more about how magnets work, providing both educational value and fun for enthusiasts of all ages. In the following section, we’ll explore a variety of magnetic kits that are perfect for deepening your understanding and appreciation of this intriguing scientific field.
4M KidzLabs Anti-Gravity Magnetic Levitation Science Kit
The 4M KidzLabs Anti-Gravity Magnetic Levitation Science Kit is quite a find for any child who’s curious about science.
This isn’t your average toy. It’s more like a hands-on science kit that gets kids involved in real experiments. Imagine them building their own mini maglev train, experimenting with magnets, and seeing firsthand how levitation works. It’s both entertaining and educational.
If you’re looking for something that will keep a young mind engaged, inquisitive, and possibly a step ahead in their science journey, this kit is a fantastic choice. It strikes just the right balance between learning and having a good time – which, in my opinion, is the best way to learn.

4M Kidzlabs Anti Gravity Magnetic Levitation Science Kit
Interactive Experiments: Explore magnetic levitation hands-on. Build and Learn: Create a mini maglev train and more. Fun Education: Understand magnetism through play. For Young Minds: Ideal for kids interested in science.
hand2mind Magnetic Science Kit
I recently had the chance to check out the hand2mind Magnetic Science Kit , and I have to say, it’s a real gem for kids who love science, especially magnetism. Designed for children aged 8-12, this kit is a brilliant way to dive into the world of magnets.
The kit is far from just a simple collection of magnets. It’s packed with 9 diverse experiments that are incredibly engaging. Kids can experience the thrill of making magnets float and even construct their own compass. The experiments are cleverly designed to be fun and educational, making learning feel like play.
What really stands out is the 20-page guide that comes with the kit. It’s full of vibrant illustrations and simplifies complex scientific concepts, making them easy to grasp. Plus, the kit includes 20 actual lab tools, giving kids a real hands-on science experience. It’s like having a mini science lab at home.
This STEM kit is great for encouraging critical thinking and problem-solving skills. It’s not just about the experiments; it’s about igniting a passion for discovery and understanding how the world works. Whether for learning at home or as a supplement to school, this kit is a fantastic resource.

Diverse Experiments: 9 fun and educational magnetic activities. Real Lab Tools: 20 pieces for an authentic science experience. Engaging Guide: Colorful, easy-to-follow 20-page manual. STEM Learning: Ideal for kids 8-12, fostering curiosity and skills.
Dowling Magnets Science Discovery Kit
The Dowling Magnets Science Discovery Kit takes you way beyond the basics of magnetism into a world where you can build your own levitating train. Yes, a train that literally floats!
This kit is perfect for anyone 10 years and older – it’s a great way to dive into the principles of equilibrium, gravity, and magnetic fields, and the best part is, it’s incredibly fun. You might just forget you’re learning because you’re too busy being amazed.
The kit includes a comprehensive guide developed by an award-winning science teacher, making it feel like you have a magnetism expert right there with you. It starts with the fundamentals of magnetism and gradually moves to more advanced projects that are in line with the Next Generation Science Standards – a real brain workout!
It includes experiments that range from understanding how the Earth is a magnet to exploring the forces of attraction and repulsion, and even creating temporary magnetism. But the highlight is definitely the levitating train project. You’ll also play with a magnetic pendulum, balance out gravity and magnetism, and delve into magnetic oscillations and energy – it’s seriously impressive.
The kit comes loaded with Neodymium and ceramic magnets, a high-force magnetic strip, iron filings, guide rails, a compass, a wood block, a nail, and more. It’s like having a mini science lab at your fingertips.

Levitating Train Project: Build and explore a floating train. Educational Guide: Award-winning teacher-designed experiments. Science Standards Aligned: Experiments follow Next Generation Science Standards. Comprehensive Kit: Includes Neodymium magnets, iron filings, compass, and more.
4M Magnet Exploration Kit
The 4M Magnet Exploration Kit from STEAM Powered Kids will be a blast for any young science enthusiast. Designed for kids 8 and older, this kit isn’t just about playing with magnets – it’s a full-on exploration of magnetic principles and experiments.
The kit boasts over 40 components, allowing for more than 25 different games and experiments. Imagine building a magnet-powered racer, a compass yacht, or even a levitating sculpture. It’s like stepping into a world where science fiction meets reality.
What’s great is how the kit simplifies complex concepts of magnetism. You’ll get to see firsthand how magnetic poles work, discover the forces of attraction and repulsion, and much more. Each experiment is a doorway to understanding the science behind magnets.
Included is an easy-to-follow guide with step-by-step instructions for all 25 activities. It feels like having a personal science teacher right there with you, making learning interactive and fun. You get to grasp the science behind each experiment, turning each activity into a meaningful lesson.
The kit is packed with exciting items: magnet handles, car and boat chassis, super power magnets, rings, magnetic fish, and a whole lot more. The inclusion of everyday items like paper clips and adhesive tape in some experiments makes the experience even more hands-on.
For any kid (or adult!) with a curious mind and a love for science, the 4M Magnet Exploration Kit is a fantastic journey into the world of magnetism. It’s educational, entertaining, and genuinely engaging – a perfect blend of learning and fun.

Over 25 Experiments: Engage in a variety of magnetic games and projects. Educational Fun: Learn about magnetism through hands-on activities. Comprehensive Guide: Step-by-step illustrated instructions for all experiments. Rich in Components: Includes over 40 parts for endless exploration.
Discovery Toys Anti-Gravity Magnetic Kit
The Discovery Toys Anti-Gravity Magnetic Science Experiment Kit is not just another science kit; it’s a captivating adventure into the realms of magnetism and levitation, perfect for kids 8 years and older.
This kit is a doorway to the fascinating world of physics and STEM. With 7 incredible experiments, it offers a hands-on experience with magnetic forces in a way that’s both educational and utterly mesmerizing. Creating an Anti-Gravity Sculpture, a Floating Spinner, and even a Maglev Personal Transporter are just a few of the awe-inspiring activities.
Beyond the fun, this kit is a fantastic educational resource. It encourages skill development in visual tracking and understanding of scientific principles like magnetic levitation and polarity. It’s a perfect blend of learning and hands-on experimentation.
Safety is clearly a priority for Discovery Toys. This kit is made with non-toxic, BPA-Free materials, meeting or exceeding all US safety standards. It’s a safe, thoughtful gift for any occasion that’s as fun as it is educational.

Discovery Toys Anti-Gravity Magnetic Science Experiment KIT
Seven Experiments: Engage in unique activities like Anti-Gravity Sculptures and Maglev Transporters. Educational Value: Enhances understanding of physics and STEM concepts. Safe and Non-Toxic: Made with BPA-Free materials. Skill Development: Improves visual tracking and scientific reasoning.
Galt Toys Magnetic Lab Kit
The Galt Toys Magnetic Lab is a great find for kids who are curious about science. Aimed at children aged 6 and older, this kit offers a hands-on approach to exploring magnetism in a way that’s both educational and genuinely fun.
In the Magnetic Lab, the world of magnets opens up through a series of engaging experiments. It’s a fantastic way to introduce early STEM concepts while keeping the experience enjoyable and interactive. Learning about magnets becomes an adventure, not just another lesson.
The experiments are creative and varied. You can experiment with a racing car that moves on its own, explore how rattlesnake sounds are made, and even try a simple levitation experiment . Each activity is rooted in science, making complex concepts accessible and interesting.
The kit comes with a 24-page lab book filled with colorful illustrations and easy-to-follow instructions for 9 different experiments. Also included are a magnetic wand, a racing car, various magnets, a levitation stand, and other tools that make each experiment a hands-on discovery.
Designed for children 6 and up, the Magnetic Lab is perfect for family activity time, encouraging collaboration and shared learning. It’s more than just a set of toys; it’s a tool for sparking imagination and a love for science.

Varied Experiments: 9 engaging activities exploring magnetism. Educational and Fun: Introduces STEM concepts in an enjoyable way. Colorful Guide: Includes a 24-page lab book with clear instructions. Interactive Tools: Comes with magnetic wand, racing car, and other hands-on components.
Magnetism & Levitation: Quick FAQs
Magnetic levitation, or maglev, is the process of using magnetic forces to suspend an object in the air, counteracting the effects of gravity. It typically involves arranging magnets in such a way that their opposing forces create a stable levitating effect.
Yes, experimenting with magnetic levitation is generally safe, especially when using small magnets and following safety guidelines. However, powerful magnets should be handled with care to avoid pinching fingers or damaging electronic devices.
Generally, these kits do not require batteries or electricity as they focus on the principles of magnetism. However, it’s always good to check the product specifications for any specific power requirements.
Common materials include small magnets (like neodymium), paper clips, styrofoam, string, and metal objects. Some experiments may require specific items like iron filings or magnetic strips.
Yes, magnetic levitation has several real-world applications, most notably in transportation with Maglev trains. These trains levitate above the tracks, reducing friction and allowing for higher speeds. Maglev is also used in various engineering and technological applications.
Related Posts

STEM Learning Styles: Mastering Education for Children

STEM for 5 Year Olds: Nurturing Curiosity and Tech Exploration

Building Block Activities For Kids

Little Passports Science Junior Stem Box Subscription
Cool Science Experiments Headquarters
Making Science Fun, Easy to Teach and Exciting to Learn!
Science Experiments
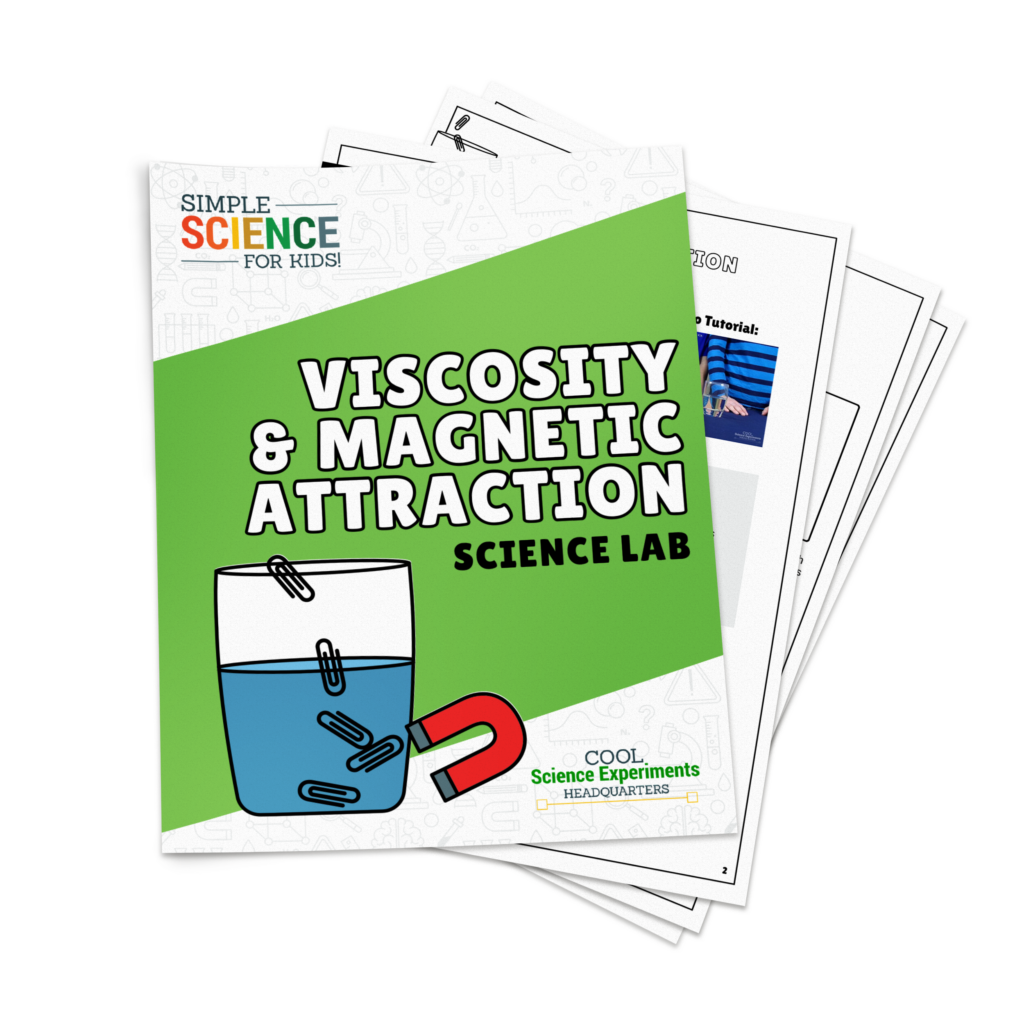
How Liquid Viscosity Impacts Magnetic Attraction Science Experiment
What do you think, will the type of liquid in a glass impact a magnet’s attraction? We use three different liquids to test our theory.
Using simple supplies found at home, kids can learn about viscosity and resistance through this simple hands-on experiment. Preview our demonstration video using water, vegetable oil and corn syrup, but our printable instructions and simple scientific explanation include alternate liquids you can use to test the concept.

JUMP TO SECTION: Instructions | Video Tutorial | How it Works
Supplies Needed
- 12 Paper Clips
- 1/2 Cup Water
- 1/2 Cup Vegetable Oil
- 1/2 Cup Light Corn Syrup
Viscosity & Magnetic Attraction Lab Kit – Only $5
Use our easy Viscosity & Magnetic Attraction Science Lab Kit to grab your students’ attention without the stress of planning!
It’s everything you need to make science easy for teachers and fun for students — using inexpensive materials you probably already have in your storage closet!
Experiment Instructions
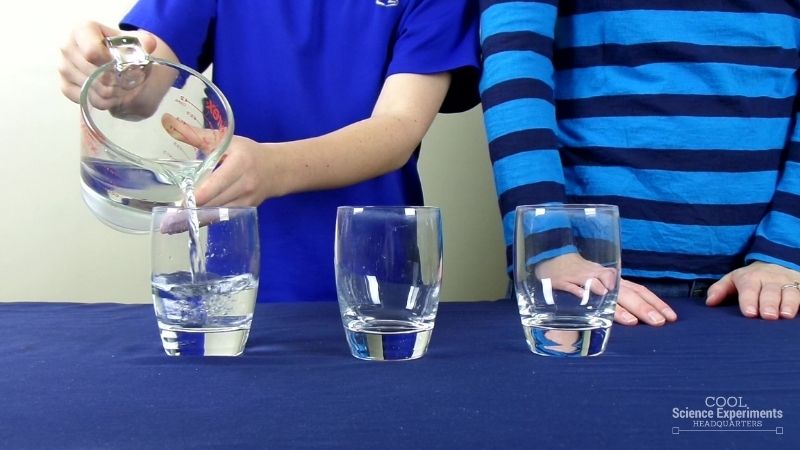
Step 1 – Place three cups in a row. Fill the first glass with the water.
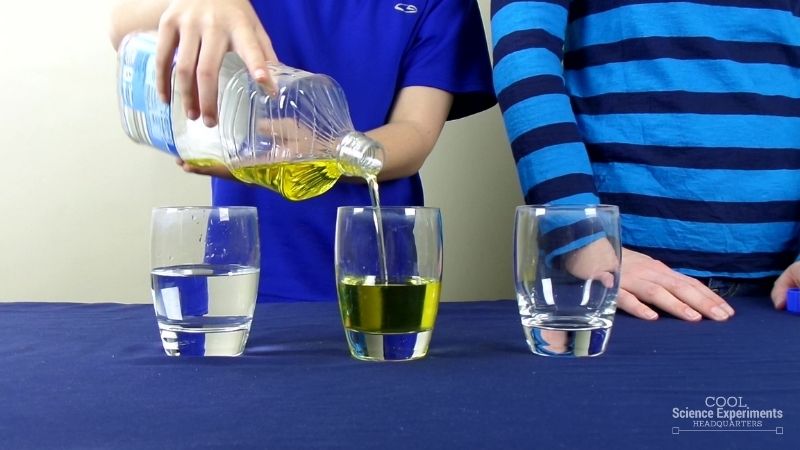
Step 2 – Fill the middle glass with the vegetable oil.
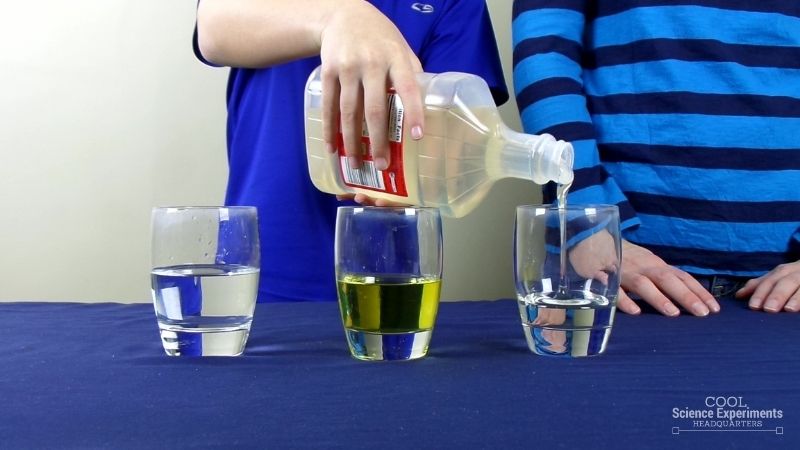
Step 3 – Fill the third glass with the corn syrup.
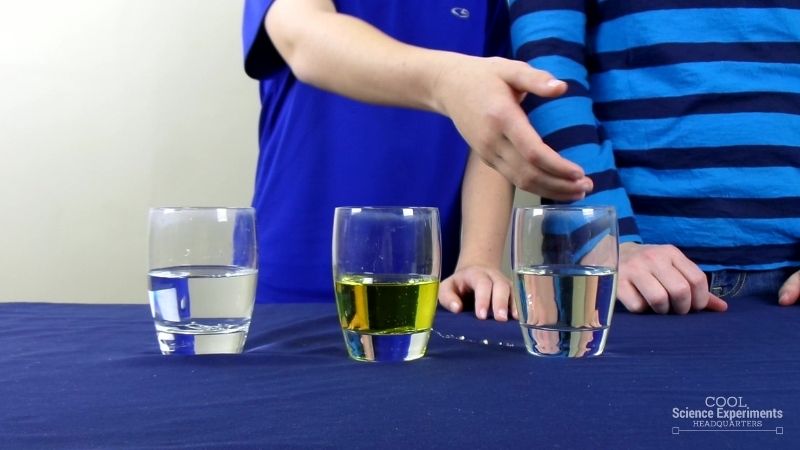
Step 4 – Next, place 4 paper clips in each glass.
Step 5 – You may need to gently push the paper clips to the bottom of the glass with the corn syrup.
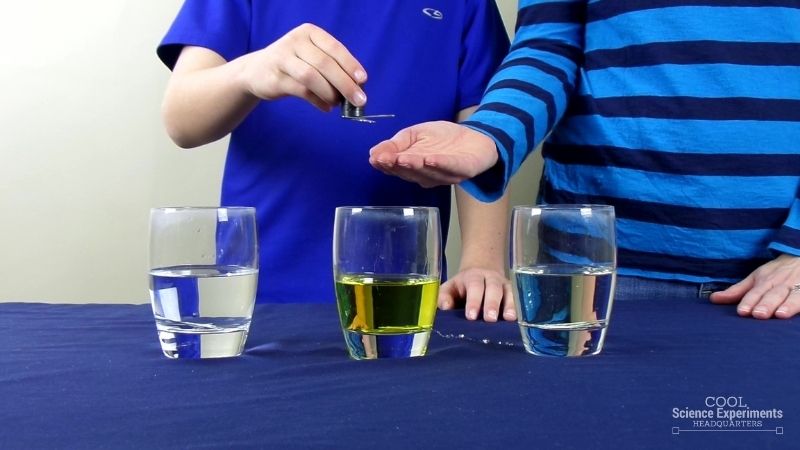
Step 6 – Test your magnet by showing how paper clips outside of the liquid are attracted to it.
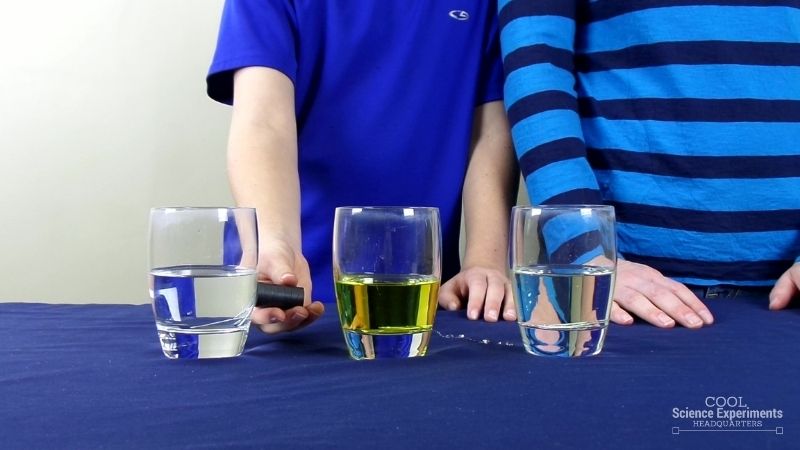
Step 7 – Next, take your magnet and place it next to each glass. Notice that all the paper clips are attracted to the magnet, but that the liquid in the glass causes the paper clips to move differently. Do you know why? Find out the answer in the how does this experiment work section below.
Video Tutorial
How Does the Science Experiment Work
The question answered in this experiment is how does the consistency of a liquid impact magnetic attraction.
A unique property of liquids is something called viscosity. Viscosity is a liquid’s resistance to flowing. Viscosity depends on the size and shape of the particles that make the liquid, as well as the attraction between the particles. Liquids that have a LOW viscosity flow quickly (ie. water, rubbing alcohol, and vegetable oil). Liquids that have a HIGH viscosity flow slowly (ie. honey, corn syrup, and molasses).
When using water and vegetable oil, the paper clips moved through the liquid to the magnet very quickly. This is because water and vegetable oil have a low viscosity and provide very little resistance to the paperclips moving through them. When using corn syrup, the paper clips moved very slowly toward the magnet. This is because the corn syrup has a high viscosity and provides a lot of resistance to the paper clips moving through it.
The magnet still attracts the paperclips in each of the scenarios, but the experiment shows how the viscosity of a liquid impacts how fast (or slow) the paperclips move toward the magnet.
I hope you enjoyed the experiment. Here are some printable instructions;

Instructions
- Place three cups in a row
- Fill the first glass with the water
- Fill the middle glass with the vegetable oil
- Fill the third glass with the corn syrup
- Next, place 4 paper clips in each glass
- You may need to gently push the paper clips to the bottom of the glass with the corn syrup
- Test your magnet by showing how paper clips outside of the liquid are attracted to it.
- Next, take your magnet and place it next to each glass. Notice that all the paper clips are attracted to the magnet, but that the liquid in the glass causes the paper clips to move differently

Reader Interactions

March 30, 2016 at 9:12 am
Will this work if plastic cups are used?

April 5, 2016 at 1:09 pm
I believe it will, but I’ve never tried it. If you do, leave a comment and let us know if it works.

April 30, 2017 at 12:54 pm
I don’t think they will work

January 8, 2018 at 7:58 am
It will definitely work! Most cups will work because the walls of the cups are thin. Additionally, metal cups and water bottles will probably not work because the molecule are packed more tightly. These materials can also contain iron particles which will make them magnetic and therefore will interfere with your experiment.

February 20, 2018 at 6:42 pm
It works, we used a plastic water bottle and it was a success!

November 8, 2016 at 6:47 pm
this is my science fair project i’m going to do

December 8, 2016 at 12:05 pm
Is this good for a science project for eighth graders or is it to easy?

December 9, 2016 at 2:37 pm
Hi, just a small comment. Is not the magnetic force that is affected is that in the case of syrup the friction force is bigger so the total force acting on the paper clip is smaller, then the acceleration will be smaller. F=m.a

January 1, 2017 at 4:21 pm
Nice experiment to show relationship between Center of Gravity and Balance Points. At the start point the Center of gravity is only a little higher than the point it’s touching the board. If it moves to the wider(higher) end, the Center of gravity lowers because the boards get wider and the contact point on the funnels gets further out, so the Center of gravity is actually getting lower as the funnel appears to be going UP HILL. It is in fact going down toward the direction of gravity.

January 25, 2017 at 11:27 am
I ENJOYED THIS EXPERIMENT AND PERFOMED THE SAME IN MY SEMINAR.I AND MY FRIENDS WAS HAVING A GOOD INTERACTIONS.SO GOOD.

April 2, 2017 at 6:47 pm

April 27, 2017 at 12:35 pm
HI thanks for the video it was cool to know how liquid impacts a magnet.

September 4, 2017 at 1:58 pm

September 8, 2017 at 12:05 am
This fits perfectly in our magnet lessons for homeschool tomorrow. Thank you! The kids are going to love it. I’m thinking we may even expand on it a bit — they love to experiment.

January 2, 2018 at 12:29 pm
How strong are your magnets?

March 14, 2018 at 4:04 am
that’s a pretty cool experiment, especially for kids! Thanks for the great idea, i will test it soon with my kids.
Regards Christine

September 3, 2018 at 9:59 pm
Thank you for sharing! Can’t wait to try it with my class this week.

October 16, 2021 at 11:47 pm
Hi Can I use honey instead of corn syrup ?

March 17, 2022 at 12:31 pm
OMG im doing this experiment for my science fair on school

December 7, 2023 at 7:36 pm
Leave a Reply Cancel reply
Your email address will not be published. Required fields are marked *
Save my name, email, and website in this browser for the next time I comment.

- Privacy Policy
- Disclosure Policy
Copyright © 2024 · Cool Science Experiments HQ
- Skip to primary navigation
- Skip to main content
- Skip to primary sidebar

- FREE Experiments
- Kitchen Science
- Climate Change
- Egg Experiments
- Fairy Tale Science
- Edible Science
- Human Health
- Inspirational Women
- Forces and Motion
- Science Fair Projects
- STEM Challenges
- Science Sparks Books
- Contact Science Sparks
- Science Resources for Home and School
Mini Magnet Maze
May 16, 2020 By Emma Vanstone 18 Comments
We have a little magnet kit that we play with frequently, it’s great fun and the children are always so surprised that they can actually feel the force pushing the cars apart.
To explain magnetism further we made a magnet maze .
First we had a play to see which type of objects a big magnet stuck to, once we’d decided metals were the key, we made some predictions about other objects and then tested them. You could even draw a table to make this activity a bit more formal.
Remember – not all metals are attracted to magnets, but iron and steel ( steel is mostly iron ) are.

You’ll need:
- Thick cardboard or a paper plate
- A magnet wand
- Metal paperclip
How to make a mini magnet maze
- Draw a maze on the cardboard or paper plate
- Draw a cardboard bug or any shape you like.

- Place a paperclip over the bug.
- Place the paperclip at the start of your maze and the magnet underneath the cardboard.
- As you move the magnet, the bug should move too.

You can make your maze as easy or as complex as you like and as big or small as you want.
Magnets for Kids
Magnets attract some objects but not others and can be different strengths.
Magnets have two poles, we call one the north pole and one the south. Depending on which poles you place together they can either attract each other or repel. Opposite poles attract.
More Magnet Size Experiments for Kids
Defy gravity with magnets with this cool trick.
Make a LEGO magnet maze .
We also love these magnet powered cars !

Last Updated on May 16, 2020 by Emma Vanstone
Safety Notice
Science Sparks ( Wild Sparks Enterprises Ltd ) are not liable for the actions of activity of any person who uses the information in this resource or in any of the suggested further resources. Science Sparks assume no liability with regard to injuries or damage to property that may occur as a result of using the information and carrying out the practical activities contained in this resource or in any of the suggested further resources.
These activities are designed to be carried out by children working with a parent, guardian or other appropriate adult. The adult involved is fully responsible for ensuring that the activities are carried out safely.
Reader Interactions
August 16, 2013 at 4:17 pm
This is great! The possibilities are endless for how you could personalize this.
August 20, 2013 at 8:03 pm
Thanks Trisha x
August 17, 2013 at 9:53 pm
Ooo this is another neat idea! Kitty would like this one I’m sure 🙂
August 20, 2013 at 8:10 pm
Cheers Annie. x
August 19, 2013 at 11:23 am
Seriously cool – this one is really easy. I tried this yesterday with Dexter and he couldn’t figue out how it was happening. Great little magic trick for the really weeney ones.
August 20, 2013 at 7:33 pm
This is SO cool! I agree with Trisha, the possibilities are endless!
August 26, 2013 at 1:13 pm
This is such a fun idea for introducing the idea of magnetism working through an object. I’ve made it one of my featured picks on this weeks Parenting Pin-it Party.
August 31, 2013 at 1:27 am
Such a fun idea! Thanks so much for sharing at the After School linky.
August 31, 2013 at 6:30 pm
September 02, 2013 at 3:29 am
Great activity! This is SUCH a fun way to incorporate play into a lesson on magnetism. I’m featuring this tomorrow on my blog at the After School Linky Party. Stop by to check it out and keep sharing!
Leave a Reply Cancel reply
Your email address will not be published. Required fields are marked *
JavaScript seems to be disabled in your browser. For the best experience on our site, be sure to turn on Javascript in your browser.
Orders Received by 3pm Eastern Ship Today
Order Anytime of Day 1-304-257-1193
- Create an Account
- Business Customers
Magnet Experiment: The Levitating PaperClip
Science Fun
Magnetic Wand Magic Science Experiment
In this fun and easy magic science experiment, we’re going to use science to make a super cool magnetic magic wand.
- Long piece of insulated copper wire
- Screwdriver
- Paper clips
- Battery (AA, C, or D size)
Instructions:
Wrap the copper wire around the screwdriver about ten times being sure to leave about three inches on either end.
Tape one end of the wire to the negative end of the battery.
Pick up the screwdriver and use your free hand to touch the other end of the wire to the positive end of the battery.
Point the screwdriver at the paperclips and see how many you can pick up using your magic magnetic wand.
Try adding more loops of wire around the screwdriver to see if you can pick up more paperclips.
EXPLORE AWESOME SCIENCE EXPERIMENT VIDEOS!
How it Works:
While we are not making an actual magic wand, we are using science to magnetize the screwdriver and give it abilities we can not see. When electricity from the battery flows through the copper wire, a magnetic field it created that enables the screwdriver to pick up metal items.
Make This A Science Project:
Try a large nail. Try different sized batteries. Try different gauges of copper wire.
EXPLORE TONS OF FUN AND EASY SCIENCE EXPERIMENTS!
SUBSCRIBE AND NEVER MISS A NEW SCIENCE FUN VIDEO!
previous experiment
Next experiment.
- Store Locator
- 800 - MAGNET - 1
- Idea Center
- Activities & Experiments
Picking up Paper Clips
How many paper clips can you pick up with a magnet?
For this magnet experiment, you’ll need:
- Assorted magnets of different sizes and shapes. If you need to purchase one that will work with this magnet experiment, try Dowling #731022
- One powerful magnet, such as a Neodymium (rare earth) magnet. If you need to purchase one that will work with this magnet experiment, try Dowling #731020
- Paper clips (or other small metal objects)
How This Magnet Experiment Works
Choose a magnet and slowly move it closer to the paper clips. Once you have used the magnet to gather as many paper clips as it can, remove and count the paper clips. Try again with magnets of different sizes and shapes. How many paper clips did the other magnets pick up?
You can also try to pick up the paper clips without touching them with the magnet, by holding the magnet slightly above them. Did you know that magnet strength is not determined by size alone? The materials that a magnet is made from will also determine the magnet’s strength. Could a Neodymium magnet the size of a pencil eraser be stronger than a flexible ferrite magnet the size of a chicken’s egg, or even the size of your hand?
Why This Magnet Experiment Works
The strength of a magnet is determined by both its size and its composition. Neodymium or “rare earth” magnets are very strong and are used in many devices including computers. But however strong Neodymium magnets are, they are also very brittle, which is why other magnets with less strength are more appropriate for use in other products.
IMAGES
COMMENTS
We used Legos to build ours. Tape the magnet to the deck of the bridge. If you manage to find a metal ruler for the bridge deck, then the magnet will simply stick to it. Tie a paper clip to the string. Slowly lift the paper clip toward the magnet until it is suspended in mid-air. Tape the other end of the string to the floor.
In this experiment, the magnetic force of the magnet is transferred through the metal paper clips. Once the paper clips become magnetized, you can place them together to form a chain. In addition, once the magnet is removed, the paper clips will stay temporarily magnetized and still stick together. More Science Fun. After conducting the ...
There is something magical about magnets for children when they see how it pulls metal objects without touching them. So we are getting paperclips and contin...
Sign up for Cool Science Experiments FREE Weekly Newsletter: http://coolscienceexperimentshq.com/subscribeTo find even more cool science experiments visit: h...
Gently glue around the bottom tissue paper leaf with a glue stick. Because tissue paper is fragile, be careful with this step or you may rip the tissue paper. 4. Tape the string down to the table. Now kids can hold the magnet wand on top of the leaf and get it to float! See how long you can get the leaf or butterfly to float for.
Easy Levitating paper clips using magnets Materials: Paper clips Neodymium magnetsPencils BooksStrings Double face tape Scissors @magnet @experiment @magnet ...
Watch the video and you will know if this is worth or not. I love magnets, small or big, and I want Reya to enjoy magnets as much as I do.Caution: If you use...
This magnetic paper clip experiment is simple to do and will teach your kids about magnetic forces. Hang one paperclip from the magnet. Use the hanging clip to pick up other paper clips. See how many paper clips you can pick up using only one magnet. You can also try this with different sizes of paper clips or paper clips that have plastic coating.
Straighten out the paper clips. Hold a straightened paper clip by one end. Hold the magnet in your other hand Bring one end of the magnet to the paper clip at the point where you are holding it and then slide the magnet away from you, along the paperclip. Move the magnet away from the paper clip when you reach the end, and repeat the process ...
You can try this simple experiment at home too! What you need. Thread about 12″ long. a paper clip. a magnet. How you do it: Tie a piece of string around a paper clip. Hold one end of the string and with the other lift the paper clip up. Then release the paper clip from the magnet and see if you can hold it up with just the magnetic force.
Count the number of paper clips that the magnet picked up, and record this value in your data table. Return all of the paper clips to the container. Image Credit: ... You could also try another experiment to see if removing the paper makes any difference in the strength of the electromagnet. Test the coils both with and without the paper form ...
Next, hold a paper clip, tied to a thread, near the magnet so that the magnet will suspend the clip. See how far away from the magnet you can pull the paper clip until it falls away from the magnet. Use a plastic ruler as a way to measure the distance. Another experiment would be to see how many paper clips can be hung end-to-end from the magnet.
Simple Magnetic Levitation Experiment: The Floating Paper Clip Now, let's have some real fun with a magnetic levitation experiment you can do right at home - the classic floating paper clip. This is a simple yet fascinating demonstration of magnetic forces at work, and it's perfect for a bit of science magic in your own living room.
Tie one end of the string to a paper clip and sellotape the other to the bottom of the box. The string length should be about 1cm shorter than the box. Place the magnet on top of the box ( or stick it to the inside if you'd rather ). Hold the paper clip just under the magnet. The paperclip will float in the air, appearing to defy gravity!
Fill the first glass with the water. Step 2 - Fill the middle glass with the vegetable oil. Step 3 - Fill the third glass with the corn syrup. Step 4 - Next, place 4 paper clips in each glass. Step 5 - You may need to gently push the paper clips to the bottom of the glass with the corn syrup. Step 6 - Test your magnet by showing how ...
How to make a mini magnet maze. Draw a maze on the cardboard or paper plate. Draw a cardboard bug or any shape you like. Place a paperclip over the bug. Place the paperclip at the start of your maze and the magnet underneath the cardboard. As you move the magnet, the bug should move too. You can make your maze as easy or as complex as you like ...
Hi, I'm back! This is a new video to show how paper clips can get magnetized using a magnet! So enjoyable! You can see a set of magnet. 1. Horseshoe Magnet...
Magnets can do some amazing things -- like accelerate a train at speeds over 300 mph or power a MRI to look through the human body. However, sometimes its just fun to conduct experiments with them. One interesting experiment to do is to make a paperclip levitate, or seem to float in midair. The experiment is about as simple as it gets, and you can do it with everyday items that you probably ...
In this fun and easy magic science experiment, we're going to use science to make a super cool magnetic magic wand. Materials: Long piece of insulated copper wire Screwdriver Paper clips Tape Battery (AA, C, or D size) Instructions: Wrap the copper wire around the screwdriver about ten times being sure to leave about three inches on either end. Tape one end of the wire to the negative end of ...
One powerful magnet, such as a Neodymium (rare earth) magnet. If you need to purchase one that will work with this magnet experiment, try Dowling #731020; Paper clips (or other small metal objects) How This Magnet Experiment Works. Choose a magnet and slowly move it closer to the paper clips. Once you have used the magnet to gather as many ...
Revised video on the paper clip and magnet experiment from 1971 from my high school days. Demonstration illustrates how effective magnetic shielding can ...
Fig. 2. Three paper clips are imbedded in a nylon disk. The front of the disk is slightly sanded so that the three paper clips clearly show. The nylon disk can be attached to a force sensor to digitally record the force exerted on the paper clips. Fig. 3. Three paper clips, imbedded in a nylon cylinder, as shown in Fig. 2 are mounted on one ...
Students encounter a floating paper clip and offer explanations for this strange behavior. They soon discover that the paper clip is actually being held up b...