
Need Help in Assignments ?
Get your Assignments completed from Professional Experts & submit before deadline.

Assign Your Assignments to Us
Our mission is to provide exceptional academic writing solutions to students helping them improve their critical thinking, learning, and academic success. We aim to provide wide services with client-centric approaches that empower education and maintain ethical integrity. We are committed to delivering well-researched and well-referenced original content personalized to the unique needs of each client.
Our vision is to become a leading academic writing company that can empower students and professionals in their professional journey. We strive to make education accessible to all and encourage individuals to pursue academic endeavours confidently.
Salient Features
Plagarism free work, on time delivery, proper formats, 24x7 support.

HR Management

Dissertation/ Thesis

Computer Science

Public Health
Who we are.
Assign Your Assignment is an Academic Research and Educational Consulting Company catering to the varied academic needs of clients across the below. We’re constantly up and running through committed efforts to facilitate the best quality and timely academic service. With a team of highly skilled trained and experienced professionals in our company, we offer academic help online with different types of homework in different subjects.

Assignments Completed
Universities covered, subject experts, satisfaction rate.
Want to Checkout Our Previous Work?
Visit Sample Page and Get Full PDF files of Our Previous Works Quality Checked by Various Institutions.
Get Quotation

Everything You Need
Trust on Us for your Assignment. You are Just 1 Call Away.
Testimonials
Let’s Find out What Our Students thinks about Our Work.

Frequently Asked Questions
We offer academic help with a wide range of papers, including essays, assignments, reports, research papers, presentations, case studies, admission papers, and others.
You can place the order by simply clicking on the order now page and filling in the required details. You can also contact us at the given mobile number or email address for one-on-one communication.
To ensure originality and plagiarism-free content, we conduct multiple quality assessment reviews and tests. The test also includes industry-leading tools to check plagiarism and AI-free content.
We have a free revision policy that will help you to get the required changes in the assignment based on feedback.
You can contact us at the given number on the website, or feel free to reach out to us through the given email address.
The time depends upon the requirements of the paper. It usually ranges anywhere between 3 to 5 business days.
We accept payments from the net banking platform.
Your Academic Journey, Our Expert Guidance
- Privacy Policy
- Terms & Condition
- Refund Policy
Get In Touch
- Apex Tower, Lal Kothi, Jaipur
- +91 9799 416 433
- [email protected]
Copyright © 2023 Assign Your Assignments | Designed by The Wextern

- Get started with computers
- Learn Microsoft Office
- Apply for a job
- Improve my work skills
- Design nice-looking docs
- Getting Started
- Smartphones & Tablets
- Typing Tutorial
- Online Learning
- Basic Internet Skills
- Online Safety
- Social Media
- Zoom Basics
- Google Docs
- Google Sheets
- Career Planning
- Resume Writing
- Cover Letters
- Job Search and Networking
- Business Communication
- Entrepreneurship 101
- Careers without College
- Job Hunt for Today
- 3D Printing
- Freelancing 101
- Personal Finance
- Sharing Economy
- Decision-Making
- Graphic Design
- Photography
- Image Editing
- Learning WordPress
- Language Learning
- Critical Thinking
- For Educators
- Translations
- Staff Picks
- English expand_more expand_less
Google Classroom - Creating Assignments and Materials
Google classroom -, creating assignments and materials, google classroom creating assignments and materials.

Google Classroom: Creating Assignments and Materials
Lesson 2: creating assignments and materials.
/en/google-classroom/getting-started-with-google-classroom/content/
Creating assignments and materials
Google Classroom gives you the ability to create and assign work for your students, all without having to print anything. Questions , essays , worksheets , and readings can all be distributed online and made easily available to your class. If you haven't created a class already, check out our Getting Started with Google Classroom lesson.
Watch the video below to learn more about creating assignments and materials in Google Classroom.
Creating an assignment
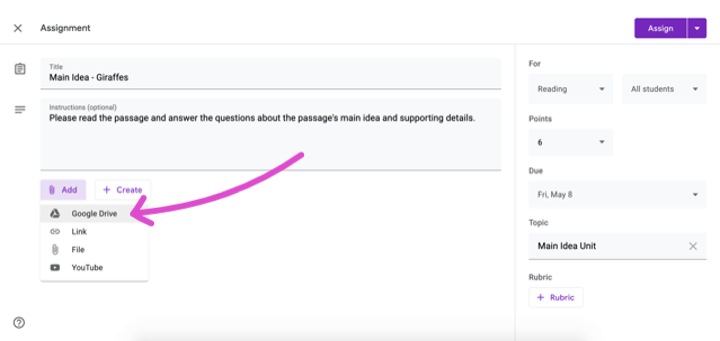
Whenever you want to create new assignments, questions, or material, you'll need to navigate to the Classwork tab.

In this tab, you can create assignments and view all current and past assignments. To create an assignment, click the Create button, then select Assignment . You can also select Question if you'd like to pose a single question to your students, or Material if you simply want to post a reading, visual, or other supplementary material.

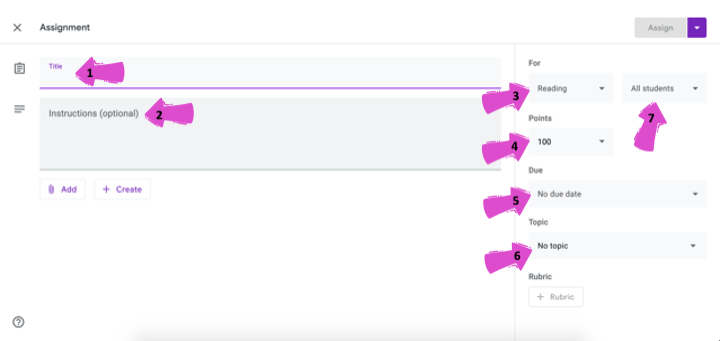
This will bring up the Assignment form. Google Classroom offers considerable flexibility and options when creating assignments.
Click the buttons in the interactive below to become familiar with the Assignment form.

This is where you'll type the title of the assignment you're creating.
Instructions
If you'd like to include instructions with your assignment, you can type them here.
Here, you can decide how many points an assignment is worth by typing the number in the form. You can also click the drop-down arrow to select Ungraded if you don't want to grade an assignment.
You can select a due date for an assignment by clicking this arrow and selecting a date from the calendar that appears. Students will have until then to submit their work.
In Google Classroom, you can sort your assignments and materials into topics. This menu allows you to select an existing topic or create a new one to place an assignment under.
Attachments
You can attach files from your computer , files from Google Drive , URLs , and YouTube videos to your assignments.
Google Classroom gives you the option of sending assignments to all students or a select number .
Once you're happy with the assignment you've created, click Assign . The drop-down menu also gives you the option to Schedule an assignment if you'd like it to post it at a later date.
You can attach a rubric to help students know your expectations for the assignment and to give them feedback.
Once you've completed the form and clicked Assign , your students will receive an email notification letting them know about the assignment.
Google Classroom takes all of your assignments and automatically adds them to your Google Calendar. From the Classwork tab, you can click Google Calendar to pull this up and get a better overall view of the timeline for your assignments' due dates.

Using Google Docs with assignments
When creating an assignment, there may often be times when you want to attach a document from Google Docs. These can be helpful when providing lengthy instructions, study guides, and other material.
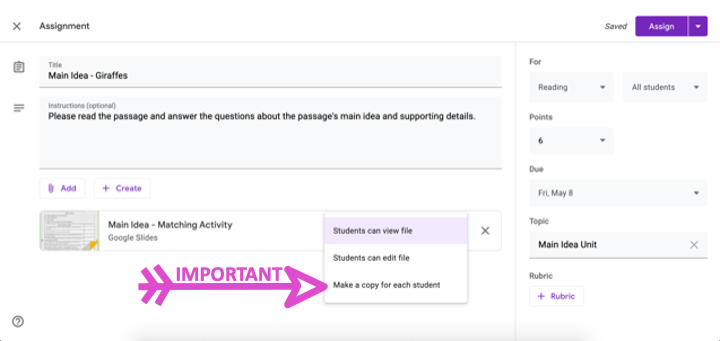
When attaching these types of files, you'll want to make sure to choose the correct setting for how your students can interact with it . After attaching one to an assignment, you'll find a drop-down menu with three options.

Let's take a look at when you might want to use each of these:
- Students can view file : Use this option if the file is simply something you want your students to view but not make any changes to.
- Students can edit file : This option can be helpful if you're providing a document you want your students to collaborate on or fill out collectively.
- Make a copy for each student : If you're creating a worksheet or document that you want each student to complete individually, this option will create a separate copy of the same document for every student.
Using topics
On the Classwork tab, you can use topics to sort and group your assignments and material. To create a topic, click the Create button, then select Topic .

Topics can be helpful for organizing your content into the various units you teach throughout the year. You could also use it to separate your content by type , splitting it into homework, classwork, readings, and other topic areas.

In our next lesson , we'll explore how to create quizzes and worksheets with Google Forms, further expanding how you can use Google Classroom with your students.
/en/google-classroom/using-forms-with-google-classroom/content/

Understanding Assignments
What this handout is about.
The first step in any successful college writing venture is reading the assignment. While this sounds like a simple task, it can be a tough one. This handout will help you unravel your assignment and begin to craft an effective response. Much of the following advice will involve translating typical assignment terms and practices into meaningful clues to the type of writing your instructor expects. See our short video for more tips.
Basic beginnings
Regardless of the assignment, department, or instructor, adopting these two habits will serve you well :
- Read the assignment carefully as soon as you receive it. Do not put this task off—reading the assignment at the beginning will save you time, stress, and problems later. An assignment can look pretty straightforward at first, particularly if the instructor has provided lots of information. That does not mean it will not take time and effort to complete; you may even have to learn a new skill to complete the assignment.
- Ask the instructor about anything you do not understand. Do not hesitate to approach your instructor. Instructors would prefer to set you straight before you hand the paper in. That’s also when you will find their feedback most useful.
Assignment formats
Many assignments follow a basic format. Assignments often begin with an overview of the topic, include a central verb or verbs that describe the task, and offer some additional suggestions, questions, or prompts to get you started.
An Overview of Some Kind
The instructor might set the stage with some general discussion of the subject of the assignment, introduce the topic, or remind you of something pertinent that you have discussed in class. For example:
“Throughout history, gerbils have played a key role in politics,” or “In the last few weeks of class, we have focused on the evening wear of the housefly …”
The Task of the Assignment
Pay attention; this part tells you what to do when you write the paper. Look for the key verb or verbs in the sentence. Words like analyze, summarize, or compare direct you to think about your topic in a certain way. Also pay attention to words such as how, what, when, where, and why; these words guide your attention toward specific information. (See the section in this handout titled “Key Terms” for more information.)
“Analyze the effect that gerbils had on the Russian Revolution”, or “Suggest an interpretation of housefly undergarments that differs from Darwin’s.”
Additional Material to Think about
Here you will find some questions to use as springboards as you begin to think about the topic. Instructors usually include these questions as suggestions rather than requirements. Do not feel compelled to answer every question unless the instructor asks you to do so. Pay attention to the order of the questions. Sometimes they suggest the thinking process your instructor imagines you will need to follow to begin thinking about the topic.
“You may wish to consider the differing views held by Communist gerbils vs. Monarchist gerbils, or Can there be such a thing as ‘the housefly garment industry’ or is it just a home-based craft?”
These are the instructor’s comments about writing expectations:
“Be concise”, “Write effectively”, or “Argue furiously.”
Technical Details
These instructions usually indicate format rules or guidelines.
“Your paper must be typed in Palatino font on gray paper and must not exceed 600 pages. It is due on the anniversary of Mao Tse-tung’s death.”
The assignment’s parts may not appear in exactly this order, and each part may be very long or really short. Nonetheless, being aware of this standard pattern can help you understand what your instructor wants you to do.
Interpreting the assignment
Ask yourself a few basic questions as you read and jot down the answers on the assignment sheet:
Why did your instructor ask you to do this particular task?
Who is your audience.
- What kind of evidence do you need to support your ideas?
What kind of writing style is acceptable?
- What are the absolute rules of the paper?
Try to look at the question from the point of view of the instructor. Recognize that your instructor has a reason for giving you this assignment and for giving it to you at a particular point in the semester. In every assignment, the instructor has a challenge for you. This challenge could be anything from demonstrating an ability to think clearly to demonstrating an ability to use the library. See the assignment not as a vague suggestion of what to do but as an opportunity to show that you can handle the course material as directed. Paper assignments give you more than a topic to discuss—they ask you to do something with the topic. Keep reminding yourself of that. Be careful to avoid the other extreme as well: do not read more into the assignment than what is there.
Of course, your instructor has given you an assignment so that they will be able to assess your understanding of the course material and give you an appropriate grade. But there is more to it than that. Your instructor has tried to design a learning experience of some kind. Your instructor wants you to think about something in a particular way for a particular reason. If you read the course description at the beginning of your syllabus, review the assigned readings, and consider the assignment itself, you may begin to see the plan, purpose, or approach to the subject matter that your instructor has created for you. If you still aren’t sure of the assignment’s goals, try asking the instructor. For help with this, see our handout on getting feedback .
Given your instructor’s efforts, it helps to answer the question: What is my purpose in completing this assignment? Is it to gather research from a variety of outside sources and present a coherent picture? Is it to take material I have been learning in class and apply it to a new situation? Is it to prove a point one way or another? Key words from the assignment can help you figure this out. Look for key terms in the form of active verbs that tell you what to do.
Key Terms: Finding Those Active Verbs
Here are some common key words and definitions to help you think about assignment terms:
Information words Ask you to demonstrate what you know about the subject, such as who, what, when, where, how, and why.
- define —give the subject’s meaning (according to someone or something). Sometimes you have to give more than one view on the subject’s meaning
- describe —provide details about the subject by answering question words (such as who, what, when, where, how, and why); you might also give details related to the five senses (what you see, hear, feel, taste, and smell)
- explain —give reasons why or examples of how something happened
- illustrate —give descriptive examples of the subject and show how each is connected with the subject
- summarize —briefly list the important ideas you learned about the subject
- trace —outline how something has changed or developed from an earlier time to its current form
- research —gather material from outside sources about the subject, often with the implication or requirement that you will analyze what you have found
Relation words Ask you to demonstrate how things are connected.
- compare —show how two or more things are similar (and, sometimes, different)
- contrast —show how two or more things are dissimilar
- apply—use details that you’ve been given to demonstrate how an idea, theory, or concept works in a particular situation
- cause —show how one event or series of events made something else happen
- relate —show or describe the connections between things
Interpretation words Ask you to defend ideas of your own about the subject. Do not see these words as requesting opinion alone (unless the assignment specifically says so), but as requiring opinion that is supported by concrete evidence. Remember examples, principles, definitions, or concepts from class or research and use them in your interpretation.
- assess —summarize your opinion of the subject and measure it against something
- prove, justify —give reasons or examples to demonstrate how or why something is the truth
- evaluate, respond —state your opinion of the subject as good, bad, or some combination of the two, with examples and reasons
- support —give reasons or evidence for something you believe (be sure to state clearly what it is that you believe)
- synthesize —put two or more things together that have not been put together in class or in your readings before; do not just summarize one and then the other and say that they are similar or different—you must provide a reason for putting them together that runs all the way through the paper
- analyze —determine how individual parts create or relate to the whole, figure out how something works, what it might mean, or why it is important
- argue —take a side and defend it with evidence against the other side
More Clues to Your Purpose As you read the assignment, think about what the teacher does in class:
- What kinds of textbooks or coursepack did your instructor choose for the course—ones that provide background information, explain theories or perspectives, or argue a point of view?
- In lecture, does your instructor ask your opinion, try to prove their point of view, or use keywords that show up again in the assignment?
- What kinds of assignments are typical in this discipline? Social science classes often expect more research. Humanities classes thrive on interpretation and analysis.
- How do the assignments, readings, and lectures work together in the course? Instructors spend time designing courses, sometimes even arguing with their peers about the most effective course materials. Figuring out the overall design to the course will help you understand what each assignment is meant to achieve.
Now, what about your reader? Most undergraduates think of their audience as the instructor. True, your instructor is a good person to keep in mind as you write. But for the purposes of a good paper, think of your audience as someone like your roommate: smart enough to understand a clear, logical argument, but not someone who already knows exactly what is going on in your particular paper. Remember, even if the instructor knows everything there is to know about your paper topic, they still have to read your paper and assess your understanding. In other words, teach the material to your reader.
Aiming a paper at your audience happens in two ways: you make decisions about the tone and the level of information you want to convey.
- Tone means the “voice” of your paper. Should you be chatty, formal, or objective? Usually you will find some happy medium—you do not want to alienate your reader by sounding condescending or superior, but you do not want to, um, like, totally wig on the man, you know? Eschew ostentatious erudition: some students think the way to sound academic is to use big words. Be careful—you can sound ridiculous, especially if you use the wrong big words.
- The level of information you use depends on who you think your audience is. If you imagine your audience as your instructor and they already know everything you have to say, you may find yourself leaving out key information that can cause your argument to be unconvincing and illogical. But you do not have to explain every single word or issue. If you are telling your roommate what happened on your favorite science fiction TV show last night, you do not say, “First a dark-haired white man of average height, wearing a suit and carrying a flashlight, walked into the room. Then a purple alien with fifteen arms and at least three eyes turned around. Then the man smiled slightly. In the background, you could hear a clock ticking. The room was fairly dark and had at least two windows that I saw.” You also do not say, “This guy found some aliens. The end.” Find some balance of useful details that support your main point.
You’ll find a much more detailed discussion of these concepts in our handout on audience .
The Grim Truth
With a few exceptions (including some lab and ethnography reports), you are probably being asked to make an argument. You must convince your audience. It is easy to forget this aim when you are researching and writing; as you become involved in your subject matter, you may become enmeshed in the details and focus on learning or simply telling the information you have found. You need to do more than just repeat what you have read. Your writing should have a point, and you should be able to say it in a sentence. Sometimes instructors call this sentence a “thesis” or a “claim.”
So, if your instructor tells you to write about some aspect of oral hygiene, you do not want to just list: “First, you brush your teeth with a soft brush and some peanut butter. Then, you floss with unwaxed, bologna-flavored string. Finally, gargle with bourbon.” Instead, you could say, “Of all the oral cleaning methods, sandblasting removes the most plaque. Therefore it should be recommended by the American Dental Association.” Or, “From an aesthetic perspective, moldy teeth can be quite charming. However, their joys are short-lived.”
Convincing the reader of your argument is the goal of academic writing. It doesn’t have to say “argument” anywhere in the assignment for you to need one. Look at the assignment and think about what kind of argument you could make about it instead of just seeing it as a checklist of information you have to present. For help with understanding the role of argument in academic writing, see our handout on argument .
What kind of evidence do you need?
There are many kinds of evidence, and what type of evidence will work for your assignment can depend on several factors–the discipline, the parameters of the assignment, and your instructor’s preference. Should you use statistics? Historical examples? Do you need to conduct your own experiment? Can you rely on personal experience? See our handout on evidence for suggestions on how to use evidence appropriately.
Make sure you are clear about this part of the assignment, because your use of evidence will be crucial in writing a successful paper. You are not just learning how to argue; you are learning how to argue with specific types of materials and ideas. Ask your instructor what counts as acceptable evidence. You can also ask a librarian for help. No matter what kind of evidence you use, be sure to cite it correctly—see the UNC Libraries citation tutorial .
You cannot always tell from the assignment just what sort of writing style your instructor expects. The instructor may be really laid back in class but still expect you to sound formal in writing. Or the instructor may be fairly formal in class and ask you to write a reflection paper where you need to use “I” and speak from your own experience.
Try to avoid false associations of a particular field with a style (“art historians like wacky creativity,” or “political scientists are boring and just give facts”) and look instead to the types of readings you have been given in class. No one expects you to write like Plato—just use the readings as a guide for what is standard or preferable to your instructor. When in doubt, ask your instructor about the level of formality they expect.
No matter what field you are writing for or what facts you are including, if you do not write so that your reader can understand your main idea, you have wasted your time. So make clarity your main goal. For specific help with style, see our handout on style .
Technical details about the assignment
The technical information you are given in an assignment always seems like the easy part. This section can actually give you lots of little hints about approaching the task. Find out if elements such as page length and citation format (see the UNC Libraries citation tutorial ) are negotiable. Some professors do not have strong preferences as long as you are consistent and fully answer the assignment. Some professors are very specific and will deduct big points for deviations.
Usually, the page length tells you something important: The instructor thinks the size of the paper is appropriate to the assignment’s parameters. In plain English, your instructor is telling you how many pages it should take for you to answer the question as fully as you are expected to. So if an assignment is two pages long, you cannot pad your paper with examples or reword your main idea several times. Hit your one point early, defend it with the clearest example, and finish quickly. If an assignment is ten pages long, you can be more complex in your main points and examples—and if you can only produce five pages for that assignment, you need to see someone for help—as soon as possible.
Tricks that don’t work
Your instructors are not fooled when you:
- spend more time on the cover page than the essay —graphics, cool binders, and cute titles are no replacement for a well-written paper.
- use huge fonts, wide margins, or extra spacing to pad the page length —these tricks are immediately obvious to the eye. Most instructors use the same word processor you do. They know what’s possible. Such tactics are especially damning when the instructor has a stack of 60 papers to grade and yours is the only one that low-flying airplane pilots could read.
- use a paper from another class that covered “sort of similar” material . Again, the instructor has a particular task for you to fulfill in the assignment that usually relates to course material and lectures. Your other paper may not cover this material, and turning in the same paper for more than one course may constitute an Honor Code violation . Ask the instructor—it can’t hurt.
- get all wacky and “creative” before you answer the question . Showing that you are able to think beyond the boundaries of a simple assignment can be good, but you must do what the assignment calls for first. Again, check with your instructor. A humorous tone can be refreshing for someone grading a stack of papers, but it will not get you a good grade if you have not fulfilled the task.
Critical reading of assignments leads to skills in other types of reading and writing. If you get good at figuring out what the real goals of assignments are, you are going to be better at understanding the goals of all of your classes and fields of study.
You may reproduce it for non-commercial use if you use the entire handout and attribute the source: The Writing Center, University of North Carolina at Chapel Hill
Make a Gift
MAKE WAVES WITH THIS FREE WEEKLONG VOCABULARY UNIT!
How to Make Assignments in Google Classroom

New to the digital teaching world and looking for a quick way to add assignments to Google Classroom?
Here are 8 easy steps on how to get started.

Open your Google Classroom page in your browser. Google Classroom will automatically open up to the Stream tab. Think of the Stream tab as the notification center, similar to the homepage on Facebook. Here, students will see announcements, classwork, questions, and resources.
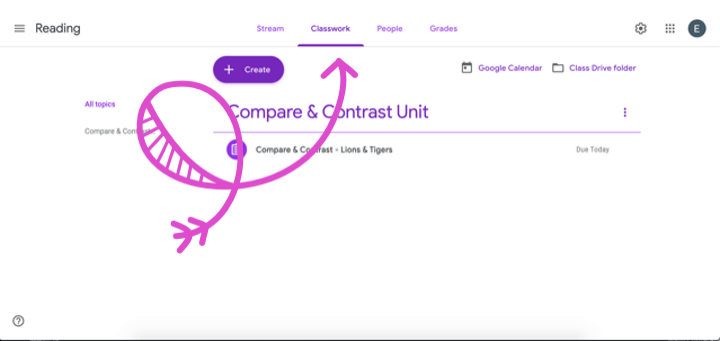
Select the Classwork tab. This is where you will see and add assignments.
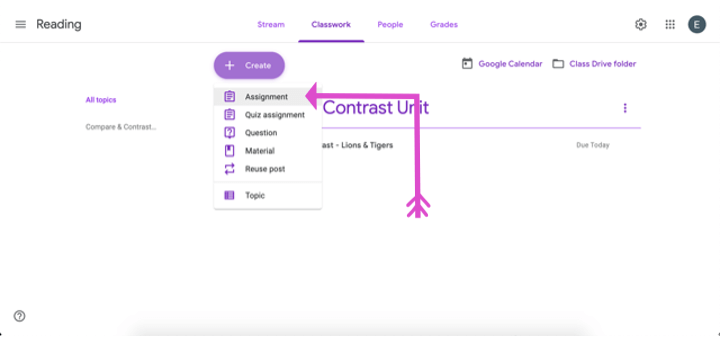
Click the Create button and select “Assignment” from the list.
You can also select the options: Quiz assignment, Question, Material, or Reuse post.
Here’s a mini explanation of each.
- Quiz assignment : Uses Google Forms to auto-grade assessments.
- Question: Post a quick, open-ended question for students to answer from the Stream page.
- Material: Need to quickly share a digital resource with students? Select Material from the list and add a link, PDF, or video for students to view.
- Reuse post: Find yourself retyping instructions again and again? Select Reuse post from the list to use a previous post as a template.

Click here to view my FREE Digital Morning Work for grades 3 through 6!
When creating an assignment, you will want to complete the following steps:
- Title your assignment
- Write instructions
- Select which subject this assignment is for
- Create a point value (if the assignment is being graded)
- Select a due date
- Select or create a topic (This will make it easy for you and your students to filter through assignments throughout the school year. I’d suggest not skipping this step!)
- Select which students should complete this assignment. (This is a great way to differentiate!)
Select the Add button and select the source where you will be attaching your resource from. If your assignment is interactive, you’ll most likely select Google Drive.
If you have purchased your assignment through Teachers Pay Teachers you’ll want to make sure that you have made a copy of the resource to your Google Drive. You can do this by selecting File -> Make Copy within the resource or through a special link provided to you by the Teachers Pay Teachers author.
Don’t Forget: You must make your own copy of the resource and add it to your Google Drive account before posting to Google Classroom.
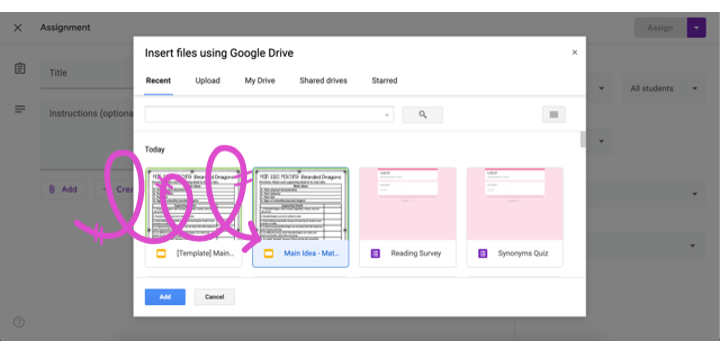
Find the assignment you’d like students to complete and click the Add button.
The next step is important. Select the dropdown menu to the right of
the assignment. Select the option “Make a copy for each student” from the menu list. If you do not select this option students will open the same Google resource and will be able to edit the same document. (Cue the raised hands or emails!) It can make for quite a mess.
Just as you would pass out a paper-based assignment in class to each student, be sure to select “Make a copy for each student” from the menu list.
Once selected, review your assignment, and press the Assign button.
Once you have assigned your assignment you will be redirected to the teacher page. From here you will see which students you’ve assigned work to and how many have completed the assignment. This page will help you keep track of your students’ work!
That’s it! Now you’re ready to assign your first assignment in Google Classroom!
Looking for digital resources that are aligned to standards and fun? These digital reading units for Google Classroom are easy to assign and easy for students to use. All of the slides (except the reading passages) are interactive!
CLICK THE LINK BELOW EACH PHOTO FOR MORE INFORMATION!

3rd Grade Digital Reading Bundle

4th Grade Digital Reading Bundle

5th Grade Digital Reading Bundle
If you’re interested in reading more about Google Classroom check out these blog posts below:
Google Classroom™ FAQ
Why You Will Love Using Google Slides™
How to Support ALL Students Using Google Slides™
- Read more about: Technology
You might also like...

Why You NEED to Use Interactive PDF Games
Classrooms have been turned upside down and inside out these past few years. Teachers everywhere are longing for routine and a return to normalcy. I

How to Assign PDF Games to Google Classroom™
With the need for more digital activities for socially distanced classrooms or distance learning, I took some of my most popular reading games and made

How to Convert Google Slides to Powerpoint – Digital Learning Hack
Have you ever downloaded a teaching resource to find that it was created in Google Slides, but you need to use it in PowerPoint?
Hi, I’m Jenn, CEO and owner of The Teacher Next Door!
I know that you strive to be an effective upper elementary teacher while maintaining a healthy work-life balance.
In order to do that, you need resources that are impactful, yet simple .
The problem is that most resources and curriculums out there are far from simple. The pages upon pages of daily lesson plans are just plain overwhelming .
At TTND, we believe teachers should be living their lives outside of the classroom, and not spend hours lesson planning and searching for resources.
We understand that now, more than ever, teachers need space to be themselves which is why we create and support teachers with timesaving tips and standards-aligned resources.
Want access to TTND's Free Resource Library? Sign up for our newsletter and we'll email you the exclusive password!
Trending posts.

SEARCH BY TOPIC
- Classroom Ideas
- Holidays and Seasonal
- Mentor Texts
- Reading Block
- Uncategorized
- Writing & Grammar
POPULAR RESOURCES

JOIN MY NEWSLETTER
Gain access to a library of FREE resources for upper elementary grades!
Facebook Group
Teachers Pay Teachers
Free Resource Library
💌 Contact Us
Disclosures
Privacy Policy
Refund Policy
Purchase Orders
Your Downloads
Reward Points
© The Teacher Next Door, LLC. All rights reserved.
")
* Please note: If your school has strong email filters, you may wish to use your personal email to ensure access.
- Google Classroom
- Google Workspace Admin
- Google Cloud
Google Classroom is turning 10. Find out what we’ve learned and what we’re doing next. 🎉
Getting started with assignments.
Learn how to use Assignments to easily distribute, analyze, and grade student work – all while using the collaborative power of Google Workspace.
Find tips and tricks from teachers like you
Get the most out of Assignments with these simple tips from fellow teachers and educators.
Discover training lessons and related resources to accelerate your learning
Error loading content :( Please try again later
- {[ item.label ]}
{[ collectionContentCtrl.activeTopic.label ]} All resources ({[ collectionContentCtrl.totalItemsCount ]})
{[ item.eyebrow ]}
{[ item.name ]}
{[ item.description ]}
{[ item.featured_text ]}
No results matching your selection :( Clear filters to show all results
Dive into Assignments
Already have Google Workspace for Education? Sign in to Assignments to explore the features and capabilities.
Get support from our help center
See how assignments can help you easily distribute, analyze, and grade student work, you're now viewing content for united states..
For content more relevant to your region, choose a different location:
- Instructor Documentation (Higher Ed)
- Welcome to the Higher Education Instructor Knowledge Base
- Log In to Brightspace
- Change your personal settings in Brightspace
- Welcome to Brightspace
- Course setup
- Start the term
- Activate your course
- About course administration
- Navigate Brightspace and find your course
- Best practices for creating a Course Homepage
- Customize your course navbar
- Automatically customize course content using replace strings
- Brightspace Virtual Assistant
- View your course using a different role
- Create accessible content in Brightspace
- Accessibility
- Adding an accessible template package to your course files
- Meeting web content accessibility standards
- Setting clear course expectations
- Making flexible time limits and deadlines
- Providing alternative learning materials
- Accessibility considerations
- Compliance to accessibility standards in HTML-authored content
- Directing learners to accessibility resources
- Scenarios for creating release conditions to increase accessibility in courses
- How assistive technology interacts with the inline grading experience
- Access course content using the ReadSpeaker docReader integration
- About Announcements
- Announcements
- Create a welcome message using the Announcements widget
- About Assignments
- Assignments
Create an assignment
- Set availability and due dates for an assignment
- Set release conditions and special access in Assignments
- Copy an existing assignment
- Copy assignments to other courses
- Add and Edit categories to manage assignments
- Reorder, edit, and delete assignments and categories
- Hide draft assignments and content
- Align learning outcomes to assignments
- Preview assignments in Evaluation mode
- About anonymous marking
- Restricted File Extensions
- Assignments and Turnitin
- Evaluate assignments using the Assignments tool
- Evaluate assignment activities
- Synchronize multi-evaluator grades between Grade Book and Assignments
- Evaluate assignment submissions from Content
- About Attendance
- File types supported by Annotations
- Assess assignments with grade schemes
- Create and manage attendance registers
- Create and manage attendance sessions
- About Awards
- Create and manage awards
- Create a blog
- About Brightspace Editor
- Brightspace Editor
- Insert and edit images with Brightspace Editor
- Insert and edit equations with Equation Editor
- About Calendar
- Manage course events with the Calendar tool
- Create a checklist
- About Class Progress
- Class Progress
- Track course progress with the Class Progress tool
- View course progress against Standards
- Accessing Class Progress data in the Brightspace Data Platform
- Change and reorder Main Indicators in Class Progress
- View assessment details on the Outcomes Progress details page
- About Classlist
- Review your Classlist
- Auditors and Bulk Auditor Management
- About Competencies
- Competencies
- Manage Competencies
- Create a learning objective
- Add a learning objective to a content topic
- Content experiences
- About course content organization
- What types of files can I use for course content?
- Use HTML templates in Content
- Improve navigation in multi-page content topics
- Notify learners about updated course content
- Add existing activities with Google Drive
- Add existing activities with OneDrive
- Create and integrate form templates in Content
- Using Virtual Classrooms and Video Assignments by Bongo
- View user progress in Content
- Change content display settings
- Add and organize learning materials in the Classic Content experience
- Fix broken links in Content
- Hide Content topics, modules, and downloads
- Add and organize learning materials in the New Content Experience (Lessons)
- ReadSpeaker integrations for Lessons
- Add availability and due dates in Content
- Add a Release Condition to Content
- Set a course timeframe
- Classic Content Experience
- View course content statistics
- Content statistics and completion tracking
- Track content completion and participation
- About Course Builder
- Course Builder
- Create a course with Course Builder
- New Content Experience (Lessons)
- Manage course waitlists
- Course Catalog
- Manage courses and programs
- Manage participants
- About Brightspace Creator+
- Create a presentation with the Capture App
- Using the Creator+ features of Brightspace Editor
- Create a presentation with Capture Web
- Manage learner self-enrollment with Discover
- About Discussions
- Create group work areas for learners
- Discussions
- Create discussion forums and topics
- Restrict a forum or topic to specific groups or sections
- Create a group thread in an existing topic
- Set up a quicklink to a discussion topic or forum within an existing Content topic
- Manage discussion forums and topics
- Evaluate discussions
- Email others using the Email tool
- About D2L Lumi Pro for Brightspace
- D2L Lumi Pro for Brightspace
- Disable your course address book
- About Consumption Dashboard
- About Brightspace ePortfolio
- Enable Brightspace ePortfolio reflections from Content
- Generate assignment ideas using D2L Lumi Idea
- About certified Brightspace artifacts
- Generate quiz questions using D2L Lumi Question
- About Form Templates
- Create FAQ questions and categories
- Generate ideas for discussions using D2L Lumi Idea
- About Grades
- Grading systems types
- Create a grading system
- About exemptions
- Grading systems
- How grade exemptions affect calculations
- Create Grading Schemes using the Grades tool
- Final Grades that include exemptions
- Grade exemptions
- Set up your Grade book
- Create and delete grade categories and items
- Import grade items
- Drop the lowest grade
- Delete grade items or categories
- Importing grades
- Gradebook icons and notifications
- About automatic transfer of overall score to a learner's grade
- Banner Grades
- Grade book Mastery View
- Managing event logs in grade book
- Setting up and configuring the Grade book Mastery view
- Setting up Outcomes for use with Grade book Mastery View
- Mastery View
- Publishing and retracting achievement evaluations in Mastery View
- Best practices for using Grade book Mastery View
- Manually overriding achievement levels in Mastery View
- Define Settings in the Grades tool
- Overall Achievement Calculation Settings
- Enter grades in the Grades tool
- Viewing Grade book Mastery View
- Manage Grades in the Grades tool
- Evaluate with the Grades tool
- Navigating in the inline grading experience
- About automatic zero grading for missing submissions
- Automatic Zero Grading
- Set release conditions for grades
- How course activity types interact with automatic zero grading
- About Groups and Sections
- Create categories and groups
- Create a section
- Groups and Sections
- About Import/Export/Copy Components
- Import, export, or copy course components
- Import/Export/Copy Components
- Integrity Advocate Remote Proctoring in D2L Brightspace
- View and Override Proctoring activity
- Integrity Advocate
- About Intelligent Agents
- Set up Intelligent Agents
- Intelligent Agents
- Run Intelligent Agents
- Using the Brightspace LeaP wizard
- Setting up learning paths
- Update learning paths
- Add a learning path link to Content in 10.3 or higher
- Using the Content Report
- Using the Progress Report
- Using the Outcomes Report
- Using the Activity Report
- Grading with LeaP
- About Brightspace Learning Object Repository
- Browse the Brightspace Learning Repository
- Learning Object Repository (LOR)
- Publish (add) objects to Brightspace Learning Repository
- Retrieve learning objects
- Manage learning objects and collections
- Review learning objects
- RSS feeds in Brightspace Learning Repository
- Create and delete a link or link category
- Manage locations
- About Manage Dates
- Bulk edit dates in Manage Dates
- Manage Dates
- About Manage Files
- Create a Content topic in Manage Files
- Apply content permissions to folders in Manage Files
- Manage Files
- About Media Library
- Manage audio-video content with Media Library
- Media Library
- Upload, edit, and play audio-video content with Media Player
- View and download audio-video transcripts
- Media Player
- Gain personalized insight about individual learners
- Learner Engagement Dashboard
- About predictive charts
- Performance+
- Interpreting the Assessments predictive chart
- Interpreting the Social Learning predictive chart
- Interpreting the Success Index predictive charts
- How does Brightspace Student Success System work?
- Student Success System (s3)
- Make predictions about learner success and risk levels
- Brightspace Student Success System areas
- Brightspace Student Success System domains
- Monitor weekly success and risk in your class
- Interpreting the win-loss chart
- Troubleshooting: I can't access Brightspace Student Success System
- Using the Students at Risk widget
- Students at Risk widget
- Class Engagement interface overview
- Easily access analytics about learners and your course
- About Portfolio
- Define Portfolio class settings
- Student at Risk widget
- Using Brightspace Portfolio for higher education and corporate learning
- Archive evidence
- Course Overview widget
- About Quizzes
- Create and configure a quiz
- Manage questions in the Quiz Builder
- Review and assess submitted Portfolio evidence
- Applying Respondus LockDown Browser to a quiz
- Manage quizzes with learner attempts
- Grade with Quick Eval
- Retake incorrect quiz questions in subsequent attempts
- Evaluate quizzes
- View quiz statistics and attempt logs
- Manage quiz questions
- Quizzes FAQ: Hot tips and workarounds
- About Question Library
- Import questions into the Question Library
- Creating Question Library questions
- Question Library
- Managing questions in Question Library
- Quizzes and Question Library
- Delete and copy questions from Question Library in a quiz
- About Rubrics
- Release Conditions
- Create a rubric using the Rubrics tool
- Evaluate assignments using the Rubrics tool
- Manage Rubrics through the Quicklinks menu
- About Release Conditions
- Import and manage SCORM
- Track activity and user progress on SCORM objects
- Create and manage seating charts
- Associate course content with Standards
- Seating Charts
- Set up Surveys
- Track survey progress and results
- Standards (Also known as Learning Outcomes, Expectations, Competencies, or Objectives)
- Create and insert a video note in Brightspace Editor
- Add subtitles to video topics
- Manage widgets on your homepage
- Set up the Activity Feed widget and post
- Post assignments using the Activity Feed widget
- Activity Feed widget
- Control commenting on Activity Feed posts
- About the Create Course widget
- Create a course in the Create Course widget
- Create Course widget
- Homepage Widget Expansion Pack
- Using the My Org Units widget
- Using the Photo Banner Widget
- Using the Slim Announcements Widget
- Using the Visual Table of Contents (TOC) Widget
- Using the Welcome Window Widget
- Create a widget-based homepage
- Displaying course grouping tabs in the My Courses widget
- Review learner course assignments with the Work To Do widget
- Change personal settings with the My Settings widget
- My Courses widget
- Glossary of Icons
- Glossary of Terms
- Documentation changes for higher ed instructors
Provide more efficient, timely, and meaningful grading and feedback. Create and edit assignments, see submission details, view submissions, associate assignments to rubrics and competencies, and return submissions with grades and feedback. On paper and observed in person assignment formats are also available.
The Create and Edit Assignments page has a fully immersive page layout. This layout is consistent with other areas of Brightspace including Assignments, Content, and Lessons, where you can upload and create a new assignment.
Access the new Assignment page
There are several different starting points to create assignments.
To create an assignment in the Classic Content Experience
- In Content , select the module where you want to create an assignment.
- Click Upload/Create .

Video: Create an assignment
To create an assignment from the New Content Experience
- From your course homepage, navigate to Content .
- In your desired module, click Create New .

Video: The New Assignments Creation Experience
To create an assignment from the Assignments tool
- Navigate to Assignments .
- Click New Assignment .
Fill in assignment details
When creating a new assignment, start by entering basic details such as name, grade scheme, due date, and description.
To fill in assignment details

- For Grade Out Of , enter the number of points for the assignment.
| You can also create grade items and categories from the Grades tool. Refer to for more information. |
- Add to Grade Book
- Enter the Due Date for your assignment.
| You can click the icons to upload any files, link to any existing activities or external weblinks, attach any files from Google Drive or OneDrive, and record and/or upload any audio or video files. |
- If you do not wish to configure your assignment further, toggle the assignment to Visible and click Save and Close .
The new assignment is created and available to learners.
Set a start and end date for your assignment
You can further customize your assignment by setting availability dates.
To set a start date and end date

- Set a Start Date and an End Date .
- Visible with access restricted
- Visible with submission restricted

The new assignment is created with specified start and end dates.
| You can also click the link below the start and end date fields to change the default settings for availability dates. When you collapse , the summary text displays the selected start and end date information. The default time for an assignment start date is set to 12:00 AM. The default end date time is set to 11:59 PM. |
Create a new release condition for your assignment
You can add release conditions to your assignment. Release conditions are conditions that must be met for an assignment to be made visible to learners. For example, you can set your assignment to only be available to learners when they achieve a specified score on a quiz.
To create a new release condition

- Under Condition Type , select the condition that must be met.
- Under Assignment Submission Folder , select the assignment submission folder in which this condition must be met.
- Click Create .
A new release condition is added to your assignment.
Attach an existing release condition to your assignment
You can also attach an existing release condition to your assignment.
To attach an existing release condition

| Use the drop-down menu to filter the existing release conditions. |
An existing release condition is added to your assignment.
Make your assignment only available to a select group
You can Manage Special Access for your assignment. This enables you to make your assignments available only to a select group of users or to add individualized due dates for certain users.
To make your assignment available to a select group

- Allow users with special access to submit outside the normal availability dates for this folder.
- Allow only users with special access to see this folder.
- To add users, click Add Users to Special Access .
- Specify the Due Date and the Availability start and end dates for selected users.
- Select the check box alongside the users who you want to grant this special access to.
- Click Save and then click Save and Close .
Your assignment is configured to give special access to specific users or groups.
Customize Submission Type & Completion settings
You can also customize what type of assignment you are creating, and what file types you will accept from learners submitting their assignments.
To customize submission type and completion settings

| You must have groups set up in your course to set an assignment as a group assignment. |
| You can edit the name of an existing category from the page. On the page, click . |
- For File Submissions , set the number of Files Allowed Per Submission and the Submissions rules.
- For Text submissions , set the Submission rules.
- For On paper submissions , set Marked as completed to one of the available options: Manually by learners , Automatically on evaluation , or Automatically on due date .
| When you collapse , the summary text displays your selection. |
- From the Allowable File Extensions drop-down menu, select an option to restrict file extensions on submissions for the assignment.
| This field is only available when the assignment is set to or . |
The assignment type and acceptable file type for submission is set.
Customize Evaluation & Feedback settings
Add rubrics, associate learning objectives, display annotations, and use anonymous marking. You can also use Advanced Assessments described below to better manage courses with large class sizes and multiple evaluators, delegate and manage evaluator workflows, and reduce bias in marking.
To add Rubrics and associate learning objectives
| If you are attaching multiple rubrics, select the rubric to be used by default when scoring from the drop-down list. |
- Click Manage Learning Objectives .
- Click Associate Learning Objectives .
- Select the learning objective you want to add and then click Add Selected .
- On the context menu of the associated learning objective, select Add Assessment .
- Select an existing rubric or create a new rubric.
- Select the rubric criteria and specify if the assessment activity is required to complete the learning objective.
- Click Save .
- Click Close .
| If this is not turned on when creating the assignment, the assignment is hidden from learners. |
- Click Save and Close .
| only appears when the tool is enabled and the course is not using the tool. If your course is using learning standards (Learning Outcomes tool), and if you have , you can assess submissions against standards for individual and group assignments. |
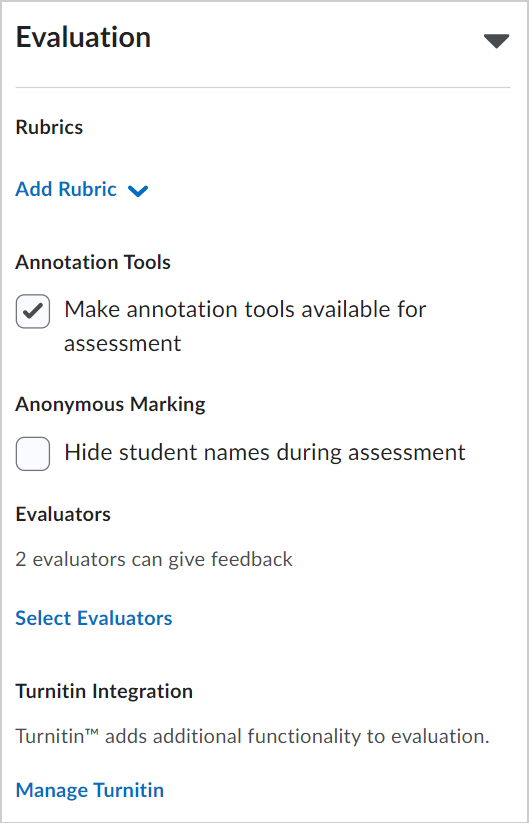
To display annotations and use anonymous marking
- From the New Assignment page, expand Evaluation & Feedback .
- To display annotation tools in the document viewer, under Annotation Tools , select Make annotation tools available for assessment .
- To enable anonymous marking, under Anonymous Marking , select Hide student names during assessment .
| If is not turned on when creating the assignment, the assignment is hidden from learners. |
To set up a delegation, co-Marking, or multi-evaluator workflow and enable Turnitin
| : The > permission is required to populate both the evaluator and publisher lists. |

- All evaluators can publish any evaluations
- Evaluators can only publish their evaluation

| : Only publishers can retract evaluations already released to learners. |
To match evaluators to learners, in Allocate Evaluators to Learners > Manage Allocations > manually pair learners with evaluators or select one of the following options:
- Allocate all evaluators to every learner
- Randomly allocate 1 evaluator to every learner evenly
- Randomly allocate 2 evaluators to every learner evenly
- Randomly allocate 3 evaluators to every learner evenly
Click Apply Allocation Method > Done .
| : By default, selected evaluators can evaluate any learner. Evaluator can also be assigned to groups and or sections using the or drop-down menu. Learners in the group or section can be mapped to an evaluator. |
To choose a multi-evaluator workflow, navigate to Coordinate Multiple Evaluators , select one of the following options:
One shared evaluation to allow all evaluators yo work on the same evaluation together. Publishers release this evaluation to learners.
| When using the workflow, each assigned evaluator can edit a shared evaluation. The evaluation change history is not saved and evaluators may not notice changes made by other assigned evaluators. Therefore, D2L recommends that you use this option for real-time, collaborative evaluation between multiple people (for instance, when an instructor and a teaching assistant are evaluating an assignment together and discussing the evaluation as they are doing it). Select if you need independent evaluations. |
Multiple individual evaluations to allow evaluators to work on their own evaluations separately. Publishers aggregate results into one final evaluation and release it to learners.
| : When enrollment changes are made for evaluators in a course, it may take longer than expected (more than two minutes) for these changes to be processed and reflected in the list and the section. This is based on the number of users in the course and the number of Advanced Assessment activities. |
If Turnitin is enabled for your role in the course, you can use the Similarity Report options while the Online Grading tools are disabled by doing the following:
- Under Turnitin Integration , click Manage Turnitin .
- Enable the Turnitin integration and click Save .
| : You can still access the option called Feedback studio in Turnitin when you access the tool on Turnitin's page. However, any inputs in the tool are not restricted by the evaluators defined in Advanced Assessment. Additionally, any grades or feedback are not auto-synchronized with the Consistent Evaluation Experience or Grade Book. |
Refer to Advanced Assessment for Assignments in test, development, and staging environments of Brightspace for more information.
Add a rubric to an assignment

| You can add more than one rubric to an assignment. |

Preview an assignment submission
There are often situations where you would like to see the end-to-end flow of submitting an assignment you created. This can easily be accomplished by leveraging the Preview function within the Assignments tool. You can go through the process of viewing and submitting an assignment and have your preview submission available in the evaluation workflow.
| Your preview submissions will not impact the statistics for your course. |
To preview an assignment submission

- Select the assignment you want to preview.
- Select Allow this preview submission to be available in the folder .
- Click Add a File to submit a test assignment.

- On the Review Assignment Submission page, click Exit Preview .
- If you want to view the evaluation workflow for your assignment submission, click on the assignment where you just made the submission.
- Click Show Search Options .

- Click Apply and find your assignment submission.
You now have access to the to the evaluation screen for your assignment submission.
- PRO Courses Guides New Tech Help Pro Expert Videos About wikiHow Pro Upgrade Sign In
- EDIT Edit this Article
- EXPLORE Tech Help Pro About Us Random Article Quizzes Request a New Article Community Dashboard This Or That Game Happiness Hub Popular Categories Arts and Entertainment Artwork Books Movies Computers and Electronics Computers Phone Skills Technology Hacks Health Men's Health Mental Health Women's Health Relationships Dating Love Relationship Issues Hobbies and Crafts Crafts Drawing Games Education & Communication Communication Skills Personal Development Studying Personal Care and Style Fashion Hair Care Personal Hygiene Youth Personal Care School Stuff Dating All Categories Arts and Entertainment Finance and Business Home and Garden Relationship Quizzes Cars & Other Vehicles Food and Entertaining Personal Care and Style Sports and Fitness Computers and Electronics Health Pets and Animals Travel Education & Communication Hobbies and Crafts Philosophy and Religion Work World Family Life Holidays and Traditions Relationships Youth
- Browse Articles
- Learn Something New
- Quizzes Hot
- Happiness Hub
- This Or That Game
- Train Your Brain
- Explore More
- Support wikiHow
- About wikiHow
- Log in / Sign up
- Education and Communications
- Study Skills
How to Start an Assignment
Last Updated: January 29, 2024 Fact Checked
This article was co-authored by Michelle Golden, PhD . Michelle Golden is an English teacher in Athens, Georgia. She received her MA in Language Arts Teacher Education in 2008 and received her PhD in English from Georgia State University in 2015. There are 8 references cited in this article, which can be found at the bottom of the page. This article has been fact-checked, ensuring the accuracy of any cited facts and confirming the authority of its sources. This article has been viewed 110,432 times.
Getting started on an assignment or homework can often times be the hardest step. Putting off the assignment can make the problem worse, reducing the time you have to complete the task and increasing stress. By learning how to get started and overcome the urge to procrastinate, you can get your assignments done on schedule and with less stress, opening up more free time.
Restructuring Your Assignment

- For example, you might research areas of a report that you find most interesting before moving on to other areas.
- If your math assignment has different types of questions, try doing those that you enjoy the most before moving on to the others.
- You might also try tackling smaller or easier tasks first so you can cross a few items off your list. Seeing that you've already made progress may help you feel motivated to continue.

- Promise yourself that you will meet your goal of working for five minutes on the assignment.
- Once you get started, you may find that you don't want to stop working. Otherwise, you can take a break and come back to the assignment, knowing you're at least five minutes closer to finishing than you were before.

- Try to set reasonable periods of time that you know you can meet. For example, you might set aside two hours on a Friday to dedicate to your assignment. If you don't have that much time all at once, try to carve out a few 20- or 30-minute blocks.
- You may or may not wish to continue working after your time limit has gone by.
- Have a realistic understanding of how fast you can write and plan your schedule accordingly.

- It can help to read the assignment as soon as you get it and then ask any questions you might have.
- If you're not sure if you understand the assignment, try rewriting it in your own words or explaining it to someone else. If you find you can't or have a lot of questions, you may need more information.
- You should have an overview of the assignment, understand the main task, and understand the technical and stylistic requirements.
- Look for important words in the instructions to understand the assignment. These words might include define, explain, compare, relate, or prove.
- Keep your audience in mind and write a paper that would best deliver information to them.

- Goals that are too big or not well defined can be difficult to start working towards.
- Smaller and well defined goals can seem easier to achieve than larger ones.
- For example, you could break a research paper down into several smaller tasks: 1) do preliminary research, 2) write an outline, 3) draft an introduction, 4) draft body paragraphs, 5) write conclusion, 6) revise. Each of these is much more do-able on its own.
Changing Your Focus

- You might want to go for a quick walk after working for a set amount of time.
- Try reading a website or book that you enjoy for a few minutes after working.
- Alternatively, try a quick burst of exercise before setting to work. Exercise releases feel-good chemicals called endorphins and can also help boost your memory. [8] X Research source

- Instead of dreading your work, focus on how good it will feel to make progress. You won't have it hanging over your head. You can actually enjoy the weekend instead of feeling guilty.
- Keeping your eye on long-term rewards can help you stay motivated to finish your assignment.

- Avoid moving your workspace constantly.
- Don't get lost on tangential research.
- Don't take constant breaks to get a snack.

- For every hour you waste procrastinating, you can limit how much television you watch that night.
- If you waste too much time procrastinating, you might deny yourself a favorite snack later on.

Community Q&A
You Might Also Like

- ↑ https://www.psychologytoday.com/blog/solving-unsolvable-problems/201408/4-steps-stop-procrastinating
- ↑ https://www.psychologytoday.com/blog/friendship-20/201405/the-surefire-first-step-stop-procrastinating
- ↑ http://writingcenter.unc.edu/handouts/procrastination/
- ↑ https://kidshealth.org/en/teens/homework.html
- ↑ http://writingcenter.unc.edu/handouts/understanding-assignments/
- ↑ https://open.alberta.ca/dataset/ab22ff64-3358-4387-9761-8c58878a6b84/resource/3ee38320-17e4-46f9-b24f-c95f9f345eb9/download/ipp7.pdf
- ↑ http://well.blogs.nytimes.com/2013/08/07/how-exercise-can-help-us-learn/
- ↑ https://kidshealth.org/en/teens/happy-life.html
About This Article

To start an assignment, try working on the most enjoyable or easiest parts of the assignment first to get the ball rolling. Even if no part of the assignment seems enjoyable or easy, set a timer and try to make yourself work for at least 5 minutes, which is usually enough time to build momentum and overcome procrastination. You can also try breaking your assignment up into smaller, more manageable tasks and scheduling yourself regular breaks so it doesn't seem as overwhelming. To learn how to stay positive and avoid procrastination while working on your homework, scroll down! Did this summary help you? Yes No
- Send fan mail to authors
Reader Success Stories
Faith Wanjiku
Dec 7, 2018
Did this article help you?

Winnie Wong
May 18, 2016
Turab Ahamad
Oct 23, 2016
Sofia Madrid
Sep 5, 2016
Doha Elabbasi
Sep 27, 2016

Featured Articles

Trending Articles

Watch Articles

- Terms of Use
- Privacy Policy
- Do Not Sell or Share My Info
- Not Selling Info
Get all the best how-tos!
Sign up for wikiHow's weekly email newsletter
Eberly Center
Teaching excellence & educational innovation, creating assignments.
Here are some general suggestions and questions to consider when creating assignments. There are also many other resources in print and on the web that provide examples of interesting, discipline-specific assignment ideas.
Consider your learning objectives.
What do you want students to learn in your course? What could they do that would show you that they have learned it? To determine assignments that truly serve your course objectives, it is useful to write out your objectives in this form: I want my students to be able to ____. Use active, measurable verbs as you complete that sentence (e.g., compare theories, discuss ramifications, recommend strategies), and your learning objectives will point you towards suitable assignments.
Design assignments that are interesting and challenging.
This is the fun side of assignment design. Consider how to focus students’ thinking in ways that are creative, challenging, and motivating. Think beyond the conventional assignment type! For example, one American historian requires students to write diary entries for a hypothetical Nebraska farmwoman in the 1890s. By specifying that students’ diary entries must demonstrate the breadth of their historical knowledge (e.g., gender, economics, technology, diet, family structure), the instructor gets students to exercise their imaginations while also accomplishing the learning objectives of the course (Walvoord & Anderson, 1989, p. 25).
Double-check alignment.
After creating your assignments, go back to your learning objectives and make sure there is still a good match between what you want students to learn and what you are asking them to do. If you find a mismatch, you will need to adjust either the assignments or the learning objectives. For instance, if your goal is for students to be able to analyze and evaluate texts, but your assignments only ask them to summarize texts, you would need to add an analytical and evaluative dimension to some assignments or rethink your learning objectives.
Name assignments accurately.
Students can be misled by assignments that are named inappropriately. For example, if you want students to analyze a product’s strengths and weaknesses but you call the assignment a “product description,” students may focus all their energies on the descriptive, not the critical, elements of the task. Thus, it is important to ensure that the titles of your assignments communicate their intention accurately to students.
Consider sequencing.
Think about how to order your assignments so that they build skills in a logical sequence. Ideally, assignments that require the most synthesis of skills and knowledge should come later in the semester, preceded by smaller assignments that build these skills incrementally. For example, if an instructor’s final assignment is a research project that requires students to evaluate a technological solution to an environmental problem, earlier assignments should reinforce component skills, including the ability to identify and discuss key environmental issues, apply evaluative criteria, and find appropriate research sources.
Think about scheduling.
Consider your intended assignments in relation to the academic calendar and decide how they can be reasonably spaced throughout the semester, taking into account holidays and key campus events. Consider how long it will take students to complete all parts of the assignment (e.g., planning, library research, reading, coordinating groups, writing, integrating the contributions of team members, developing a presentation), and be sure to allow sufficient time between assignments.
Check feasibility.
Is the workload you have in mind reasonable for your students? Is the grading burden manageable for you? Sometimes there are ways to reduce workload (whether for you or for students) without compromising learning objectives. For example, if a primary objective in assigning a project is for students to identify an interesting engineering problem and do some preliminary research on it, it might be reasonable to require students to submit a project proposal and annotated bibliography rather than a fully developed report. If your learning objectives are clear, you will see where corners can be cut without sacrificing educational quality.
Articulate the task description clearly.
If an assignment is vague, students may interpret it any number of ways – and not necessarily how you intended. Thus, it is critical to clearly and unambiguously identify the task students are to do (e.g., design a website to help high school students locate environmental resources, create an annotated bibliography of readings on apartheid). It can be helpful to differentiate the central task (what students are supposed to produce) from other advice and information you provide in your assignment description.
Establish clear performance criteria.
Different instructors apply different criteria when grading student work, so it’s important that you clearly articulate to students what your criteria are. To do so, think about the best student work you have seen on similar tasks and try to identify the specific characteristics that made it excellent, such as clarity of thought, originality, logical organization, or use of a wide range of sources. Then identify the characteristics of the worst student work you have seen, such as shaky evidence, weak organizational structure, or lack of focus. Identifying these characteristics can help you consciously articulate the criteria you already apply. It is important to communicate these criteria to students, whether in your assignment description or as a separate rubric or scoring guide . Clearly articulated performance criteria can prevent unnecessary confusion about your expectations while also setting a high standard for students to meet.
Specify the intended audience.
Students make assumptions about the audience they are addressing in papers and presentations, which influences how they pitch their message. For example, students may assume that, since the instructor is their primary audience, they do not need to define discipline-specific terms or concepts. These assumptions may not match the instructor’s expectations. Thus, it is important on assignments to specify the intended audience http://wac.colostate.edu/intro/pop10e.cfm (e.g., undergraduates with no biology background, a potential funder who does not know engineering).
Specify the purpose of the assignment.
If students are unclear about the goals or purpose of the assignment, they may make unnecessary mistakes. For example, if students believe an assignment is focused on summarizing research as opposed to evaluating it, they may seriously miscalculate the task and put their energies in the wrong place. The same is true they think the goal of an economics problem set is to find the correct answer, rather than demonstrate a clear chain of economic reasoning. Consequently, it is important to make your objectives for the assignment clear to students.
Specify the parameters.
If you have specific parameters in mind for the assignment (e.g., length, size, formatting, citation conventions) you should be sure to specify them in your assignment description. Otherwise, students may misapply conventions and formats they learned in other courses that are not appropriate for yours.
A Checklist for Designing Assignments
Here is a set of questions you can ask yourself when creating an assignment.
- Provided a written description of the assignment (in the syllabus or in a separate document)?
- Specified the purpose of the assignment?
- Indicated the intended audience?
- Articulated the instructions in precise and unambiguous language?
- Provided information about the appropriate format and presentation (e.g., page length, typed, cover sheet, bibliography)?
- Indicated special instructions, such as a particular citation style or headings?
- Specified the due date and the consequences for missing it?
- Articulated performance criteria clearly?
- Indicated the assignment’s point value or percentage of the course grade?
- Provided students (where appropriate) with models or samples?
Adapted from the WAC Clearinghouse at http://wac.colostate.edu/intro/pop10e.cfm .
CONTACT US to talk with an Eberly colleague in person!
- Faculty Support
- Graduate Student Support
- Canvas @ Carnegie Mellon
- Quick Links
- Norsk (Bokmål)
- Português, Brasil
Create and Edit Assignments
You are viewing Original Course View content
Your institution controls which tools are available in the Original Course View . Assignments are always available to instructors in the Ultra Course View .
You can create assignments alongside other content.
With assignments, you can create coursework and manage the grades and feedback for each student separately. You can create assignments in content areas, learning modules, lesson plans, and folders.

When you create an assignment, a Grade Center column is created automatically. From the Grade Center or Needs Grading page, you can see who has submitted their work and start grading. Students access their grades from their My Grades pages or the assignment's Review Submission History page.
You can also create a group assignment and release it to one or more groups in your course. Each group submits one collaborative assignment and all members receive the same grade. You can create a single assignment and assign it to all groups, or create several unique assignments and assign them to individual groups.
More on group assignments
Create an assignment
You can create assignments in content areas, learning modules, lesson plans, and folders.
In the Blackboard mobile app, assignment instructions for Original courses show after students begin an attempt.
Drag files from your computer to the "hot spot" in the Attach Files area. If your browser allows, you can also drag a folder of files. The files will upload individually. If the browser doesn't allow you to submit your assignment after you upload a folder, select Do not attach in the folder's row to remove it. You can drag the files individually and submit again.
You won't be able to drag files to upload if your institution uses an older version of Blackboard Learn.
You can use the file name or provide another name for the file.

- Optionally, select a Due Date . Assignments with due dates automatically show in the course calendar and in the To Do module. Submissions are accepted after this date but are marked late. If you don’t want students to access an assignment after the due date, choose the appropriate display dates.
If you set the points possible to a non-whole number, letter grades may not be assigned correctly.
- Optionally, add a rubric . Expand the sections to make selections such as anonymous grading, how the grade is displayed, and the number of attempts. You can allow more than one attempt on an assignment.
- Make the assignment available when you're ready for students to access it. Select the appropriate options for availability, tracking, and display dates. Display dates don't affect an assignment's availability, only when it appears.
- Select Submit .
More on assignment grade settings
More on adding files in the editor
More on Course Files vs. the Content Collection
Video: Create an Assignment
Watch a video about creating an assignment.
The following narrated video provides a visual and auditory representation of some of the information included on this page. For a detailed description of what is portrayed in the video, open the video on YouTube , navigate to More actions , and select Open transcript .
Video: Create an assignment explains how to create an assignment.
Late assignments
When you assign a due date for an assignment, students can still submit attempts after the date passes. Submissions after the due date are marked late. If you penalize late submissions, inform students in the assignment instructions.
You can view the late label in these areas:
- Student's submission page in the grade panel
- Student's Grade Details page
- Needs Grading page

From the Grade Center, you can also view a list of all submissions with the Assignment File Download option in an assignment's menu. View who has submitted, submission dates, and the grading statuses. You can sort by date to easily see who submitted after the due date.

If you don’t want students to access an assignment after the due date, choose the appropriate display dates. Inform students that you won’t accept submissions after the due date and the assignment will no longer be available.
Students see the late label after they make a submission after the due date.

Student assignment submission confirmations
When students submit assignments successfully, the Review Submission History page appears with information about their submitted assignments and a success message with a confirmation number. Students can copy and save this number as proof of their submissions and evidence for academic disputes. For assignments with multiple attempts, students receive a different number for each submission. If your institution has enabled email notifications for submission receipts, students will also receive an email with a confirmation number and other details for each submission.
You and your students won't be able to view confirmation numbers if your institution uses Blackboard Learn 9.1 Q4 2016 or earlier. Student email notifications and student access to receipt history were introduced in Blackboard Learn 9.1 Q2 2017.

You and your administrators have a retrievable record in the system even if an attempt, assignment, or student is later deleted. These records are maintained in the course and also retrievable after the archive and restore process.
You can access all of your students' confirmation numbers from the Grade Center. Open the Reports menu and select Submission Receipts .

On the Submission Receipts page, you can view information for each assignment, such as who submitted and when. Group assignments are also logged and the Submitter column lists who submitted for the group. In the Submission column, view if a student submitted a file or wrote the submission in the assignment's editor.
Use the menus at the top of the page to filter the items. In the second menu, select Not blank and leave the search box empty to show all of the submission receipts. Select a column heading to sort the items.
Edit, reorder, and delete assignments
You can edit, reorder, and delete your assignments. Change the order of assignments with the drag-and-drop function or the keyboard accessible reordering tool. For example, reorder the assignments to keep the current one at the top.

From an assignment's menu, select on option:
- Move an assignment to another location in your course. When you move an assignment, it's removed from its original location. You can't copy an assignment.
- Edit an assignment. If you change the instructions, students who have already made submissions will see the new instructions only on subsequent attempts.
- Apply release criteria, tracking, metadata, and review status.
More on options you can apply
Delete assignments
You can delete an assignment from a course area and if no student submissions exist, the Grade Center column is also deleted.
When you delete an assignment that has student submissions, you also delete all the submissions. You have two options:
- Preserve the scores in the Grade Center, but delete the assignment and all submissions. Though the scores remain in the Grade Center, you can't access the students' submissions again. The action is irreversible.
- Delete the assignment, the Grade Center column, all assigned grades, and all submissions. The action is irreversible.
Alternatively, make the gradable item unavailable in your course to preserve the submissions and the scores in the Grade Center.
Learn - instructor
Need more help with learn .
Contact your institution's support desk
- Watch videos for instructors
- Join the Community
Assignments
Assignments are the work you do for your class in WebAssign , and might include homework assignments, labs, quizzes, or tests, depending on your instructor.
Your instructor creates your assignments, schedules them, and sets guidelines such as:
- How many times you can submit an assignment.
- If you can have extensions of due dates.
- The kind of feedback that you receive after you submit an assignment.
Pardon Our Interruption
As you were browsing something about your browser made us think you were a bot. There are a few reasons this might happen:
- You've disabled JavaScript in your web browser.
- You're a power user moving through this website with super-human speed.
- You've disabled cookies in your web browser.
- A third-party browser plugin, such as Ghostery or NoScript, is preventing JavaScript from running. Additional information is available in this support article .
To regain access, please make sure that cookies and JavaScript are enabled before reloading the page.
- Ubiquiti Help Center
- Getting Started
Using the UniFi Talk Application
This article outlines key setup and configuration processes that can be completed in the UniFi Talk application.
Create Users
To create new users in the UniFi Talk application:
- Navigate to Assignments > Users and click Add User in the top right.
- Enter the user's first name, last name, and extension in the respective text fields. If you do not assign an extension, the UniFi Talk application will do so automatically. You may also add an email to allow the user to receive voicemail notifications.
- Select the user's phone number from the drop-down menu and click Save . If no phone number is selected, the user will only be able to make internal calls unless they are added to a group with a number assigned.
Assign Phones to Users
A user must be assigned to each phone managed by the UniFi Talk application. You can assign a phone to a user on the Devices page or in the user's profile panel.
To assign a phone to a user on the Devices page:
- Navigate to Assignments > Devices .
- Select the phone you'd like to assign, and click Assign Device .
- Select the user from the pop-up window's drop-down field, then select Assign .
To assign a phone to a user via their profile panel:
- Navigate to Assignments > Users .
- Select the user that you’d like to assign a phone to.
- Open the Settings tab, and select the Manage drop-down option.
- Select the phone that you'd like to assign to the user from the Assigned Device drop-down field.
- Select Apply Changes .
Assign Numbers to Users
If you wish to purchase additional numbers in the UniFi Talk application before you start assigning, see our article here.
To assign a number to a user:
- Select a user.
- Select the number that you’d like to assign to the user from the Number drop-down field.
Note: Users without a number assigned will not be able to make or receive external calls, but will still have an active extension that can make and receive unlimited internal calls.
Set Up a Smart Attendant
The Smart Attendant helps you create and execute custom call routing to ensure that all your calls are directed to the right extension or preferred language speaker.
To set up a Smart Attendant:
- Open the Engagement tab in the UniFi Talk application. If you already have one or more Smart Attendants, click the Add Smart Attendant button. Otherwise, proceed with setup.
- Name your Smart Attendant and click Next .
- If you select None , your Smart Attendant will not be active until you assign it a number.
- You can also select multiple numbers for your Smart Attendant to answer.
- Ringback : The audio that callers hear when dialing a Talk user or group via your Smart Attendant.
- Hold Music : The audio that callers hear when a Talk user places them on hold after being dialed via your Smart Attendant.
- If you select Yes , configure your business hours schedule. You can add multiple business hour segments within a single day.
- All Ring Destinations : Dial any user or group in your Talk application by their extension.
- Smart Attendant Ring Menus : Dial only the users and groups added to the Smart Attendant with a Ring Phone(s) menu by their extension.
- Custom List + Smart Attendant Ring Menus : Dial users and groups added to both the custom list and the Smart Attendant with a Ring Phone(s) menu by their extension.
- Select the voice your Smart Attendant will use for generated audio.
- Select the greeting type. You can generate audio from text or use custom audio by recording or uploading a file.
- Follow the instructions to configure your greeting based on the type selected.
- Enter the prompt message and select the user(s) and/or group(s) that each key press will direct to.
- If you don't need a call routing tree or wish to configure this later, click No then Finish .
To add a new menu or user:
- Hover your cursor over the menu that you'd like to add a new block to and click the + icon when it appears.
- Keypress Prompt (e.g., Press 1 for Sales)
- Ring Phone(s) (Dial a specific user or group)
- Park Call (Place the call in a Parking Lot)
- Play Audio (Play an audio message)
- Voicemail (Leave voicemail for a specific user)
- Keypress to Return (Return to the previous menu)
- Schedule (Configure call handling based on a schedule)
To delete a menu or user, hover your cursor over it and click the X icon when it appears.
Set Up a Ring Flow
A Ring Flow allows you to create a custom call routing sequence for a user to ensure that their calls are always answered.
To create a Ring Flow for a user:
- Open the Settings tab, and select the User Status drop-down option.
- Select Add Ring Flow and enter a Ring Flow Name.
- Adjust the Ringing Sequence by editing the ring duration and adding users, groups, or global contacts in the desired ring order.
- Global (Send to Voicemail)
- Select the desired Voicemail Recipient from the drop-down option.
- Select Save.
Manage Voicemails and Call Recordings
The UniFi Talk application collects voicemail by default. To listen to voicemails, click the Voicemail button on your Talk phone.
To automate call recordings:
- Enable the Automatic Call Recording toggle from Settings > Call Settings .
- Review the disclaimer text in the pop-up advisory window carefully, and click I Understand if you consent.
To disable voicemail:
- Navigate to Settings > Voicemail .
- Deselect Voicemail .
View Call Logs
To view your call logs:
- Navigate to System Log > Calls to view a listing of every call made with a device managed by the UniFi Talk application.
- Click the desired call's entry or hover your cursor over its listing and click the View link when it appears.
- Review basic call information (e.g., caller, recipient, call experience score, length, date, and time) from the Overview section of the call log's pop-up panel.
- Click the Recording tab at the top of the call log's panel to listen to its recording.
- For voicemail messages, click the Voicemail tab at the top of the call log’s panel to listen to its recording.
- Select the desired call's entry and click Delete , then select the Delete button in the confirmation pop-up window.
- Select the checkbox next to the desired calls and select the Delete button at the bottom left of the list.
Set Up Groups
The UniFi Talk application allows you to create groups that allow multiple phones to share the same number and ring. Groups can utilize all UniFi Talk application features, including the Smart Attendant.
To create a new group:
- Navigate to Assignments > Users and select Add Group at the top-right corner of the following page.
- Enter a group name, assign a number to the group (optional), and add an internal extension (optional).
- Simultaneous : When the group is called, all phones assigned to group members will ring. The first phone to answer will receive the call and the other phones will stop ringing.
- Sequential : When the group is called, phones assigned to group members will ring in the order you define.
- Manage the group’s members. You can add Talk users and global contacts to a group.
- Configure the Ringback for the group. This is the audio that callers hear when calling the group.
- Click Add .
Note: Groups without a number assigned will not be able to make or receive external calls, but will still have an active extension that can make and receive unlimited internal calls.
To assign a specific outgoing number to a user who is a member of several groups:
- Navigate to Assignments > Users , select the user, and click the Manage tab.
- Select the desired outgoing number from the drop-down field.
Teleport VPN for UniFi Talk Devices
Teleport is a zero-configuration VPN that allows you to instantly connect to your UniFi network from a remote location. Users with a UniFi Gateway or Cloud Gateway can remotely connect and manage UniFi Talk Touch series phones by sending a Teleport VPN invite to a UniFi Talk user.
To send a Teleport VPN invite:
- In UniFi Network, ensure that Teleport is enabled from Settings > VPN > Teleport .
- In UniFi Talk, go to Assignments > Users and select the user who needs to connect remotely.
- Under the user's profile, go to Settings > Teleport and click Send Invite .
- The user will receive a Teleport invite email. From the UniFi Talk phone, go to Settings > Work Remotely and initiate the Teleport connection process.
- Use the UniFi Talk phone's camera to scan the QR code in the Teleport invite email to establish the Teleport VPN connection.
- In Talk, go to Assignments > Devices . The phone will now be available for assignment to a user.
For more information on Teleport VPN, please see our article here. .
Transfer Ownership of UniFi Talk
The UniFi Talk owner is responsible for subscription and billing management. This role is specific to UniFi Talk and is separate from the UniFi Console owner role. You can identify the current UniFi Talk owner from Settings > System in the UniFi Talk application.
You can transfer ownership of UniFi Talk to another Ubiquiti account with the following steps:
- Create a Ubiquiti account for the new UniFi Talk owner at account.ui.com if one doesn't already exist.
- Add the new UniFi Talk owner's Ubiquiti account to the UniFi Console running UniFi Talk as an administrator. Please refer to this article for more information about UniFi OS user roles and permissions.
- Log in to the new UniFi Talk owner's Ubiquiti account in Site Manager and access the UniFi Talk application.
- Note: The transfer button will only display for an eligible new UniFi Talk owner. It will not display if you're logged in as the current UniFi Talk owner.
- Click the button to start the transfer and follow the instructions on the screen to complete the process.
Recover a Previous UniFi Talk Installation
If you need to factory reset, replace, or migrate to a new UniFi Console, or reset the UniFi Talk application, you can recover your installation including your subscription and phone numbers during the UniFi Talk setup process. This option is available when you’re logged in to a Ubiquiti account that owns one or more UniFi Talk installations.
To recover or migrate your Talk installation:
- Log in to your Ubiquiti account in Site Manager and select the UniFi Console you'd like to recover or migrate your Talk subscriptions to.
- If you have multiple UniFi Talk deployments associated with your Ubiquiti account, you’ll see a list of previous deployments to select from. Hover over the information tooltip to view the phone numbers associated with each deployment.
- Select the deployment with the phone numbers that you want to recover or migrate.
- Click Next to continue setup.
- On the Setup Device(s) page, you’ll now have the option to assign your recovered or migrated phone numbers to users and devices. These are available for selection from the Number / Area Code dropdown menu. Make your selections and click Next .
- Complete the UniFi Talk setup process to finish recovering or migrating your UniFi Talk installation.
Note: A UniFi Talk installation can only be active on a single UniFi Console. If you use this option during the UniFi Talk setup process while the installation is still active on another UniFi Console, your installation will be transferred and will no longer be accessible from that console.
Export Audio Data
Before factory resetting, replacing, or migrating to a new UniFi Console, or resetting the UniFi Talk application, we recommend downloading your current audio files using the Audio Data Export feature found at Settings > System . Audio files available to export include Smart Attendant greetings, hold music, voicemail & voicemail greetings, as well as call recordings.
To export audio data:
- In the Talk application, navigate to Settings > System to locate the Audio Data Export option.
- Select Export next to the Audio Data Export option.
- Select the audio data you want to include in the export.
- Select Download .
Manage Outgoing Intercom
You can manage a user's ability to make outgoing intercom calls to other users from within the Talk application.
To enable Outgoing Intercom for a user:
- Select the checkbox for Outgoing Intercom.
Set a Failover Redirect Number
You can set a redirect number in case your Talk application, UniFi Console, or Internet connection goes offline. All incoming calls to your UniFi Talk numbers will be forwarded to this redirect number during downtime.
To set a Failover Redirect Number:
- Navigate to Settings > Call Settings > Additional .
- Within the Failover Redirect Number box type your phone number, including the country code, to save the failover number.
Troubleshooting
I can't receive incoming calls..
We recommend enabling Advanced Call Routing if your UniFi Talk deployment can’t receive incoming calls. The instructions below describe how to implement this fix.
- In the Talk application, go to Settings > System and enable Advanced Call Routing .
Note: For Advanced Call Routing to take immediate effect, restart the Talk application.
I can't make outgoing calls.
For outgoing call failures, we recommend enabling Advanced Call Routing. The instructions below describe how to implement this fix.
Note: For Advanced Call Routing to take immediate effect, we recommend restarting the Talk application.
If the steps above did not work, we recommend disabling the SIP ALG setting found in the router upstream from the UniFi Console running the Talk application (e.g., the router modem installed by your ISP). The SIP ALG setting is sometimes enabled by default on these devices and interferes with telephony.
I could previously make and/or receive calls, and now I can’t.
In some cases, events like a network outage can result in degraded Talk application performance. This can be resolved by restarting the Talk application.
To restart the Talk application:
- From Site Manager , select your UniFi Console, go to OS Settings > Applications , and locate the Talk application tile.
- Click on the three dots menu in the Talk application tile and select Stop .
- After the Talk application has stopped, click on the Start Talk button.
If you’re still having trouble making and/or receiving calls, please contact UniFi Technical Support .
My outgoing calls are labeled as spam, scam likely, or blocked entirely.
We recommend taking the following steps to mitigate nuisance labels such as spam or scam likely and call blocking by other carriers:
- (Available to business customers only) Set a caller ID name (CNAM) on impacted phone numbers, such as your business name, up to a maximum of 15 characters. You can self-manage your Business Profile and CNAM Branded Calling from Settings > Organization in the UniFi Talk application.
- (Available to business customers only) Enroll in STIR/SHAKEN Trusted Calling to enable Full Attestation (A), which requires a verified business profile. You can initiate this process from Settings > Organization in the UniFi Talk application.
- Register impacted phone number(s) with the analytics providers that support major US wireless and wireline carriers through this free registry site .
Was this article helpful?
More From Forbes
The importance of setting and tracking financial goals for your small business.

- Share to Facebook
- Share to Twitter
- Share to Linkedin
James Webster, Executive Chairman, ROK Financial .
Setting financial goals for your business may be one of your most important responsibilities as a leader and business owner.
Your financial goals serve as far more than wishful projections to attract attention from potential investors. They form the backbone of your projected road map for success, internal and external. Something that every single business should possess regardless of its market, model or size.
In my experience and role, I've had the opportunity to assist other business owners through my networks and suggest ways in which they, too, can set and track their financial goals. For example, I once heard a business owner indicate that they blindly set their financial goals. They wanted to see a 15% increase year over year. However, they weren't constantly monitoring the current state of their business or identifying throughout the year areas in which they needed to turn up or cut back expenses to make that goal attainable. We sat and discussed ways that receiving monthly reporting from their teams on sales and expenses could allow him as a leader to steer the ship in the right direction.
Data is key to all business decisions and must be used when making financial decisions. Having goals is great (and you should do so), but they should be goals that accompany your data to make them achievable.
Why You Need Tangible Goals
Setting your business goals gives you the foundation to build projections, direction, purpose and core metrics to measure your honest success and failure. You want to set these goals for risk mitigation as well as motivation and accountability.
Making tangible goals provides a solid framework for risk assessment. First, it lets you see potential financial pitfalls before they happen. Seeing, measuring and visualizing the criteria you need for success also reveals the criteria for failure. Both serve as two essential sides of the same essential coin. Especially for younger and smaller businesses relying on smaller amounts of capital. Secondly, setting realistic financial goals also allows you to create strong contingency plans for the potential pitfalls you identify. Remember, the only thing worse than being in a terrible financial situation is being in a terrible financial situation with no plan of escape.
More and more businesses are becoming aware of how creating team, department and even company goals can motivate individuals into action.
When there's a clear desired outcome, the team is more likely to harmonize together on achieving it. By clarifying specific targets and objectives with core metrics, the team members can better comprehend their collective responsibilities. This can lead directly to better communication, effort and efficiency.
How To Set Financial Goals In 5 Steps
1. evaluate your current financial state.
As a business owner, you start building financial goals by painting a clear picture of the business's current performance.
Your battle plan always starts with an in-depth analysis of your performance. Use all the information at your disposal to paint an internal and external picture. This should include assessing revenue streams, expenses, debts, cash flow or anything that can help you understand where. All of it will serve to set realistic and achievable financial goals. The more information you can draw from, the better off you'll be.
2. Define Clear Objectives
Write out what you want to achieve and be as specific as possible. The main advantage of setting goals lies in their tangibility and measurability. So committing to vague goals like "increase profits'' is only going to hinder you.
Instead, you should opt for a specific target like "boost monthly net profit by 15% within six months." Make sure to use as many solid metrics as possible when you're describing your objective. Relying on numbers will ensure that everyone understands the desired outcomes.
3. Align Them With Your Business Strategy
Your financial goals must align with your overall business strategy. This means taking into consideration factors such as company values, mission statement and long-term vision. Goals should support and contribute to the bigger picture of what you want to achieve with your business (not just financial). Any financial goal you set should align with your business strategy seamlessly. If you're aiming for market expansion, it needs to be tangibly reflected in the necessary investment and revenue targets.
4. Break Down Goals Into Achievable Milestones
Large goals can be overwhelming. When you have your own business goals, you want them to serve as guiding and motivating future achievements. If you make them feel unattainable, they can turn into looming reminders of failure—which is the opposite of what you want to see. Take all of your goals and break each down into small achievable milestones. This will also give you opportunities for celebrating incrementally on the path.
5. Assign Responsibilities
You need to assign responsibilities for each separate goal. One good method for doing this is assigning key teams or departments to a specific financial goal. Make each one responsible for driving the initiatives associated with the financial objectives. Initiate a plan of action and milestones that should be met to achieve a set goal.
Allow your team to feel a deep sense of shared achievement. Make each department responsible for a portion of that goal; this way they have a sense of the company win being their win as well.
Tips For Keeping Track Of Small-Business Finances
Your financial goals need to be tangible, solid and measurable. You'll notice a crystal clear correlation between how effective your financial projections are and how measurable they can be. Plus, if you don't make them coherent, they'll become detrimental to your decision-making process instead of helpful.
Regularly Reconcile Accounts
You should be reconciling everything from bank statements to credit card statements, or anything else you can use to paint a financial picture. In fact, every responsible business owner should be doing this consistently. Regularly reconciling your accounts ensures that your records are accurately reflecting your transactions. This information is not just for your financial goals. It also factors into the general management of your assets and capital. Reconciling your accounts will serve as one of your primary methods for identifying financial discrepancies.
Monitor Cash Flow
Monitoring your cash flow is another source of financial information you should be measuring constantly. This should be something that you're doing well before you even begin to make financial projections, and should be taken into consideration when making those projections. It should be a pillar of all your future goals. And it should serve as another core metric of how well your goals are being met as you move forward.
Remember, financial goals aren't just numbers on a spreadsheet. They're the heartbeat of your business's financial health. But they also serve as a means to unite and motivate your staff. Creating a healthy and competitive culture that is all the more qualified to achieve success. Both the short-term and long-term.
Forbes Finance Council is an invitation-only organization for executives in successful accounting, financial planning and wealth management firms. Do I qualify?

- Editorial Standards
- Reprints & Permissions
- Environment
- Science & Technology
- Business & Industry
- Health & Public Welfare
- Topics (CFR Indexing Terms)
- Public Inspection
- Presidential Documents
- Document Search
- Advanced Document Search
- Public Inspection Search
- Reader Aids Home
- Office of the Federal Register Announcements
- Using FederalRegister.Gov
- Understanding the Federal Register
- Recent Site Updates
- Federal Register & CFR Statistics
- Videos & Tutorials
- Developer Resources
- Government Policy and OFR Procedures
- Congressional Review
- My Clipboard
- My Comments
- My Subscriptions
- Sign In / Sign Up
- Site Feedback
- Search the Federal Register
This site displays a prototype of a “Web 2.0” version of the daily Federal Register. It is not an official legal edition of the Federal Register, and does not replace the official print version or the official electronic version on GPO’s govinfo.gov.
The documents posted on this site are XML renditions of published Federal Register documents. Each document posted on the site includes a link to the corresponding official PDF file on govinfo.gov. This prototype edition of the daily Federal Register on FederalRegister.gov will remain an unofficial informational resource until the Administrative Committee of the Federal Register (ACFR) issues a regulation granting it official legal status. For complete information about, and access to, our official publications and services, go to About the Federal Register on NARA's archives.gov.
The OFR/GPO partnership is committed to presenting accurate and reliable regulatory information on FederalRegister.gov with the objective of establishing the XML-based Federal Register as an ACFR-sanctioned publication in the future. While every effort has been made to ensure that the material on FederalRegister.gov is accurately displayed, consistent with the official SGML-based PDF version on govinfo.gov, those relying on it for legal research should verify their results against an official edition of the Federal Register. Until the ACFR grants it official status, the XML rendition of the daily Federal Register on FederalRegister.gov does not provide legal notice to the public or judicial notice to the courts.
Design Updates: As part of our ongoing effort to make FederalRegister.gov more accessible and easier to use we've enlarged the space available to the document content and moved all document related data into the utility bar on the left of the document. Read more in our feature announcement .
Proposed Memorandum of Understanding (MOU) Assigning Certain Federal Environmental Responsibilities to the State of Maine, Including National Environmental Policy Act (NEPA) Authority for Certain Categorical Exclusions (CEs)
A Notice by the Federal Highway Administration on 08/14/2024
This document has a comment period that ends in 27 days. (09/13/2024) Submit a formal comment
Thank you for taking the time to create a comment. Your input is important.
Once you have filled in the required fields below you can preview and/or submit your comment to the Transportation Department for review. All comments are considered public and will be posted online once the Transportation Department has reviewed them.
You can view alternative ways to comment or you may also comment via Regulations.gov at https://www.regulations.gov/commenton/FHWA-2024-0058-0001 .
- What is your comment about?
Note: You can attach your comment as a file and/or attach supporting documents to your comment. Attachment Requirements .
this will NOT be posted on regulations.gov
- Opt to receive email confirmation of submission and tracking number?
- Tell us about yourself! I am... *
- First Name *
- Last Name *
- State Alabama Alaska American Samoa Arizona Arkansas California Colorado Connecticut Delaware District of Columbia Florida Georgia Guam Hawaii Idaho Illinois Indiana Iowa Kansas Kentucky Louisiana Maine Maryland Massachusetts Michigan Minnesota Mississippi Missouri Montana Nebraska Nevada New Hampshire New Jersey New Mexico New York North Carolina North Dakota Ohio Oklahoma Oregon Pennsylvania Puerto Rico Rhode Island South Carolina South Dakota Tennessee Texas Utah Vermont Virgin Islands Virginia Washington West Virginia Wisconsin Wyoming
- Country Afghanistan Åland Islands Albania Algeria American Samoa Andorra Angola Anguilla Antarctica Antigua and Barbuda Argentina Armenia Aruba Australia Austria Azerbaijan Bahamas Bahrain Bangladesh Barbados Belarus Belgium Belize Benin Bermuda Bhutan Bolivia, Plurinational State of Bonaire, Sint Eustatius and Saba Bosnia and Herzegovina Botswana Bouvet Island Brazil British Indian Ocean Territory Brunei Darussalam Bulgaria Burkina Faso Burundi Cambodia Cameroon Canada Cape Verde Cayman Islands Central African Republic Chad Chile China Christmas Island Cocos (Keeling) Islands Colombia Comoros Congo Congo, the Democratic Republic of the Cook Islands Costa Rica Côte d'Ivoire Croatia Cuba Curaçao Cyprus Czech Republic Denmark Djibouti Dominica Dominican Republic Ecuador Egypt El Salvador Equatorial Guinea Eritrea Estonia Ethiopia Falkland Islands (Malvinas) Faroe Islands Fiji Finland France French Guiana French Polynesia French Southern Territories Gabon Gambia Georgia Germany Ghana Gibraltar Greece Greenland Grenada Guadeloupe Guam Guatemala Guernsey Guinea Guinea-Bissau Guyana Haiti Heard Island and McDonald Islands Holy See (Vatican City State) Honduras Hong Kong Hungary Iceland India Indonesia Iran, Islamic Republic of Iraq Ireland Isle of Man Israel Italy Jamaica Japan Jersey Jordan Kazakhstan Kenya Kiribati Korea, Democratic People's Republic of Korea, Republic of Kuwait Kyrgyzstan Lao People's Democratic Republic Latvia Lebanon Lesotho Liberia Libya Liechtenstein Lithuania Luxembourg Macao Macedonia, the Former Yugoslav Republic of Madagascar Malawi Malaysia Maldives Mali Malta Marshall Islands Martinique Mauritania Mauritius Mayotte Mexico Micronesia, Federated States of Moldova, Republic of Monaco Mongolia Montenegro Montserrat Morocco Mozambique Myanmar Namibia Nauru Nepal Netherlands New Caledonia New Zealand Nicaragua Niger Nigeria Niue Norfolk Island Northern Mariana Islands Norway Oman Pakistan Palau Palestine, State of Panama Papua New Guinea Paraguay Peru Philippines Pitcairn Poland Portugal Puerto Rico Qatar Réunion Romania Russian Federation Rwanda Saint Barthélemy Saint Helena, Ascension and Tristan da Cunha Saint Kitts and Nevis Saint Lucia Saint Martin (French part) Saint Pierre and Miquelon Saint Vincent and the Grenadines Samoa San Marino Sao Tome and Principe Saudi Arabia Senegal Serbia Seychelles Sierra Leone Singapore Sint Maarten (Dutch part) Slovakia Slovenia Solomon Islands Somalia South Africa South Georgia and the South Sandwich Islands South Sudan Spain Sri Lanka Sudan Suriname Svalbard and Jan Mayen Swaziland Sweden Switzerland Syrian Arab Republic Taiwan, Province of China Tajikistan Tanzania, United Republic of Thailand Timor-Leste Togo Tokelau Tonga Trinidad and Tobago Tunisia Turkey Turkmenistan Turks and Caicos Islands Tuvalu Uganda Ukraine United Arab Emirates United Kingdom United States United States Minor Outlying Islands Uruguay Uzbekistan Vanuatu Venezuela, Bolivarian Republic of Viet Nam Virgin Islands, British Virgin Islands, U.S. Wallis and Futuna Western Sahara Yemen Zambia Zimbabwe
- Organization Type * Company Organization Federal State Local Tribal Regional Foreign U.S. House of Representatives U.S. Senate
- Organization Name *
- You are filing a document into an official docket. Any personal information included in your comment text and/or uploaded attachment(s) may be publicly viewable on the web.
- I read and understand the statement above.
- Preview Comment
This document has been published in the Federal Register . Use the PDF linked in the document sidebar for the official electronic format.
- Document Details Published Content - Document Details Agencies Department of Transportation Federal Highway Administration Agency/Docket Number Docket No. FHWA-2024-0058 Document Citation 89 FR 66170 Document Number 2024-18085 Document Type Notice Pages 66170-66172 (3 pages) Publication Date 08/14/2024 Published Content - Document Details
- View printed version (PDF)
- Document Dates Published Content - Document Dates Comments Close 09/13/2024 Dates Text Comments must be received on or before September 13, 2024. Published Content - Document Dates
This table of contents is a navigational tool, processed from the headings within the legal text of Federal Register documents. This repetition of headings to form internal navigation links has no substantive legal effect.
FOR FURTHER INFORMATION CONTACT:
Supplementary information:, electronic access and filing.
Comments are being accepted - Submit a public comment on this document .
FederalRegister.gov retrieves relevant information about this document from Regulations.gov to provide users with additional context. This information is not part of the official Federal Register document.
Notice of Proposed Memorandum of Understanding (MOU) Assigning Certain Federal Environmental Responsibilities to the State of Maine, Including National Environmental Policy Act (NEPA) Authority for Certain Categorical Exclusions (CEs)
- Sharing Enhanced Content - Sharing Shorter Document URL https://www.federalregister.gov/d/2024-18085 Email Email this document to a friend Enhanced Content - Sharing
- Print this document
Document page views are updated periodically throughout the day and are cumulative counts for this document. Counts are subject to sampling, reprocessing and revision (up or down) throughout the day.
This document is also available in the following formats:
More information and documentation can be found in our developer tools pages .
This PDF is the current document as it appeared on Public Inspection on 08/13/2024 at 8:45 am.
It was viewed 0 times while on Public Inspection.
If you are using public inspection listings for legal research, you should verify the contents of the documents against a final, official edition of the Federal Register. Only official editions of the Federal Register provide legal notice of publication to the public and judicial notice to the courts under 44 U.S.C. 1503 & 1507 . Learn more here .
Document headings vary by document type but may contain the following:
- the agency or agencies that issued and signed a document
- the number of the CFR title and the number of each part the document amends, proposes to amend, or is directly related to
- the agency docket number / agency internal file number
- the RIN which identifies each regulatory action listed in the Unified Agenda of Federal Regulatory and Deregulatory Actions
See the Document Drafting Handbook for more details.
Department of Transportation
Federal highway administration.
- [Docket No. FHWA-2024-0058]
Federal Highway Administration (FHWA), DOT.
Notice of proposed MOU; request for comments.
The FHWA and the State of Maine, acting by and through its Department of Transportation (State), propose a MOU providing participation of the State in the Categorical Exclusion Assignment program. This program allows FHWA to assign its authority and responsibility for determining whether certain designated activities within the geographic boundaries of the State, as specified in the proposed MOU, are categorically excluded from preparation of an environmental assessment or an environmental impact statement under the National Environmental Policy Act.
Comments must be received on or before September 13, 2024.
You may submit comments, identified by Docket Number FHWA-2024-0058, by any of the methods described below. To ensure that you do not duplicate your submissions, please submit them by only one of the following means:
- Federal eRulemaking Portal: Go to www.regulations.gov and follow the online instructions for submitting comments.
- Mail: U.S. Department of Transportation, Docket Operations, 1200 New Jersey Avenue SE, Room W12-140, Washington, DC 20590-0001.
- Hand Delivery or Courier: U.S. Department of Transportation, Docket Operations, West Building Ground Floor, Room W12-140, 1200 New Jersey Avenue SE, Washington, DC, between 9:00 a.m. and 5:00 p.m. ET, except Federal holidays.
Instructions: You must include the agency name and docket number FHWA-2024-0058 at the beginning of your comments. All comments received will be posted without change to www.regulations.gov , including any personal information provided.
For FHWA: Gary Scholze; by email at [email protected] or by telephone at 207-512-4917. The Maine Division ( print page 66171) Office's normal business hours are 8 a.m. to 5 p.m. (eastern standard time), Monday through Friday, except Federal holidays. For the State of Maine: Kristen Chamberlain; by email at [email protected] or by telephone at 207-557-5089. The Maine Department of Transportation's business hours are 7:30 a.m. to 4:30 p.m. (eastern standard time), Monday through Friday, except State and Federal holidays.
This document, a complete copy of the proposed MOU, background documents, and comments received may be viewed online through the Federal eRulemaking portal at www.regulations.gov . The website is available 24 hours each day, 365 days each year. An electronic copy of this document may also be downloaded by accessing the Office of the Federal Register's website at www.federalregister.gov and the Government Publishing Office's website at www.govinfo.gov . This document is also available on the Maine Department of Transportation (MDOT) website at https://www.maine.gov/mdot/env/NEPA/assignment/index.shtml .
Section 326 of title 23, United States Code (U.S.C.), creates a program that allows the Secretary of the U.S. Department of Transportation (Secretary), to assign, and a State to assume, responsibility for determining whether certain highway projects are included within classes of action that are categorically excluded (CE) from requirements for environmental assessments or environmental impact statements pursuant to the National Environmental Policy Act of 1969, 42 U.S.C. 4321 et seq. (NEPA). In addition, this program allows the assignment of other environmental review requirements applicable to Federal highway projects. The FHWA is authorized to act on behalf of the Secretary with respect to these matters.
The FHWA would execute Maine's participation in this program through an MOU. Statewide decisionmaking responsibility would be assigned for all activities identified in the MOU within the categories listed in 23 CFR 771.117(c) and those listed as examples in 23 CFR 771.111(d) , and any activities added through FHWA rulemaking to those listed in 23 CFR 771.117(c) or example activities listed in 23 CFR 771.117(d) after the date of the execution of this MOU. In addition to the NEPA CE determination responsibilities, the MOU would assign to the State the responsibility for conducting Federal environmental review, consultation, and other related activities for projects that are subject to the MOU with respect to the following Federal laws and Executive Orders:
Clean Air Act (CAA), 42 U.S.C. 7401-7671q . Including determinations for project-level conformity if required for the project, except as specified in Stipulation II.B.2 of the MOU
- Noise Control Act of 1972, 42 U.S.C. 4901-4918
- Compliance with the noise regulations in 23 CFR part 772 (except approval of the State noise policy in accordance with 23 CFR 772.7 )
- Section 7 of the Endangered Species Act of 1973, 16 U.S.C. 1531-1544 , and 1536
- Fish and Wildlife Coordination Act, 16 U.S.C. 661-667d
- Migratory Bird Treaty Act, 16 U.S.C. 703-712
- Bald and Golden Eagle Treaty Act, as amended, 16 U.S.C. 668-668c
- Section 106 of the National Historic Preservation Act of 1966, as amended, 54 U.S.C. 306108
- Archeological Resources Protection Act of 1979, 16 U.S.C. 470aa -mm
- Title 54, Chapter 3125—Preservation of Historical and Archeological Data, 54 U.S.C. 312501-312508
- Native American Grave Protection and Repatriation Act (NAGPRA), 25 U.S.C. 3001-3013 ; 18 U.S.C. 1170
- American Indian Religious Freedom Act, 42 U.S.C. 1996
- Farmland Protection Policy Act (FPPA), 7 U.S.C. 4201-4209
- Clean Water Act, 33 U.S.C. 1251-1377 , Sections 401, 404, and 319
- Rivers and Harbors Act of 1899, 33 U.S.C. 403
- Wild and Scenic Rivers Act, 16 U.S.C. 1271-1287
- Emergency Wetlands Resources Act, 16 U.S.C. 3921 , 3931
- Wetlands Mitigation, 23 U.S.C.103(b)(6)(m) , 133(b)(3)
- FHWA wetland and natural habitat mitigation regulations, 23 CFR part 777
- Flood Disaster Protection Act, 42 U.S.C. 4001-4128
- Safe Drinking Water Act (SDWA), 42 U.S.C. 300f-300j-6
- Section 4(f) of the Department of Transportation Act of 1966, 23 U.S.C. 138 and 49 U.S.C. 303 ; and 23 CFR part 774
- Land and Water Conservation Fund (LWCF), Public Law 88-578, 78 Stat. 897 (known as Section 6(f))
- Comprehensive Environmental Response, Compensation, and Liability Act (CERCLA), 42 U.S.C. 9601-9675
- Superfund Amendments and Reauthorization Act of 1986 (SARA), 42 U.S.C. 9671-9675
- Resource Conservation and Recovery Act (RCRA), 42 U.S.C. 6901-6992k
- Landscaping and Scenic Enhancement (Wildflowers), 23 U.S.C. 319
- E.O. 11990 , Protection of Wetlands
- E.O. 11988 , Floodplain Management (except approving design standards and determinations that a significant encroachment is the only practicable alternative under 23 CFR 650.113 and 650.115 )
- E.O. 12898 , Federal Actions to Address Environmental Justice in Minority Populations and Low Income Populations
- E.O. 11593 , Protection and Enhancement of Cultural Resources
- E.O. 13007 , Indian Sacred Sites
- E.O. 13175 , Consultation and Coordination with Indian Tribal Governments
- E.O. 13122 and E.O. 13751 , Invasive Species
- E.O. 13985 , Advancing Racial Equity and Support for Underserved Communities Through the Federal Government
- Planning and Environmental Linkages, 23 U.S.C. 168 , except for those FHWA responsibilities associated with 23 U.S.C. 134 and 135
- Programmatic Mitigation Plans, 23 U.S.C. 169 , except for those FHWA responsibilities associated with 23 U.S.C. 134 and 135 .
The MOU allows the State to act in the place of FHWA in carrying out the functions described above, except with respect to government-to-government consultations with federally recognized Indian Tribes. The FHWA will retain responsibility for conducting formal government-to-government consultation with federally recognized Indian Tribes, which is required under some of the above-listed laws and Executive Orders. The State may also assist FHWA with formal consultations, with consent of a Tribe, but FHWA remains responsible for the consultation.
This assignment includes transfer to the State of Maine the obligation to fulfill the assigned environmental responsibilities on any proposed projects meeting the criteria in Stipulation 1(B) of the MOU that were determined to be CEs prior to the effective date of the proposed MOU but that have not been completed as of the effective date of the MOU.
The FHWA will consider the comments submitted on the proposed MOU when making its decision on whether to execute this MOU. The ( print page 66172) FHWA will make the final, executed MOU publicly available.
(Catalog of Federal Domestic Assistance Program Number 20.205, Highway Planning and Construction. The regulations implementing Executive Order 12372 regarding intergovernmental consultation on Federal programs and activities apply to this program.)
Authority: 23 U.S.C. 326 ; 42 U.S.C. 4331 , 4332 ; 23 CFR 771.117 ; 40 CFR 1507.3 , 1508.4 .
Todd Jorgensen,
Division Administrator, Federal Highway Administration.
[ FR Doc. 2024-18085 Filed 8-13-24; 8:45 am]
BILLING CODE 4910-22-P
- Executive Orders
Reader Aids
Information.
- About This Site
- Legal Status
- Accessibility
- No Fear Act
- Continuity Information

Schedule work to assign later
Orchestrate classwork ahead of time! Create assignments in Microsoft Teams for Education now, set dates to automatically post them to your class later.
Create a new assignment
Navigate to your desired classroom and select Assignments .

Give your assignment a title—this is required.
Assign work to multiple classes or individual students using the dropdowns. Your assignment will default to All Students in the current class.
Note: You can only assign work to individual students in one class at a time.

Finish adding details to your assignment:
Assignment title (required)
Instructions (optional)
Set points available using any denominator you wish. For example: 100 points or 4.0. (optional)
Attach resources to the assignment by selecting Attach or +New . You can attach a blank Word, Excel, or PowerPoint file for your students to turn in during this step (optional).
Add a category (optional).
Select Add rubric to add a grading rubric.
Select Schedule . Students will be notified of their new assignment on the day you chose.
The scheduled assignment will appear on your list of assigned work.

Create an assignment
Edit an assignment
Delete an assignment

Need more help?
Want more options.
Explore subscription benefits, browse training courses, learn how to secure your device, and more.

Microsoft 365 subscription benefits

Microsoft 365 training

Microsoft security

Accessibility center
Communities help you ask and answer questions, give feedback, and hear from experts with rich knowledge.

Ask the Microsoft Community

Microsoft Tech Community

Windows Insiders
Microsoft 365 Insiders
Was this information helpful?
Thank you for your feedback.
- Help Center
- Assignments
- Privacy Policy
- Terms of Service
- Submit feedback
Learn how Assignments LTI™ works
Assignments is an add-on application for learning management systems (LMSs) to help you distribute, analyze, and grade student work with Google Workspace for Education.
For file submissions, Assignments make Google Docs, Google Sheets, Google Slides, and Google Drive compatible with your LMS. You can use Assignments to save time distributing and grading student work, and analyze student submissions with originality reports to ensure authenticity.
You use Assignments as a Learning Tools Interoperability (LTI) tool integrated within your LMS. It works with any LMS that supports LTI version 1.1 or higher, such as Canvas, Schoology, Blackboard, Moodle, and others.
Adding Assignments to your LMS might require assistance from your LMS administrator. If you have never set up an add-on application or external tool for your LMS before, talk to your IT or LMS admin about setting up Assignments in Canvas, Schoology, or another LMS.
Get started with Assignments
Assignments workflow
Step 1: instructor creates an assignment.
- (Required) Setting the point value
- (Optional) Setting the due date
- (Optional) Adding a grading rubric
- (Optional) Attaching assignment files to make a copy for each student to edit and submit
- (Optional) Enabling originality reports
Step 2: Students submit their assignments
- Google Docs, Sheets, Slides, Sites, and Drawings
- Microsoft®️ Word®️, Excel®️, or PowerPoint®️
- Image files
- Video files (WEBM, MPEG4, 3GPP, MOV, AVI, MPEG-PS, WMV, FLV, OGG)
- They no longer have edit or comment access to their original file.
- Assignments makes a copy of the submitted file and saves it to the student's Drive.
For more details, go to How instructors and students share files .
Step 3: Instructor grades and returns assignments
- Ownership of the file returns to the student.
- Assignments archives a copy of the graded file and saves it to the instructor's Drive.
- Grades are saved to the LMS grade book.
General FAQ
Does my organization need google workspace for education to use assignments, where and in what languages is assignments available, how much does assignments cost, what browsers are supported, does assignments work on mobile devices, is assignments built for accessibility, grading faq, does assignments have plagiarism detection, does assignments support rubric grading, can i save draft grades or feedback outside the student’s view, can classwork be returned individually or all at once.
- Leave draft grades and overall feedback.
- Return to the list of students.
- Check the boxes for all the students whose assignments you want to return.
- Click Return .
Can I return classwork without a grade?
Can returned classwork be resubmitted or regraded.
- To provide context for giving a new grade, the previous grade is displayed next to the grade field. Only the most recent grade syncs to the LMS.
- Previous overall feedback is displayed and new overall feedback open in a separate text box.
Can co-instructors grade assignments?
Do grades sync to the lms, class management faqs, can instructors see all their linked courses & assignments, can instructors delete courses & assignments.
Instructors who own courses can delete courses and assignments. Learn how to delete courses and assignments .
Does Assignments support group assignments?
- Tell each group to create a Google Doc and share it with group members for editing.
- Have the owner of the file submit the assignment for grading.
- Grade the assignment, leaving overall feedback as a margin comment or suggestion. Tip : The overall feedback field is visible only to the owner of the file and not to the group.
- In your grade book, record the grade for the other group members.
Does Assignments support peer review of assignments?
- Ask your students to start their assignments in Docs.
- Tell students to share their files with their peer reviewer.
- In Docs, peer reviewers leave margin comments and suggestions.
- Have students turn in their assignments, leaving in the reviewer’s comments and suggestions.Alternatively, students can review, implement, and resolve reviewer comments and instructors can view version history.
- Grade the assignments.
- (Optional) Record a separate grade for peer reviews.
Will Assignments work in a course copied in my LMS?
- Total points
- Settings for originality reports
- Attachments
- Use Assignments LTI version 1.3 for best results.
- Copied assignments can only be opened by students after an instructor links the Assignment to their account. Learn about linking your account to Assignments .
- Make sure the person who copies the course is in the same Google Workspace for Education organization as the course creator or is on the organization’s allow list. Learn more about how to manage your organization’s allow lists .
- Don’t edit or delete the original assignment or its attachments.
Need more help?
Try these next steps:.

Ex All-Star set to begin rehab stint, setting stage for Red Sox debut in September
- Published: Aug. 15, 2024, 8:10 p.m.

Liam Hendriks could begin his rehab start Sunday. (Photo by Maddie Malhotra/Boston Red Sox/Getty Images) Getty Images
- Chris Cotillo | [email protected]
BALTIMORE — Red Sox reliever Liam Hendriks is about to start the final step he needs to take before joining the team’s bullpen, but that doesn’t mean his activation is imminent.
Barring any setbacks in the next couple days, Hendriks is expected to began a rehab stint Sunday at Worcester, according to manager Alex Cora. It’ll mark Hendriks’ first game action since June 9, 2023, when he threw his final pitch for the White Sox before needing Tommy John surgery two months later. Hendriks threw three live batting practice sessions over the course of the last eight days, including a final one Wednesday at Fenway .
The Red Sox want Hendriks to simulate spring training as he ramps up. With that in mind, he’s expected to make somewhere in the range of 6-8 appearances in the minors.
“I think we’re shooting for seven,” Cora said. “All depends. I do believe he’s ready for a rehab assignment. Of course, physically, that’s another story to see how he reacts. We’re not going to compromise one day for him to get here sooner rather than later. It’s one day, or a few days. Whatever we have to do to get him on the mound, we’ll do. (The training staff) is really good at what they do. We’ve got to trust them.”
The Red Sox will need to see Hendriks jump multiple hurdles on his rehab assignment before activating him. The righty will certainly need to show the ability to pitch in back-to-back games by the end of the stint. With that in mind, it’s likely he’ll spend at least a couple weeks with the WooSox, putting a potential return date near Sept. 1, at the earliest.
Hendriks, a three-time All-Star who signed a two-year, $10 million deal with the Sox during spring training, will give Cora another high-potential option at the end of a bullpen that has struggled throughout the season’s second half. While the Red Sox aren’t counting on the 35-year-old to save the season or serve as closer, the group is excited for the potential of having Hendriks pitch in meaningful games before returning fully healthy for 2025 .
“From the competitive-side, you saw it. He’s ready to compete,” Cora said. “There’s effort behind (it). Conviction. Obviously, we have to be very careful. This is not about the team, actually. It’s about the player.”
If you purchase a product or register for an account through a link on our site, we may receive compensation. By using this site, you consent to our User Agreement and agree that your clicks, interactions, and personal information may be collected, recorded, and/or stored by us and social media and other third-party partners in accordance with our Privacy Policy.
IMAGES
COMMENTS
Assign Your Assignments to Us. Our mission is to provide exceptional academic writing solutions to students helping them improve their critical thinking, learning, and academic success. We aim to provide wide services with client-centric approaches that empower education and maintain ethical integrity.
Create an assignment in Microsoft Teams for Education and assign it to individual or small groups of students in a class. Groups turn in one copy of the assignment that can be graded separately or together.
Learn how to create assignments and materials for your students to access in Google Classroom.
Easily distribute, analyze, and grade student work with Assignments for your LMS. Assignments is an application for your learning management system (LMS). It helps educators save time grading and guides students to turn in their best work with originality reports — all through the collaborative power of Google Workspace for Education.
Use the Assign tab to create an assignment. From your teacher dashboard: select the class you want to create an assignment. Click the Assign tab under Assignments and select the content you want the student (s) to work on using the checkboxes. Assignments can be made for specific students, for an entire class, or for multiple class periods all ...
Follow the steps above to create an assignment and select classes. To schedule the same assignment across multiple classes, make sure to select all classes you want to include. Next to Assign, click the Down arrow Schedule. Next to the date, click the Down arrow and select a publish date and time for each class.
This handout will help you unravel your assignment and begin to craft an effective response. Much of the following advice will involve translating typical assignment terms and practices into meaningful clues to the type of writing your instructor expects. See our short video for more tips.
Teachers & coaches. Making assignments and mastery goals for your students.
Create an assignment Use Assignments to create, collect, and give feedback on assignments in a learning management system (LMS).
Selecting a future start date will give your students the assignment on that date Students will see the assignments listed in order by the due date, with assignments due soonest will show up at the top of their list. If you would like to sequence the assignments in a specific order, assign them with slightly different due dates.
View and navigate your assignments (educator) Manage assignments on a mobile device. Grade, return, and reassign assignments. Delete an assignment in Microsoft Teams. Create group assignments or assign to individual students. Create and manage grading rubrics in Microsoft Teams. Add MakeCode activities to assignments in Microsoft Teams.
Create assignments for your students in Microsoft Teams for Education. Manage assignment timelines, add instructions, create resources to turn in, and more.
When creating an assignment, you will want to complete the following steps: Title your assignment. Write instructions. Select which subject this assignment is for. Create a point value (if the assignment is being graded) Select a due date. Select or create a topic (This will make it easy for you and your students to filter through assignments ...
Assignments, an application for your learning management system, gives educators a faster, simpler way to distribute, analyze, and grade student work - all while using the collaborative power of Google Workspace.
Provide more efficient, timely, and meaningful grading and feedback. Create and edit assignments, see submission details, view submissions, associate assignments to rubrics and competencies, and return submissions with grades and feedback. On paper and observed in person assignment formats are also available. The Create…
Getting started on an assignment or homework can often times be the hardest step. Putting off the assignment can make the problem worse, reducing the time you have to complete the task and increasing stress. By learning how to get started...
Here are some general suggestions and questions to consider when creating assignments. There are also many other resources in print and on the web that provide examples of interesting, discipline-specific assignment ideas. Consider your learning objectives. What do you want students to learn in your ...
Create an assignment. You can create assignments in content areas, learning modules, lesson plans, and folders. From the Assessments menu, select Assignment and provide the name, instructions, and the files students need. You can use the functions in the editor to format text and add files. You can also add files in the Assignment Files section.
Assignments are the work you do for your class in WebAssign, and might include homework assignments, labs, quizzes, or tests, depending on your instructor. Your instructor creates your assignments, schedules them, and sets guidelines such as: How many times you can submit an assignment. If you can have extensions of due dates.
At the top, click Create Assignment. Enter the title and any instructions. You can continue to edit and customise your assignment. Otherwise, if you're ready, see below to post, schedule or save your assignment. Select additional classes. Assignments to multiple classes go to all of the students in those classes.
Learn how to create a classroom to start creating assignments for it. You can invite/add students to your classroom before or after creating an assignment.
Marketing document from University of Florida, 17 pages, ADV3403 - Branding Assignment #1 - Audit of Competitive Brand Elements Your Name (first, last) UFID#: Date: Reminders • Pick three brands that compete in the same category • Gather and resize brand elements listed on the template for each of your three b
Navigate to Assignments > Users and click Add User in the top right. Enter the user's first name, last name, and extension in the respective text fields. If you do not assign an extension, the UniFi Talk application will do so automatically. You may also add an email to allow the user to receive voicemail notifications.
Setting financial goals for your business may be one of your most important responsibilities as a leader and business owner.
The FHWA and the State of Maine, acting by and through its Department of Transportation (State), propose a MOU providing participation of the State in the Categorical Exclusion Assignment program. This program allows FHWA to assign its authority and responsibility for determining whether certain...
Select Create>Assignment. Give your assignment a title—this is required. Assign work to multiple classes or individual students using the dropdowns. Your assignment will default to All Students in the current class. Note: You can only assign work to individual students in one class at a time. Beneath the Date due and Time due fields, select ...
With Triston Casas coming back tonight, it's the end of the Dom Smith era in Boston. He has been designated for assignment.
Learn how Assignments LTI™ works Assignments is an add-on application for learning management systems (LMSs) to help you distribute, analyze, and grade student work with Google Workspace for Education.
The Red Sox will need to see Hendriks jump multiple hurdles on his rehab assignment before activating him. The righty will certainly need to show the ability to pitch in back-to-back games by the ...
AI writing detectors like Turnitin and GPTZero suffer from false positives. Here's the advice of academics, AI scientists and students on how to deal with it.