Cool Science Experiments Headquarters
Making Science Fun, Easy to Teach and Exciting to Learn!
Science Experiments

Egg in Vinegar Science Experiment – How to Make a Bouncy Egg
Hold on to your eggs because this egg in vinegar science experiment might have your kids bouncing along with these bouncy raw eggs. Kids will discover how a chemical reaction can dissolve what seems solid into something that feels more like a bouncy ball!
Watch the video, print out the instructions, then try it for yourself. Our simple scientific explanation helps kids see and feel the results of chemical reactions while learning how it works.
JUMP TO SECTION: Instructions | Video Tutorial | How it Works
Supplies Needed
- Glass or Jar
Bouncy Egg Science Lab Kit – Only $5
Use our easy Bouncy Egg Science Lab Kit to grab your students’ attention without the stress of planning!
It’s everything you need to make science easy for teachers and fun for students — using inexpensive materials you probably already have in your storage closet!
Egg in Vinegar Science Experiment Instructions
Experiment Setup – Start with some observations about the egg. Explain that it is a raw egg and that that the shell is fragile and can easily be cracked. Demonstrate this with another egg. Then ask some questions. Does it seem possible that we can get the egg to bounce? Next observe the supplies for the experiment. What do you think will happen if you put the egg in vinegar? Write down your hypothesis (prediction) and then follow the steps below.
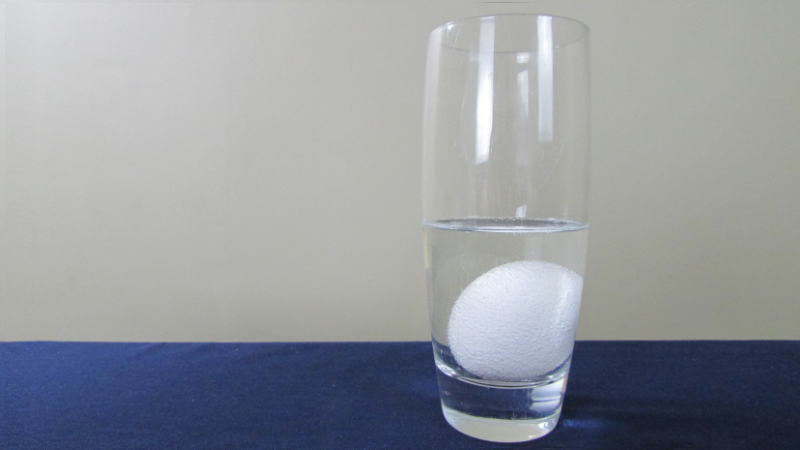
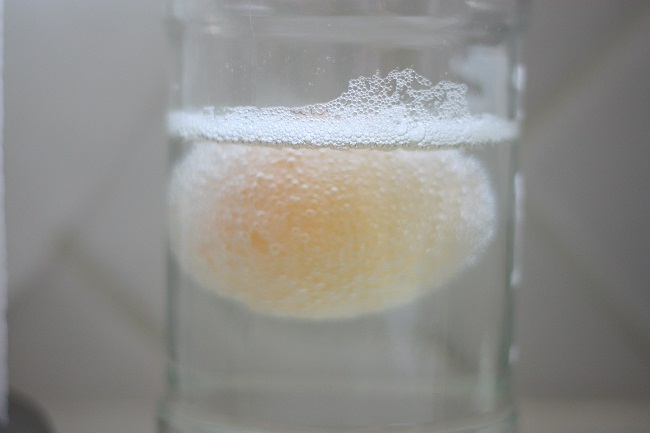
Step 1 – Get a raw egg and carefully place it into a glass or jar. Then fill the glass with white vinegar until the egg is completely submerged.
Step 2 – Leave the egg in the glass for 2-3 days. Each day, check back on the egg. Make some observations. Do you notice any changes to the egg? Is anything happening to the vinegar? Write down your observations each day. After about 3 days the egg will start to become translucent and you will know it is ready to move to step 3.
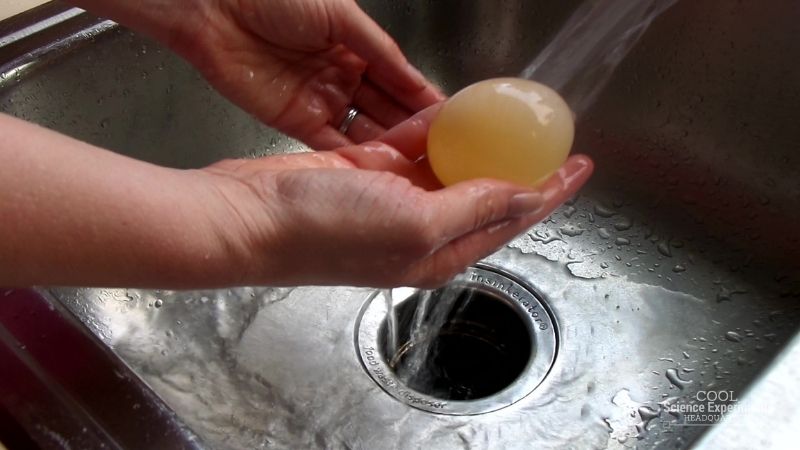
Step 3 – Carefully remove the egg from the glass and rinse it under some tap water. While rinsing the egg, gently rub the outside of the egg and the white film will come off leaving you with a translucent egg. Examine the egg and make some observations. Does the egg look different from when you started the experiment? Does the egg feel different? Perhaps you notice that it feels rubbery (like a bouncy ball). Write down your observations.
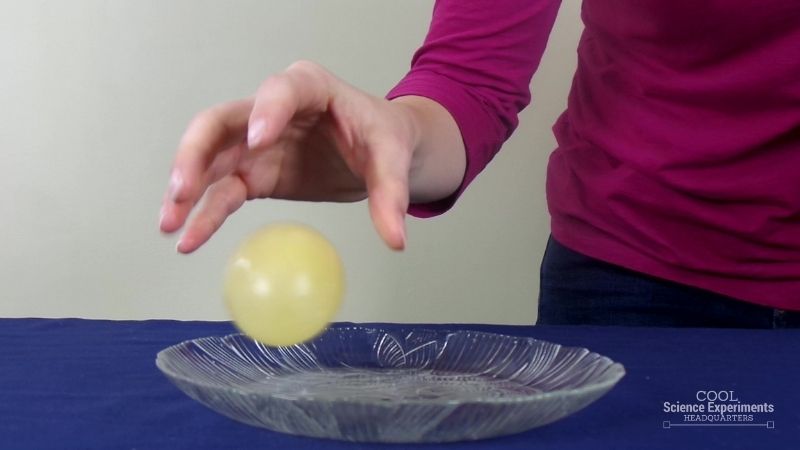
Step 4 – Over a plate or other container, lift the egg 1-2 inches in the air, let go, and watch it bounce. Make some observations. What happens to the egg? Does it bounce? Is this different than what you expected?
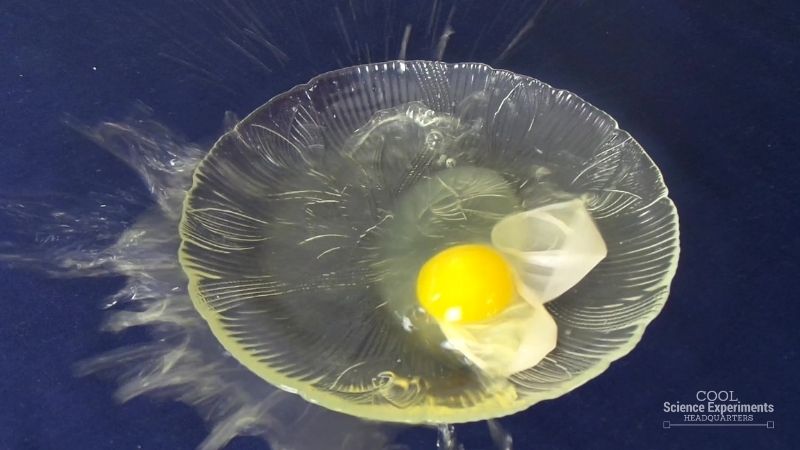
Step 5 – When you are ready for some messy fun, lift the egg a little higher in the air and let it go…SPLAT!
Wondering what caused the egg to bounce? Find out the answer in the how does this experiment work section below.
Video Tutorial
Watch the Bouncy Egg in Vinegar Science Experiment Step by Step Instructions
How Does the Bouncy Egg Science Experiment Work
The egg becomes bouncy as a result of a chemical reaction between the eggshell and the vinegar. The eggshell of a chicken egg is made of calcium carbonate, and vinegar is a weak acid. If you’ve ever mixed baking soda and vinegar together, you know the violent reaction that results. The calcium carbonate that makes up the eggshell will react with the vinegar the same way baking soda reacts with vinegar (just a lot less violently). You know the vinegar and calcium carbonate of the eggshell are reacting because of the small bubbles that form around the egg when it is placed in the vinegar. These small bubbles are carbon dioxide gas, which are the result of the reaction between calcium carbonate and vinegar.
Once the shell of the egg is gone, all that is left covering the egg is a thin membrane. The vinegar begins working on the egg’s membrane. The membrane of a chicken egg is selectively permeable . The vinegar is able to cross the selectively permeable membrane of the egg through osmosis . The vinegar toughens up the membrane of the egg making it bouncy!
The selectively permeable membrane of the egg means that some substances can pass through the membrane while others cannot. Osmosis is the diffusion of solvent molecules through a selectively permeable membrane.
Other Ideas to Try
Try other acids like lemon juice. Does it have the same effect on the eggshell? Try other types of eggs – white vs. brown shells, regular vs. organic eggs, maybe you can even find some unusual egg types at your local grocery store to experiment with (turkey, duck, quail eggs).
I hope you enjoyed the experiment. Here are some printable instructions:

Bouncy Egg Science Experiment
Instructions.
- Get a raw egg and carefully place it into a glass or jar. Then fill the glass with white vinegar until the egg is completely submerged.
- Leave the egg in the glass for 2-3 days. Each day, check back on the egg. Make some observations. Do you notice any changes to the egg? Is anything happening to the vinegar? Write down your observations each day. After about 3 days the egg will start to become translucent and you will know it is ready to move to step 3.
- Carefully remove the egg from the glass and rinse it under some tap water. While rinsing the egg, gently rub the outside of the egg and the white film will come off leaving you with a translucent egg. Examine the egg and make some observations. Does the egg look different from when you started the experiment? Does the egg feel different? Perhaps you notice that it feels rubbery (like a bouncy ball). Write down your observations.
- Over a plate or other container, lift the egg 1-2 inches in the air, let go, and watch it bounce. Make some observations. What happens to the egg? Does it bounce? Is this different than what you expected?
- When you are ready for some messy fun, lift the egg a little higher in the air and let it go…SPLAT!

Reader Interactions

October 8, 2017 at 5:08 pm
this website was extremely helpful

December 13, 2017 at 8:42 am

January 28, 2018 at 3:22 am
How long should I wait accurately to turn the egg bouncy

March 13, 2018 at 11:54 pm
You need to wait at a minimum of two days before bouncing the egg.

October 1, 2018 at 8:17 pm
Hi you have to wait for a maximum of 1-3 days till it bounces.

December 5, 2018 at 12:18 am

April 18, 2018 at 9:55 am
thank you for this useful information guys. always fun to get my hands messy and do a science experiment with with reuban and max 🙂

May 16, 2018 at 6:09 pm
my daughter did this for her science fair project and she left it in for 24 hours and it was perfect

November 12, 2018 at 8:47 pm
We think the calicium on the egg shell dissolves with the vinegar which is an acid.
Are we correct?

December 18, 2018 at 9:42 am
This is so cool.

January 8, 2019 at 8:22 am
Thanks! It helped me a lot for my science project at school!

January 27, 2020 at 4:13 am
Can you add food colouring? ??

February 3, 2023 at 12:32 pm
Yes you can, when i did this experiment in class we did food coloring and highlighter and we made glow in the dark and colored eggs.

February 25, 2020 at 5:12 pm
The acid from the vinegar made the elasticity in the egg.
Leave a Reply Cancel reply
Your email address will not be published. Required fields are marked *
Save my name, email, and website in this browser for the next time I comment.

- Privacy Policy
- Disclosure Policy
Copyright © 2024 · Cool Science Experiments HQ
- Grades 6-12
- School Leaders
FREE Thanksgiving Worksheet Bundle for Last-Minute Activities 🦃
Egg and Vinegar Experiment: How-To Plus Free Worksheet
It’s so easy you’ll want to do it again and again.

You and your students are going to love the Egg and Vinegar Experiment. It’s an easy project you can complete in a few days, and it makes a good science fair experiment too. We asked 3rd grader Hazel from Baltimore, Maryland, to help us put this one to the test, and she did a great job. Be sure to check out her video for step-by-step instructions, and then keep reading to learn how to do the experiment on your own.
Also grab your free, printable Egg and Vinegar Experiment recording sheet when you fill out the form on this page.
How does the Egg and Vinegar Experiment work?
The Egg and Vinegar Experiment, also known as the “Naked Egg Experiment,” demonstrates osmosis. Placing an egg in vinegar triggers a reaction between the eggshell’s calcium carbonate and the vinegar’s acetic acid, producing carbon dioxide bubbles. As the acetic acid dissolves the eggshell over time, the semi-permeable membrane remains, permitting water molecules to enter via osmosis. This influx causes the egg to swell.
Check out this video tutorial of the experiment, featuring 3rd grader Hazel:
How do you do the experiment?
First, get your materials together..

You’ll need an egg, a graduated cylinder, and white vinegar.
Put your egg in the vinegar.

Pour white vinegar into a graduated cylinder. Fill it high enough so that your egg will be completely submerged. Gently add your egg.
Observe the egg.

Keep an eye on it for a couple of days to notice the changes. Then after a few days, you can remove the egg from the graduated cylinder.
Examine the results.

Pour out the vinegar and give your egg a gentle rinse. You can try bouncing the egg. Also take time to look for the yolk inside.
Break the egg.

After you’re done examining the egg, try breaking it to find the yolk. This will also help you find the egg’s membrane.
What does the Egg and Vinegar Experiment teach?
This experiment teaches several important scientific concepts: ADVERTISEMENT
Students learn about the movement of water molecules across a semi-permeable membrane from an area of high concentration to an area of low concentration. In this case, water moves from the vinegar solution into the egg.
Chemical reactions
Students observe a chemical reaction between calcium carbonate (present in the eggshell) and acetic acid (present in the vinegar), leading to the dissolution of the eggshell.
Structure and function
By removing the eggshell, students can observe the structure and function of the egg’s semi-permeable membrane, which allows certain molecules to pass through while restricting others.
Experimental procedure
Students gain experience in following a step-by-step experimental procedure, making observations, and drawing conclusions based on their observations.
Can this experiment be done for a science fair?

Absolutely! The Egg and Vinegar Experiment is not only educational but also visually captivating, making it an excellent choice for a science fair project. Students can explore variations of the experiment by changing variables such as the concentration of vinegar, the duration of immersion, or the temperature of the vinegar solution. Additionally, they can research the scientific principles behind the experiment and present their findings in a clear and engaging manner. Overall, this experiment offers a hands-on opportunity for students to learn about osmosis and chemical reactions while showcasing their creativity and scientific inquiry skills at a science fair.
Get your free Egg and Vinegar Experiment recording sheet:
Just fill out the form on this page to get instant access to your free, printable Egg and Vinegar Experiment recording sheet.
Looking for more science experiment ideas? Check out our big list of experiment ideas here.
Plus, be sure to subscribe to our newsletters for more articles like this., you might also like.

30 of Our Favorite Halloween Science Experiments
From exploding Peeps to dancing gummy bears! Continue Reading
Copyright © 2024. All rights reserved. 5335 Gate Parkway, Jacksonville, FL 32256
Science Project Ideas
Egg in Vinegar Experiment
The egg in vinegar experiment, though pretty simple, gives your child the foundation knowledge on reactions between acids and bases. It goes on to change the chemical composition of an egg, making it rubbery on being dipped in vinegar for a few days. There are minor changes in the size of the egg too which can be measured over the period and plotted in a graph.

Rubber Egg Science Project
On soaking an egg in vinegar, the liquid dissolves its hard shell while exposing the thin membrane that is the only thing that holds the egg yolk and white.
- White vinegar
- A clear jar or tall glass
- A big spoon
- Place the egg in the jar or glass such that it does not touch the walls of the container.
- Pour vinegar so as to cover the egg completely.
- Watch the egg closely. You should see bubbles forming on its surface. Note down your observations.
- Let the egg soak in the vinegar for one day.
- Use the spoon to scoop out the egg from the vinegar. You need to be very careful while doing this as the shell should already be partially dissolved by this time, leaving the egg tender.
- Now pour out the old vinegar, put the egg back in the container and cover it with fresh vinegar.
- Let the arrangement sit for another week.
- Scoop out the egg and rinse it carefully.
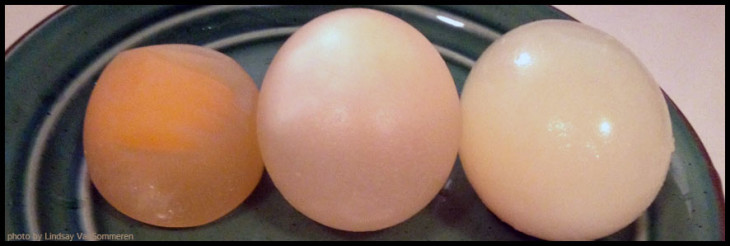
- Now you are left with an egg without a shell. Though it still looks like an egg, it has a translucent covering membrane that flexes when you squeeze it. If you shake it, you can see the egg yolk sloshing about in the egg white. You can even bounce it gently over hard surfaces.

Things You Can Try
- Perform the experiment on a hardboiled egg
- Try other variations of vinegar such as concentrated or apple cider vinegar. You can also replace vinegar with vinegar and baking soda solution, coke, corn syrup, salt water, tap water, etc. and look for any difference in the results.
Egg and Vinegar Experiment Video
Explanation for the bouncy egg.
Eggshells are made of calcium carbonate (chemical formula CaCO 3 ) while vinegar is acetic acid (chemical formula CH 3 COOH). The two chemically react to separate the calcium and carbonate parts. The calcium ions freely float in the vinegar while the carbonate ions form carbon dioxide that you can see in the form of bubbles.
Since the egg membrane is semi-permeable, it allows some of the vinegar to enter the interiors by osmosis, a process by which molecules of a solvent pass through a semi-permeable membrane to land themselves in a more concentrated solution from a less concentrated one. This makes the egg bigger and more delicate when you handle it. If the membrane ruptures, the insides of the egg will spill into the vinegar. After the experiment, if you leave the nude egg exposed to air, the atmospheric carbon dioxide reacts with the leftover calcium in the egg to make it regain rigidity after some time.
In the lab, it can also be used as a tool to grow dental health awareness in children. Teachers can explain that a similar reaction occurs when the bacteria sticking to their teeth create acids on reacting with sweets or coke (soda) when they have it. Their enamels get destroyed in the process. The fun yet educative activity has all the ingredients to become a favorite science fair project.
Leave a Reply Cancel reply
Your email address will not be published. Required fields are marked *
Save my name, email, and website in this browser for the next time I comment.
- Plant Biology
- Human Biology
- Biology Cells Osmosis Experiment
Osmosis Experiment: Dissolving Egg Shells With Vinegar
How does osmosis keep you healthy.
Right now, as you read this, there are millions of things happening throughout your body. The food you ate just a bit ago is making its way through a watery slurry inside your stomach and small intestines. Your kidneys are working hard to excrete waste and extra water. The lacrimal glands near your eyes are secreting tears, which allow your eyelids to close without damaging your eyeballs. What’s one thing that all of these processes have in common? They all rely on osmosis: the diffusion of water from one place to another.
Osmosis factors heavily in each of these processes and is an important force for keeping every single cell in your body healthy. Osmosis is hard to see without a microscope. But if we create our very own model of a cell, using a shell-less chicken egg, we can see what happens when we manipulate the osmotic balance in the “cell”!

- 3 glasses (large enough to fit the egg plus liquid)
- 3 butter knives
- White vinegar (about 3 cups)
- Distilled water (about 2 cups)
- Light corn syrup (about 1 ¼ cups)
- Slotted spoon
- Measuring cup (1 cup)
- Measuring spoons (1 tablespoon and ½ tablespoon)
- Sticky notes and marker
- Scale (optional)
Note : It’s okay to touch the eggs, but remember to wash your hands afterwards to avoid any nasty surprises!
1. Place one egg in each glass. Pour in enough vinegar to cover each egg. Bubbles will start to form around the egg, and it’ll float up. To keep it submerged, put a butter knife in the glass to hold it down.
2. Put the three glasses in the refrigerator and allow to sit for 24 hours.
3. Gently holding the egg in the glass, pour out the old vinegar. Replace with fresh vinegar, and let sit in the refrigerator for another 24 hours. Repeat this process until the shells are fully dissolved and only the membrane remains. This should take about 2-3 days.
4. Gently remove the eggs using the slotted spoon and rinse with tap water in the sink. Rinse out the empty glasses as well.
5. Gently put the shell-less eggs aside for a moment on a plate.
6. Prepare three different sugar-water solutions as follows, labeling with sticky notes:
Glass 1: Label “hypertonic”. Pour in one cup of corn syrup.
Glass 2: Label “isotonic”. Add 1 ½ tablespoons corn syrup to the one cup measuring cup, and fill the remainder with distilled water. Pour into glass (make sure you get all the corn syrup out!) and stir to dissolve.
Glass 3: Label “hypotonic”. Pour in one cup of distilled water. Gently put one shell-less egg in each of the glasses, and let sit in the refrigerator for another 24 hours.

7. Remove the glasses from the refrigerator, and gently put the eggs on a plate. If you weighed the eggs before putting them in each solution, weigh them again. What happened to each of the eggs?

How does osmosis work?
Osmosis is the scientific term that describes how water flows to different places depending on certain conditions. In this case, water moves around to different areas based on a concentration gradient , i.e. solutions which have different concentrations of dissolved particles ( solutes ) in them. Water always flows to the area with the most dissolved solutes, so that in the end both solutions have an equal concentration of solutes. Think about if you added a drop of food dye to a cup of water – even if you didn’t stir it, it would eventually dissolve on its own into the water.
In biological systems, the different solutions are usually separated by a semipermeable membrane , like cell membranes or kidney tubules . These act sort of like a net that keeps solutes trapped, but they still allow water to pass through freely. In this way, cells can keep all of their “guts” contained but still exchange water.
Now, think about the inside of an egg. There’s a lot of water inside of the egg, but a lot of other things (i.e. solutes) too, like protein and fat. When you placed the egg in the three solutions, how do you think the concentration of solutes differed between the inside of the egg and outside of the egg? The egg membrane acts as a semipermeable membrane and keeps all of the dissolved solutes separated but allows the water to pass through.
How did osmosis make the eggs change size (or not)?
If the steps above work out properly, the results should be as follows.
In the case of the hypertonic solution, there were more solutes in the corn syrup than there were in the egg. So, water flowed out of the egg and into the corn syrup, and as a result the egg shriveled up.
In the case of the isotonic solution, there was roughly an equal amount of solutes in the corn syrup/water solution than there was in the egg, so there was no net movement in or out of the egg. It stayed the same size.
In the case of the hypotonic solution, there were more solutes in the egg than in the pure water. So, water flowed into the egg, and as a result, it grew in size.
Osmosis and You
Every cell in your body needs the right amount of water inside of it to keep its shape, produce energy, get rid of wastes, and other functions that keep you healthy.
This is why medicines that are injected into patients need to be carefully designed so that the solution has the same concentration of solutes as their cells (i.e. isotonic). If you were sick and became dehydrated, for example, you would get a 0.90% saline IV drip. If it were too far off from this mark it wouldn’t be isotonic anymore, and your blood cells might shrivel up or even explode , depending on the concentration of dissolved solutes in the water.
Osmosis works just the same way in your cells as it does in our egg “cell” model. Thankfully, though, the semipermeable membrane of the egg is much stronger, so you don’t have to worry about the egg exploding as well!
Related Topics
Choose one of the following categories to see related pages:.
- Experiments
Share this Page

Lindsay graduated with a master’s degree in wildlife biology and conservation from the University of Alaska Fairbanks. She also spent her time in Alaska racing sled dogs, and studying caribou and how well they are able to digest nutrients from their foods. Now, she enjoys sampling fine craft beers in Fort Collins, Colorado, knitting, and helping to inspire people to learn more about wildlife, nature, and science in general.
- Basic Types of Cells
- Cell Organelles
- Connective Tissue Cells
- Epithelial Cells
- Introduction to Cells
- Muscle Cells
- Nerve Cells
- Osmosis Experiment
- Structure of the Cell Nucleus
- Structures of the Cell Cytoplasm
Science Newsletter:
Full list of our videos.

Teaching Biology?

How to Make Science Films

Read our Wildlife Guide

New From Untamed Science

- Skip to main content
- Skip to primary sidebar
Fun with Mama
Toddler and preschool activities
Written by Brenda • Jan 30, 2024 • Leave a Comment
Easy Egg in Vinegar Experiment

One of our favorite science experiments to do at home with kids is the egg in vinegar experiment! This rubber egg science experiment is a lot of fun for kids of all ages and it is a highly visual science experiment that is exciting for kids. Keep reading to learn how to do the experiment and to read about the science behind the egg in vinegar experiment!
Be sure to check out my Fizzy Egg Dyeing Science Experiment – The Best Way To Dye Easter Eggs as well!

Follow along with these directions to learn how to make a rubber egg!
All the details on how to complete the naked egg experiment from start to finish are listed below, including supplies too.
Here is what you need to complete this science experiment:
- Regular eggs (raw white eggs)
- White Vinegar
- Clear cup, mason jars, or other container (plastic or glass will both work)
What happens when you put eggs in vinegar?
This is what this simple experiment is going to show! The combination of the vinegar with the raw eggs and water is nothing sort of “magic”. This is one activity that does an amazing job of combining learning and fun in a way that will keep the kids engaged and ready for more.
Video of the rubber egg experiment
The science behind the naked egg science experiment.
When you place a raw egg in vinegar, the shell will dissolve overnight, exposing the membrane of the egg and the yellow yolk inside the egg.
The shell dissolves because of the acidic nature of the vinegar which triggers a chemical reaction with the shell of the egg.
Eggshells are made from calcium carbonate, which is a base. The acid in the vinegar (acetic acid) reacts with the calcium and breaks down the eggshell overnight. The acid in the vinegar reacting with the calcium carbonate in the shell produces Carbon Dioxide gas (co2.)
After the shell dissolves, the membrane of the egg remains. This is called a “semipermeable membrane” because the membrane can absorb some water.
Have the kids compare the size of the naked eggs with a shelled egg to see how the membrane absorbed some of the water from the vinegar and became larger.
The flow of water through a semipermeable membrane is called “osmosis.”
Directions for the Egg Soaked in Vinegar Experiment
Place 1-3 eggs in a clear container. Be careful not to crack the eggshell or the experiment might not work properly.

Pour enough vinegar over the eggs to cover them. You can add food coloring to the vinegar if you like.
Place the solution in an out-of-the-way place. While the egg sits in the vinegar some of the water in the vinegar will travel through the egg’s membrane
Check on the eggs in about one hour. You should see bubbles forming on the outside of the shell.
At the end of the day, stir the eggs gently with a spoon to help release the shell from the egg.
The next day, check on the eggs. The shell will appear as scum on the top of the vinegar.

Take out the egg and inspect it. You may have to gently rub it to remove the last bit of the shell.
If the shell comes off easily, the egg is ready to inspect. If not, put it back in the vinegar and remove it the following day.
Rinse the egg carefully with cool water to remove any shell residue.
Another variation on how to do the activity:
- Place the egg in vinegar
- After 24 hours change the vinegar. Drain the old vinegar carefully then add the fresh vinegar.
- Place the egg in vinegar in the refrigerator untouched for 7 days. After 7 days, pour off the vinegar, rinse the egg, and the shell will be gone. All you will be left with are naked eggs.

Inspect the egg under bright lighting to see the parts of the egg. Gently squeeze the egg to test the strength of the membrane!
The kids will love this rubber egg experiment! We also refer to this as our bouncy egg experiment because it does have a little bit of bounce to it, too!
What to do with the rubber egg
Do a bouncing eggs chemistry experiment. Can your rubber egg bounce?
Try placing your naked egg in a glass filled with corn syrup. The egg will shrivel up. The reason for this is that corn syrup has a lower concentration of water than the egg does. The water in the egg moves through the membrane into the corn syrup in order to equalize the water concentration levels on both sides.
Fun Ideas To Extend this Rubber Egg Activity
The fun part about creating science at home is that you can easily try out other hypotheses and ideas. Use this STEM activity as a way to get the kids to think outside the box. Talk to them about what they think is going to happen if other liquids are used and have them write out their thoughts.
Even if you don’t actually do the activity, this will show them the process of how a scientist’s mind works!
I hope you enjoyed this fun science activity. Simple science experiments are a great way to encourage curiosity in children by asking them questions, asking them to make a hypothesis on what will happen and will encourage further exploration.

Brenda MacArthur is a STEM curriculum writer, STEM author, and STEM accessibility advocate. She founded the site STEAMsational.com in 2012 which offers hands-on STEM activities for kids and STEM lesson plans for teachers.
View all posts from this author
You May Also Enjoy These Posts:

Get easy and instant access to ALL of our printable activities and resources by joining the Fun With Mama printables club.
Get all the details and join here.
Reader Interactions

Leave a Comment Cancel reply
Your email address will not be published. Required fields are marked *
This site uses Akismet to reduce spam. Learn how your comment data is processed .
Have you grabbed the latest FREE printables?

Get Your ALL ACCESS Shop Pass here →
Egg In Vinegar (Rubber Egg) Experiment
The rubber egg or bouncy egg experiment is a must-try science activity you can set up in minutes in the classroom or at home! How can you make an egg bounce? What happens to the shell? Does light pass through it?

Egg In Vinegar Experiment
💡 This experiment is quick to set up, but it must be left for 48 to 72 hours to dissolve the shell and create a bouncy egg!
Grade Recommendation:
This experiment is suitable for Grades K-2 (simple observation of chemical reactions) and Grades 3-4 (more in-depth understanding of reactions).
- Household Vinegar
- Jar or a Vase
STEP 1: Place an egg in the jar and cover with vinegar.
Optional: You can color the vinegar with food coloring for rainbow-colored rubber eggs too!

STEP 2: Wait and watch!
Notice the bubbles on the eggshell! The acid in the vinegar reacts with the calcium carbonate in the shell. This reaction produces a gas called carbon dioxide!

STEP 3: After 48 hours, remove the egg and rinse it off. Ours had a layer of brown scum that was easily washed away!
The hard outer shell is gone and the egg white and yolk are surrounded by a thin membrane.

Why Does An Egg Become Bouncy In Vinegar?
Eggshells get their hardness from a mineral called calcium carbonate, which is similar to our bones. When you place the egg into the vinegar, you will observe bubbles.
The chemical reaction between the vinegar (an acid) and the calcium carbonate (the base) in the eggshell produces these bubbles or gases.
When an acid and a base mix, they form carbon dioxide, a gas. Learn more about acids and bases.
The eggshell breaks down, leaving a soft, bendable, squeeze-able, rubber egg. Does it bounce? Kids can gently squeeze the egg and bounce the egg. However, be prepared for the eggs to burst! See our suggestions below.
Try our seashells in vinegar experiment for another variation of this chemistry lesson.
How does osmosis work?
You may have noticed that the egg gets larger as the shell disappears. This is due to the process of osmosis, which is why the inside of the egg increases in size!
Osmosis is the movement of water through a semi-permeable cell membrane. The water from the vinegar moved inside the egg because of the tiny holes in the membrane.
However, the holes are not big enough to allow the egg to come out, so now the egg and water are inside the cell membrane together! The cell membrane is called semi-permeable because only some materials can pass through. Learn more about osmosis here!
FREE Printable Science Activities Calendar

Fun Things To Do With Your Rubber Egg
Now for the fun part: exploring the naked egg with students! We gathered a few supplies such as a magnifying glass and a large flashlight. However, first, we talked about what our naked egg felt and looked like. We had made a cool, rubbery feeling egg!
💡 TIP: Help your child learn to explore by asking questions to spark curiosity!
All of these questions encourage exploration and hands-on learning. Have kids use their senses to observe ! What does it smell like? What does it look like? There are so many ways to explore. Grab the magnifying glass too!

Can an egg bounce?
Yes!! How high can an egg bounce?
TEST IT: How high can your egg bounce before it breaks? Watch out! This might get messy!

Can you see through an egg?
In general, you can’t see through a raw egg but what about a rubber egg? What happens when you put the naked egg up to a flashlight?
TEST IT: You can see through it! You can even see the yolk rolling around inside. Why is this? Because the hard outer shell is no longer there, you can see through the membrane of the egg.

Will a rubber egg eventually burst?
Of course, we were prompted to wonder what would happen if you burst the naked egg. WOW! With a quick prick from a skewer, the egg burst! We were all quite surprised. The images below show what the naked egg looked like afterward.

How to Differentiate this Project
💡Make sure to introduce the Scientific Method along the way. You can use this method will ages and especially older kids!
For Younger Students (Kindergarten-Grade 1):
- Focus on Observation : Have students simply observe the changes in the egg over time, drawing or coloring what they see.
- Guided Explanation : Use simple language to explain how the vinegar dissolves the shell, leaving the membrane.
For Older Students (Grade 2-4):
- Introduce Scientific Concepts : Discuss the chemical reaction between acetic acid (vinegar) and calcium carbonate (egg shell).
- Data Collection : Have students measure the egg before and after the experiment, then record their findings and make predictions.
Extension for Grades 4-5:
- Inquiry-Based Learning : Ask students to hypothesize what would happen if you used a different liquid, test their hypothesis, and compare results.
- Eggs – Are there differences in eggshells between brown and white eggs? How about organic eggs versus regular eggs?
More Fun Science Experiments To Try
- Take egg drop STEM challenge
- See if you can make an egg float
- Test the strength of the shell
- Make a crystal eggshell .
- Set up a potato osmosis lab.
- Dissolve a seashell!

Printable Science Projects Pack
If you’re looking to grab all of our printable science projects in one convenient place plus exclusive worksheets and bonuses like a STEAM Project pack, our Science Project Pack is what you need! Over 300+ Pages!
- 90+ classic science activities with journal pages, supply lists, set up and process, and science information. NEW! Activity-specific observation pages!
- Best science practices posters and our original science method process folders for extra alternatives!
- Be a Collector activities pack introduces kids to the world of making collections through the eyes of a scientist. What will they collect first?
- Know the Words Science vocabulary pack includes flashcards, crosswords, and word searches that illuminate keywords in the experiments!
- My science journal writing prompts explore what it means to be a scientist!!
- Bonus STEAM Project Pack: Art meets science with doable projects!
- Bonus Quick Grab Packs for Biology, Earth Science, Chemistry, and Physics
- Science Fair Project Pack with experiments to try!

14 Comments
- Pingback: Best Kids Science Experiments for a Year of Science Fun!
- Pingback: Easter Science Activities and Easter STEM Ideas for Kids
- Pingback: Easter Science Activities For Kids: 24 Incredible Experiments
- Pingback: Chemistry Activities and Science Experiments for Kids
- Pingback: Salt Water Density Experiment For Kids | Little Bins for Little Hands
- Pingback: 25 Best Science Experiments For Kids | Little Bins for Little Hands
- Pingback: The BEST Very Simple Science Experiments for Kids to Try Anywhere
- Pingback: 40+ Super Easy Science Fair Project Ideas For Every Grade And Age – Beeblebuy
my my bursted my rubberr egg im very upset
is this a fair test?
too many pages to print out….not easy to be able to do .keeps saying click below but get the cards on hypothesisi…dont want that
This is an awesome activity.
This was amazing! in the end it turned out great! my sister popped it tho :c
Comments are closed.

Subscribe to receive a free 5-Day STEM Challenge Guide
~ projects to try now ~.

IMAGES
VIDEO