How to MLA Format on Word: A Step-by-Step Guide
MLA format is a style of writing and citing sources commonly used in the humanities. To use MLA format on Word, you’ll need to set the correct font and margins, create a header with your last name and page number, and use proper in-text citations and a Works Cited page. Let’s get started!

Step by Step Tutorial: MLA Format on Word
Before jumping into the steps, it’s important to know that following these instructions will help you set up your document according to the MLA guidelines. This includes setting up page layout, font, spacing, header, and citations.
Step 1: Set the Font and Size
Select Times New Roman and a 12-point font size for your document.
The MLA format requires the use of a legible font. Times New Roman, in 12-point size, is the most commonly accepted.
Step 2: Set the Margins
Set one-inch margins on all sides of your document.
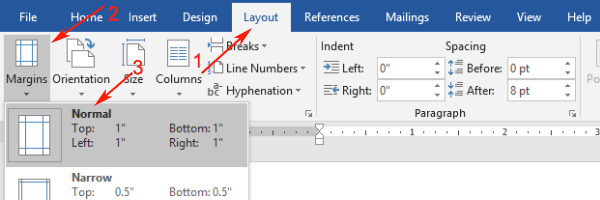
In the "Layout" or "Page Layout" section of Word, you can adjust the margins to meet MLA standards. This ensures your document looks professional and is easy to read.
Step 3: Set the Header
Create a header that includes your last name and page number, flush with the right margin.
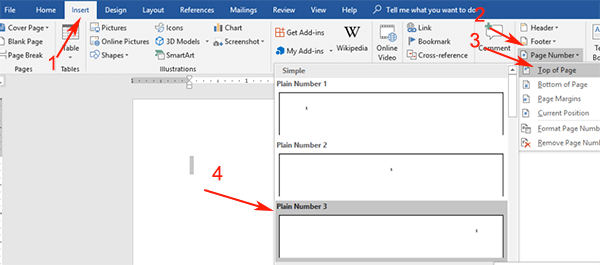
Go to the "Insert" tab, click on "Header," and select a simple format. Then type your last name followed by a space, and insert the page number using the "Page Number" feature.
Step 4: Double Space the Text
Ensure your entire document is double-spaced.
In the "Home" tab, click on the "Line and Paragraph Spacing" icon and select "2.0." This guarantees that your document adheres to MLA spacing guidelines.
Step 5: Indent the First Line of Paragraphs
- Indent the first line of each paragraph by half an inch.
You can set the first line indent by using the ruler on the top of the document or by pressing the "Tab" key once before you start typing a paragraph.
Step 6: Add In-Text Citations
Include in-text citations for any quotes, summaries, or paraphrases within your text.
For MLA in-text citations, include the author’s last name and the page number without a comma between them. You can add this detail in parentheses at the end of the quoted or paraphrased section.
Step 7: Create a Works Cited Page
Start a new page at the end of your document for the Works Cited list.
This page should list all the sources you’ve cited in your paper. Make sure to use the correct MLA format for each type of source.
After completing these steps, your document will be properly formatted according to MLA style. You’ll have a professional-looking paper that follows the specific guidelines required for humanities essays and research papers.
Tips for MLA Format on Word
- Always check the latest MLA guidelines, as they can change over time.
- Use the "Styles" feature in Word to quickly format headings and subheadings.
- Set up your document before you start writing to save time on formatting later.
- Keep a copy of the MLA Handbook or an online guide handy for reference.
- Proofread your Works Cited page carefully to ensure all entries are correctly formatted.
Frequently Asked Questions
What is the correct way to format a title in mla.
The title should be centered and not bolded, italicized, or underlined.
Can I use bullet points in MLA format?
Bullet points are not typically used in MLA format. It’s best to write in paragraph form.
How do I cite a source with no author in MLA format?
Use the title of the work in place of the author’s name in the in-text citation.
Do I need a title page for MLA format?
MLA generally does not require a separate title page. Your name, instructor’s name, course, and date should be included on the first page.
How do I make a hanging indent for my Works Cited page on Word?
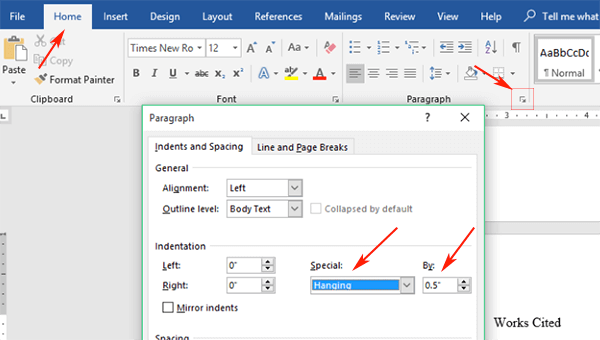
You can create a hanging indent by going to the "Paragraph" settings and selecting "Hanging" under the "Special" dropdown in the "Indentation" section.
- Set the Font and Size to Times New Roman, 12-point.
- Set one-inch Margins on all sides.
- Create a Header with your last name and page number.
- Double Space the text.
- Add In-Text Citations when referencing sources.
- Create a Works Cited Page at the end.
Knowing how to MLA format on Word is a critical skill for anyone in the humanities. It’s not just about making your paper look good; it’s about ensuring that your ideas and sources are presented clearly and consistently. By following the above steps, you can format your Word document to meet MLA standards. Remember to always refer back to the MLA Handbook or trusted online sources for specific citation rules and examples. Happy writing, and may your essays always be perfectly formatted!

Matt Jacobs has been working as an IT consultant for small businesses since receiving his Master’s degree in 2003. While he still does some consulting work, his primary focus now is on creating technology support content for SupportYourTech.com.
His work can be found on many websites and focuses on topics such as Microsoft Office, Apple devices, Android devices, Photoshop, and more.
Share this:
- Click to share on Twitter (Opens in new window)
- Click to share on Facebook (Opens in new window)
Related Posts
- How to Create a Hanging Indent in Google Docs
- How to Indent Second Line in Google Docs: A Step-by-Step Guide
- How to Do a Hanging Indent in Google Docs: A Step-by-Step Guide
- How to Indent on Google Docs
- How to Remove Page Number from First Page of Google Docs and Google Sheets
- How to Make Text Vertical in Google Docs
- How to Indent in Excel: A Step-by-Step Guide for Beginners
- How to Cite a Website in a PowerPoint: A Step-by-Step Guide
- How to Get Rid of Header in Google Docs: A Step-by-Step Guide
- How to Make the Header Smaller in Word 2013: A Step-by-Step Guide
- How to Change Margins in Google Docs (A Quick 4 Step Guide)
- How to Set Up 1 Inch Margins in Word 2010: A Step-by-Step Guide
- How to Set Margins in Word 2010: A Step-by-Step Guide
- How to Set 1 Inch Margins in Word for Office 365: A Step-by-Step Guide
- How to Remove Hanging Indent in Word: A Step-by-Step Guide
- How to Use a Signature Font in Word for Office 365: A Step-by-Step Guide
- How to Insert Picture in Excel Header
- How to Repeat Something at the Top of Every Page in Word 2019: A Step-by-Step Guide
- How to Delete a Header in Excel 2013: Step-by-Step Guide
- How to Add the Filename to the Header in Excel 2013: A Step-by-Step Guide
Get Our Free Newsletter
How-to guides and tech deals
You may opt out at any time. Read our Privacy Policy
- How to setup your software
- Sample MLA Paper – normal paper
- Sample MLA Paper – has cover page
- Sample APA Paper
- Sample Chicago Paper
- Sample CSE Paper
- APA Format Guidelines
MLA Format Using Microsoft Word 2019
This tutorial will guide you through the process of setting up Microsoft Word 2019 for your MLA Format paper. It is very easy and we are going to accomplish the following settings:
- All text is font “Times New Roman” & Size 12.
- One-inch page margin for all sides (top, bottom, right and left).
- A header with your last name and page number 1/2 inch from the top-right of each page.
- The entire research paper is double-spaced.
- Your name, name of professor, course title, and due date of paper on the first page.
- Your research paper title is centered.
- Body paragraphs have a 1/2 inch first line indent.
- A Works Cited page beginning on a separate page at the end of the paper.

I. How to Set the Font and Size:
- We set the Font and Size under the Home tab (like in the image below).
- Click on the font and select Times New Roman .
- Click on the size and select 12 .

Font and Size
II. How to Set the Margins in Microsoft Word 2019:
- Click on the Layout tab => click on Margins => click on Normal => the margins will then automatically be set to 1″ top, 1″ bottom, 1″ left, 1″ right.

III. How To Create a Header in Microsoft Word 2019:

- Press the Left Arrow key on your keyboard ( to deselect the inserted page number )
- Now type in your Last Name => press the Spacebar on your keyboard once to make a space between your Last Name and the page number.

- You are done with the header. To close the header, double click anywhere outside the header. To open the header again, use the same method, simply double click on the header.
IV. How to Setup Line Spacing to Double Spaced in Word 2019:
- Click on the Home tab.
- Click on the Line Spacing button .

V. How to Enter the First Page Information:
- Type your full name => press Enter .
- Type your professor’s name => press Enter .
- Type course title => press Enter .
- Type your paper’s due date => press Enter .
- Click on the Align Center icon on the formatting toolbar (to center your blinking cursor) => Type the title of your paper , capitalizing the first letter and all major words and proper nouns. Do not use italics, boldfaced type, underlining, or all caps to format your title. Do not type a period at the end of the title => press Enter .

VI. How to Setup the Works Cited Page:
Follow this how-to when you are ready to work on your Works Cited page. The Works Cited page has the following characteristics:
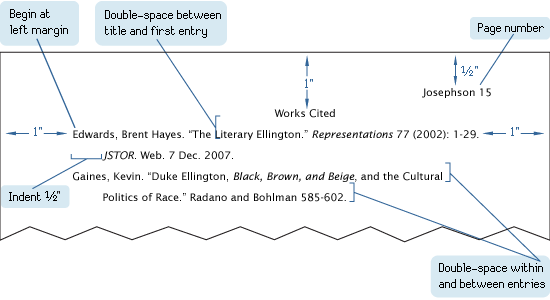
- A heading “Works Cited” centered one inch below the top edge of a new page. Do not bold or underline this heading.
- No indent on the first line of each entry. If an entry runs more than one line, indent the subsequent line or lines 1/2 inch from the left margin.
- Alphabetize entries in your list of works cited by the author’s last name, using the letter-by-letter system.
Immediately after typing the final line of your paper , press the CTRL key and the ENTER key at the same time to begin a new page (another method is to insert a page break from the toolbar). Your header with your last name and automatic page numbering should already appear at the top right of your paper.
- Click on the align center icon so that the text is centered.
- Type Works Cited (do not underline, boldface, italicize, or enclose the title in quotation marks).
- Press the Enter key once to begin a new line.
- Click on the align left icon so that the text is aligned left.

- Now type your sources. If you have Internet sources, when you type the URL, Microsoft Word automatically applies the hyperlink to it. To remove the hyperlink, right-click on the URL => choose Remove Hyperlink .
Sample Works Cited Page:

Works Cited
You are done with the settings for Microsoft Word 2019. Take care!
If you find this website useful, please share with a friend:
Thanks for the great information on how to do this!
This is much better than tutorial I don’t have to keep stopping I just read along at my pace. 😊
thank you so much for helping out with the MLA Format, it is amazing for beginners.
Thank you for creating a good website that works well.
thanks so much really helpful! take care!
It would be nice to show how you make another paragraph. I think this helped me a lot, thank you. 9.4/10
Leave a Comment
Current ye ignore me @r *
Leave this field empty
Previous post: MLA Format Microsoft Word 2016
- The Format of the Research Paper
- MLA Format Cover Page
- MLA Format Headings
- MLA Citations
- MLA Format Works Cited
- MLA Format FAQs
- MLA Format Sample Paper
- MLA Sample Paper w/ Cover and Outline Pages
HOW TO SETUP YOUR SOFTWARE
- MLA Format using Google Docs
- MLA Format Microsoft Word 2016
- MLA Format using Pages on Mac
Copyright © 2011–2024 • MLA Format • All rights reserved. Currently, MLA is at its 8th edition. This website has no official relationship with the Modern Language Association and is not endorsed by the MLA.

Microsoft 365 Life Hacks > Writing > Writing an Essay in MLA Format
Writing an Essay in MLA Format
Knowing how to write a Modern Language Association—or MLA—essay is an essential part of making it through school these days. Be warned, however, that daunting little tasks await around every corner—whether it’s knowing where to set your margins, how to edit a header, the right way to format a heading, and beyond!

While we can’t write your paper for you, this guide can certainly help you understand the proper MLA format for your essay. Keep reading to learn about writing an MLA-format paper with some tips for making sure it’s done right the first time.

Get the most out of your documents with Word
Elevate your writing and collaborate with others - anywhere, anytime
What is an MLA-format essay? It’s not uncommon for associations and organizations to follow a standard format and writing style. The Associated Press (AP) and University of Chicago styles are most common in professional settings. News outlets typically prefer the AP style, while businesses and creative agencies will choose the Chicago style. Academia, on the other hand, traditionally follows APA and MLA styles. APA (not the same as AP style) comes from the American Psychological Association and is used in scholarly articles. An MLA-format essay fits the established style for citing references and formatting essays established by the Modern Language Association.
Required elements of an MLA-format paper. MLA is the preferred style when writing an essay in high school and most college settings. As with other writing styles, there are specific characteristics and items an MLA-format paper needs to include to fit the bill of the style. Every MLA-format essay must include the following:
- One-inch margins
- Double-spaced text
- Easy-to-read font (typically Times New Roman) in size 12
- New paragraphs indented 0.5 inches
- Italicized media titles (books, magazines, etc.), no underlining
- Page numbers in the header 0.5 inches from the top of the page
- Oxford comma
- Center-justified title
- Headings and subheadings
- Clearly labeled and titled tables and figures
- Parenthetical citations
In addition to the listed elements above, every MLA essay must include a Works Cited. MLA format doesn’t require a title page, but it also doesn’t deem them unnecessary, so it’s up to your professor whether you’ll need one or not. One way to take the edge off the process of writing this type of essay is to use a free template or a handy built-in tool that helps you build bibliographies and more.

Tips for meeting MLA formatting guidelines. It’s said that the devil is in the details, and it’s never truer than when it comes to MLA-format essays. The following tips are areas to pay attention to when writing your essay:
- Set your margins. Your software might be set to one-inch margins, double-spaced text, and 0.5-inch indentations by default—but you can save yourself the trouble (and a headache) later in the writing process by adjusting them before you get started. Of course, one of the best parts about using a computer to write your essay is that you can always make adjustments later.
- Straighten out your headings . One area students might miss with MLA formatting is with the title, headings, and subheadings. It’s normal to want to use bold or italicized typeface on your titles and headings to make them stand out from the rest of the text. MLA style specifically calls for them to match the rest of the text without any alterations aside from title case. A centered or left-justified heading will stand out enough from the rest of your text that it needn’t any additional adjustments.
- Understand subheadings. While primary headings aren’t to receive any special formatting, subheadings will be changed to set them apart from their headings. For example, if your heading is about mammals, you might have subheadings about land and water mammals. You can further organize your water mammals subheading into types of whales and dolphins. Using subheadings helps to organize your writing and makes it easier to consume as a reader.
- Know how to cite your work. The information you’re presenting in your essay didn’t mysteriously appear from out of the ether. You need to give credit where it’s due when writing an MLA-format paper, so you’re giving credit to the original author of your sources. You can also improve your writing credibility and avoid plagiarism. Plagiarism is one of the biggest academic offenses a student can commit and could lead to expulsion in some cases. Properly citing your work with parenthetical citations and quoting authors when necessary will help to keep you covered.
When it comes down to it, practice makes perfect. The more essays you write, the better you’ll become at writing and meeting the expectations of MLA style. Before you know it, MLA format will be second nature, and everything will fall into place.
Still having a hard time visualizing what an MLA essay looks like? Check out a sample paper so you can see first-hand how they’re formatted!
Get started with Microsoft 365
It’s the Office you know, plus the tools to help you work better together, so you can get more done—anytime, anywhere.
Topics in this article
More articles like this one.

Is it 'dragged' or 'drug'?
Do you mix up the words "drug" and "dragged"? Learn the difference and when to use each word so you'll never mistake them again

How to write a plot twist in your story
When executed carefully, a plot twist has the power to shock and dazzle your reader. Learn how you can incorporate one into your writing.

What's the difference between a memoir and an autobiography?
Explore the differences between memoirs, autobiographies, and biographies.

When to use 'while' vs. 'whilst'
“While” and “whilst” are usually interchangeable, but not always. See how they differ and learn how to use them effectively.

Everything you need to achieve more in less time
Get powerful productivity and security apps with Microsoft 365

Explore Other Categories

IMAGES