The Kitchen Pantry Scientist
Simple recipes for real science, diffusion and osmosis experiments.
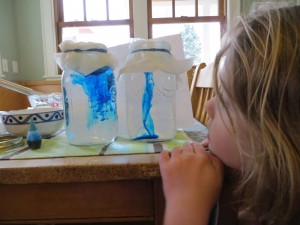
Think about the way pollutants move from one place to another through air, water and even soil. Or consider how bacteria are able to take up the substances they need to thrive. Your body has to transfer oxygen, carbon dioxide and water by processes involving diffusion as well.
Lots of things can affect how fast molecules diffuse, including temperature. When molecules are heated up, they vibrate faster and move around faster, which helps them achieve equilibrium more quickly than they would if it were cold.
Diffusion takes place in gases (like air), liquids (like food coloring moving through water,) and even solids (semiconductors for computers are made by diffusing elements into one another.)
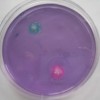
Every so often, measure the circle of food coloring as it diffuses into the jello around it. How many cm per hour is it diffusing? If you put one plate in the refrigerator and an identical one at room temperature, do they diffuse at the same rate? Why do you think you see more than one color for certain shades of food coloring? What else could you try?
Here’s a post on how to use this experiment to make sticky window decorations: https://kitchenpantryscientist.com/?p=4489
We made plates and did the same experiment using 2 cups of red cabbage juice , 2 cups of water and 4 packs of gelatin to see how fast a few drops of vinegar or baking soda solution would diffuse (a pigment in red cabbage turns pink when exposed to acid, and blue/green when exposed to a base!)
It’s also fun to experiment with the diffusion of substances across a membrane, like a paper towel. This is called osmosis. Membranes like the ones around your cells are selectively permeable and let water and oxygen in and out, but keep other, larger molecules from freely entering and exiting your cells.
For this experiment, you’ll need a jar (or two), paper towels, rubber bands and food coloring. Fill a jar with water and secure a paper towel in the jar’s mouth (with a rubber band) so that it hangs down into the water, making a water-filled chamber that you can add food coloring to. Put a few drops of food coloring into the chamber and see what happens.
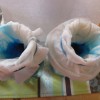
top “chambers” for food coloring

Are the food coloring molecules small enough to pass through the paper towel “membrane?” What happens if you put something bigger, like popcorn kernels in the chamber? Can they pass through the small pores in the paper towel?
Do the same experiment in side-by-side jars, but fill one with ice water and the other with hot water. Does this affect the rate of osmosis or how fast the food coloring molecules diffuse throughout the water?
Think about helium balloons. If you take identical balloons and fill one with helium and the other with air, the helium balloon will shrink much faster as the smaller helium atoms diffuse out more quickly than the larger oxygen molecules.
Tags: diffusion , experiment , kids , osmosis In: Biology Experiments , Chemistry Experiments , Physics Experiments | 8 comments »

Leave a comment
Name (required)
Mail (will not be published) (required)
XHTML: You can use these tags: <a href="" title=""> <abbr title=""> <acronym title=""> <b> <blockquote cite=""> <cite> <code> <del datetime=""> <em> <i> <q cite=""> <s> <strike> <strong>

6 EASY ways to model OSMOSIS

Teaching osmosis?
Osmosis is one of my favorite topics to teach during the cells unit because it’s so easily visualized. There are quite a few ways to easily see osmosis in action! Here’s a round-up of six labs and the pros and cons of each:
1. EGG OSMOSIS
The “naked egg” lab is very popular in biology. Students really get a kick out of seeing the eggshell dissolve! In this lab, students dissolve the shell of an egg by soaking it in vinegar (this takes about 3 days, so its best to set up on a Friday). Once the shell is gone, students carefully transfer their naked eggs to hypotonic distilled water, and a hypertonic solution like corn syrup or molasses. Students compare the mass of the egg before and after soaking and figure out which way the water moved while attempting to reach equilibrium.

PROS: Students love this lab! Also, eggs are round like red blood cells, so they can visualize what happens to cells in different hypertonic or hypotonic solutions.
CONS: It can get expensive to purchase enough eggs for all of your classes. Also, expect some to break along the way, so soak some extras just in case. Overall, it feels a little wasteful of perfectly good eggs. Maybe do this one as a demonstration, and then choose one of the options below for students to do in groups.
2. PURPLE ONION SKIN
Of all the osmosis labs, this one might be my favorite because I’m partial to getting out the microscopes. In this lab, students get a small piece of onion skin and make a wet mount slide using fresh water. They will see nice rectangular purple onion cells. Next, they will swap out the fresh water for salt water, and watch the cytoplasm in each cell shrivel up. If your students already know how to use microscopes, this one is a hit! Here is a full blog post with more details and pictures.
Note: I used to use elodea for this lab, but it became difficult to find at pet stores since it is invasive in many states. Purple onion is easy and cheaper! You can also find a lab write-up here .

PROS: Inexpensive, and fool proof. It is impossible to mess up! Unlike other options, this lab uses real plant cells. Also, it is the only version that doesn’t require soaking things overnight so you can get it done in one class period.
CONS: Your classroom will smell like onion for a day.
3. DIALYSIS TUBING
This version is a little fancier, and is a great option if you have honors or AP students. In this lab, students will get dialysis tubing and fill them with varying concentrations of sugar water solution. They will measure the initial mass of the tubes, and then soak the dialysis tubing overnight in distilled water. The following day they will measure the new mass, and see how water moved across the dialysis tubing membrane. You can find a free version of this lab from Amy Brown on TpT.
PROS: Students collect quantitative data, and it feels more “scientific” than other options.
CONS: Dialysis tubing is expensive, and if students don’t tie the string tight enough they can leak.

4. GUMMY BEARS
I am the first to admit gummy bears are not my favorite option, but I know many teachers who love doing it this way. In this version, students soak gummy bears in tap water, distilled water, and salt water overnight. They measure the change in the size of the gummy bear using rulers.
PROS: A large bag of gummy bears is only a few dollars, and students always love working with candy.

CONS: I don’t love this lab because depending on the brand you buy, the gummy bears can begin to dissolve and fall apart. Also, since they are an irregular shape it is difficult to calculate the change in volume.
5. WATER BEADS
An alternative to gummy bears is water beads, or Orbeez. You set it up the same way by soaking them in fresh water and salt water. If your kid already has some at home, use them instead of gummy bears. I like them better for a few reasons:
PROS: Water beads won’t fall apart like gummy bears, even after soaking multiple days. Since they are round, you can have students measure the diameter, and calculate the volume of the sphere. Also, you can dry them out afterward, place them in a Tupperware, and re-use them the following year.

CONS: Orbeez are smaller than gummy bears, so if your students struggle taking small, accurate measurements that might be a point of struggle. (Note: Beware of cheaper off-brands you can find on Amazon, because they WILL fall part unlike Orbeez).
6. BABY CARROTS
Last but not least are baby carrots! In this lab, each lab group gets 2 baby carrots. Just like other labs, they measure the mass before and after soaking them in fresh and salt water. Students will also notice that the baby carrot soaked in salt water becomes flimsy and bendable overnight. If you have already covered organelles, this can lead to a discussion about vacuoles and how plant cells become limp and flimsy when they lose water. You can find a lab write-up on my website !

PROS: Inexpensive materials, and uses real plant cells.
CONS: You won’t see the size of the carrot change, only the flexible vs stiff texture.
Alright, which is your favorite? Choose one (or two) and have a blast!

- Read more about: Cells

Hi, I'm Becca!
Search the site, browse by category.
- Back to School
- Biochemistry
- Body Systems
- Classification
- Classroom Decor
- Classroom Management
- Distance Learning
- End of the School Year
- Experiments
- Field Trips
- For NEW Teachers
- Formative Assessment
- Media in the Classroom
- Microscopes
- Photosynthesis & Respiration
- Plate Tectonics
- Sustainability
- Teacher Tips
- Weather and Climate
Get Freebies!
You might also like....

Teaching DNA Structure and Replication just got easier

10 Atmosphere Lessons for High School

Read Aloud Closure Assignments

Want a fun way to practice science vocabulary? Try out seek and finds!

Privacy Overview

- Plant Biology
- Human Biology
- Biology Cells Osmosis Experiment
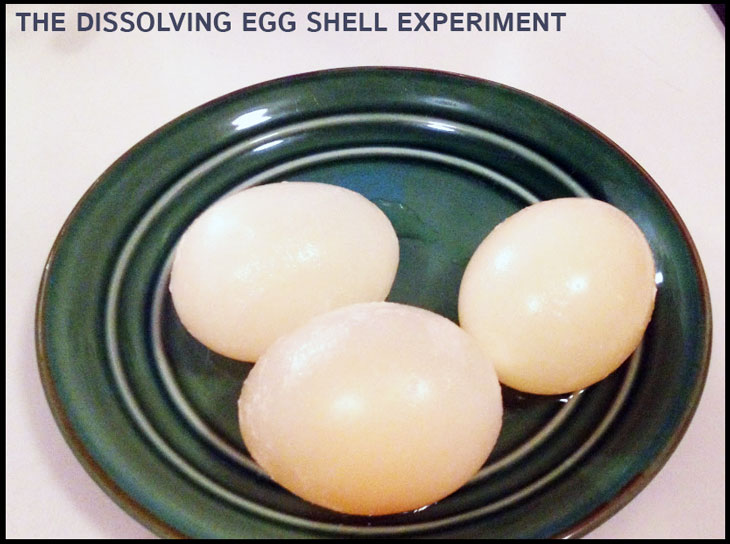
Osmosis Experiment: Dissolving Egg Shells With Vinegar
How does osmosis keep you healthy.
Right now, as you read this, there are millions of things happening throughout your body. The food you ate just a bit ago is making its way through a watery slurry inside your stomach and small intestines. Your kidneys are working hard to excrete waste and extra water. The lacrimal glands near your eyes are secreting tears, which allow your eyelids to close without damaging your eyeballs. What’s one thing that all of these processes have in common? They all rely on osmosis: the diffusion of water from one place to another.
Osmosis factors heavily in each of these processes and is an important force for keeping every single cell in your body healthy. Osmosis is hard to see without a microscope. But if we create our very own model of a cell, using a shell-less chicken egg, we can see what happens when we manipulate the osmotic balance in the “cell”!
- 3 glasses (large enough to fit the egg plus liquid)
- 3 butter knives
- White vinegar (about 3 cups)
- Distilled water (about 2 cups)
- Light corn syrup (about 1 ¼ cups)
- Slotted spoon
- Measuring cup (1 cup)
- Measuring spoons (1 tablespoon and ½ tablespoon)
- Sticky notes and marker
- Scale (optional)
Note : It’s okay to touch the eggs, but remember to wash your hands afterwards to avoid any nasty surprises!
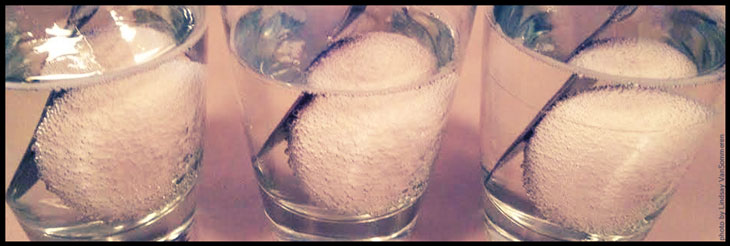
1. Place one egg in each glass. Pour in enough vinegar to cover each egg. Bubbles will start to form around the egg, and it’ll float up. To keep it submerged, put a butter knife in the glass to hold it down.
2. Put the three glasses in the refrigerator and allow to sit for 24 hours.
3. Gently holding the egg in the glass, pour out the old vinegar. Replace with fresh vinegar, and let sit in the refrigerator for another 24 hours. Repeat this process until the shells are fully dissolved and only the membrane remains. This should take about 2-3 days.
4. Gently remove the eggs using the slotted spoon and rinse with tap water in the sink. Rinse out the empty glasses as well.
5. Gently put the shell-less eggs aside for a moment on a plate.
6. Prepare three different sugar-water solutions as follows, labeling with sticky notes:
Glass 1: Label “hypertonic”. Pour in one cup of corn syrup.
Glass 2: Label “isotonic”. Add 1 ½ tablespoons corn syrup to the one cup measuring cup, and fill the remainder with distilled water. Pour into glass (make sure you get all the corn syrup out!) and stir to dissolve.
Glass 3: Label “hypotonic”. Pour in one cup of distilled water. Gently put one shell-less egg in each of the glasses, and let sit in the refrigerator for another 24 hours.
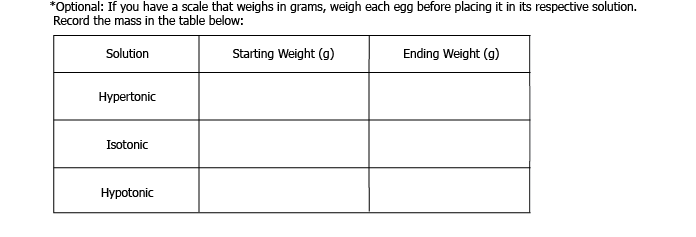
7. Remove the glasses from the refrigerator, and gently put the eggs on a plate. If you weighed the eggs before putting them in each solution, weigh them again. What happened to each of the eggs?
How does osmosis work?
Osmosis is the scientific term that describes how water flows to different places depending on certain conditions. In this case, water moves around to different areas based on a concentration gradient , i.e. solutions which have different concentrations of dissolved particles ( solutes ) in them. Water always flows to the area with the most dissolved solutes, so that in the end both solutions have an equal concentration of solutes. Think about if you added a drop of food dye to a cup of water – even if you didn’t stir it, it would eventually dissolve on its own into the water.
In biological systems, the different solutions are usually separated by a semipermeable membrane , like cell membranes or kidney tubules . These act sort of like a net that keeps solutes trapped, but they still allow water to pass through freely. In this way, cells can keep all of their “guts” contained but still exchange water.
Now, think about the inside of an egg. There’s a lot of water inside of the egg, but a lot of other things (i.e. solutes) too, like protein and fat. When you placed the egg in the three solutions, how do you think the concentration of solutes differed between the inside of the egg and outside of the egg? The egg membrane acts as a semipermeable membrane and keeps all of the dissolved solutes separated but allows the water to pass through.
How did osmosis make the eggs change size (or not)?
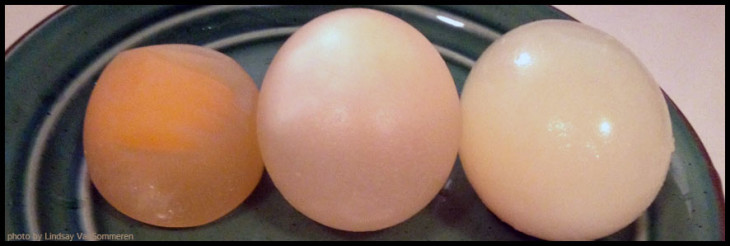
If the steps above work out properly, the results should be as follows.
In the case of the hypertonic solution, there were more solutes in the corn syrup than there were in the egg. So, water flowed out of the egg and into the corn syrup, and as a result the egg shriveled up.
In the case of the isotonic solution, there was roughly an equal amount of solutes in the corn syrup/water solution than there was in the egg, so there was no net movement in or out of the egg. It stayed the same size.
In the case of the hypotonic solution, there were more solutes in the egg than in the pure water. So, water flowed into the egg, and as a result, it grew in size.
Osmosis and You
Every cell in your body needs the right amount of water inside of it to keep its shape, produce energy, get rid of wastes, and other functions that keep you healthy.
This is why medicines that are injected into patients need to be carefully designed so that the solution has the same concentration of solutes as their cells (i.e. isotonic). If you were sick and became dehydrated, for example, you would get a 0.90% saline IV drip. If it were too far off from this mark it wouldn’t be isotonic anymore, and your blood cells might shrivel up or even explode , depending on the concentration of dissolved solutes in the water.
Osmosis works just the same way in your cells as it does in our egg “cell” model. Thankfully, though, the semipermeable membrane of the egg is much stronger, so you don’t have to worry about the egg exploding as well!
Related Topics
Choose one of the following categories to see related pages:.
- Experiments
Share this Page
Lindsay graduated with a master’s degree in wildlife biology and conservation from the University of Alaska Fairbanks. She also spent her time in Alaska racing sled dogs, and studying caribou and how well they are able to digest nutrients from their foods. Now, she enjoys sampling fine craft beers in Fort Collins, Colorado, knitting, and helping to inspire people to learn more about wildlife, nature, and science in general.
- Basic Types of Cells
- Cell Organelles
- Connective Tissue Cells
- Epithelial Cells
- Introduction to Cells
- Muscle Cells
- Nerve Cells
- Osmosis Experiment
- Structure of the Cell Nucleus
- Structures of the Cell Cytoplasm
Science Newsletter:
Full list of our videos.

Teaching Biology?

How to Make Science Films

Read our Wildlife Guide

New From Untamed Science

The Biology Corner
Biology Teaching Resources

Observing Diffusion Using Iodine and Plastic Bags
Most chapters follow the cell structure topic with one on the cell membrane and diffusion and osmosis. These concepts can be very difficult for students to understand.
In order to give them a view of how diffusion works with a semipermeable membrane, I like to do a lab that uses a plastic bag to model the cell (membrane).
It is a simple lab where students do very little except watch the process and record data and information. To set it up, you will need plastic bags, iodine, water, and corn starch. All except iodine are readily available at the supermarket.
Student handout includes instructions, pre-lab questions, and an analysis section.
Setting Up the Lab
First, add a spoonful of cornstarch and about 100 ml of water in a cheap plastic bag. (You don’t need to be exact!) Tie the top of the bag like a balloon. I like to do at least one of these while the students watch. Then I give them prepared bags because it takes too long (and is messy) for students to do this step.
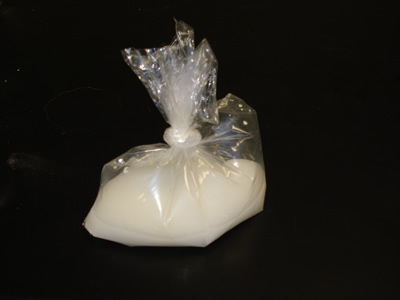
Tell the students that the bag represents a cell, with the cytoplasm being the cornstarch mixture and the plastic is the cell membrane. Explain that solid objects are not really solid at a molecular level and that the bag is more like a tiny little screen door. If molecules are small enough, they can pass right through the bag.
With the baggie in place, you will need to prepare enough beakers for your entire class. Fill them about half full and add several drops of iodine , You want the water to be very orange. The more concentrated the mixture, the faster the reaction.

Observations and Analysis
Explain that iodine is an “INDICATOR” in that it will change color whenever it encounters starch. You can demonstrate this with a beaker of starch solution and a drop of iodine. Usually students are fascinated by the quick and dramatic color change!
Finally, students will carefully place the baggie into the iodine mixture. Their worksheet will ask them to make some predictions about what will happen and to define diffusion and osmosis. The process should take about 15 minutes and students should notice a change in the color of the corn starch in the bag.
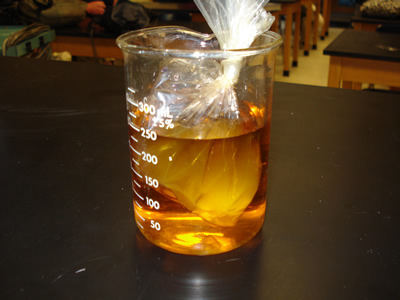
After 15 Minutes….
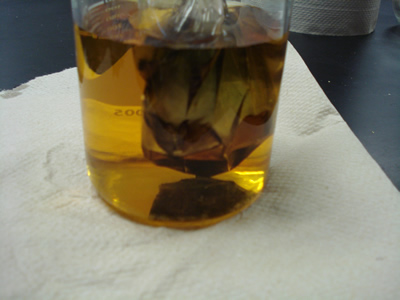
Students will then be asked on the worksheet to explain what happened. A common misconception is that the iodine “ate” through the bag. Remind students that the bag is like a screen door and iodine is a very small molecule.
Despite the fact that this lab is not very interactive, students do seem to understand the cell model and semi-permeable membranes after completing it. Many will ask to see what will happen if you put the starch in the beaker and the iodine in the bag. You can set this up for them and they can view the results the next day.
Shannan Muskopf
- Science, Tech, Math ›
- Chemistry ›
- Projects & Experiments ›
Simple Candy Osmosis Experiment
Demonstrate Osmosis Using Gummy Bears
- Projects & Experiments
- Chemical Laws
- Periodic Table
- Scientific Method
- Biochemistry
- Physical Chemistry
- Medical Chemistry
- Chemistry In Everyday Life
- Famous Chemists
- Activities for Kids
- Abbreviations & Acronyms
- Weather & Climate
- Ph.D., Biomedical Sciences, University of Tennessee at Knoxville
- B.A., Physics and Mathematics, Hastings College
Osmosis is the diffusion of water across a semipermeable membrane. The water moves from an area of higher to lower solvent concentration (an area of lower to higher solute concentration). It's an important passive transport process in living organisms, with applications to chemistry and other sciences. You don't need fancy lab equipment to observe osmosis. You can experiment with the phenomenon using gummy bears and water. Here's what you do:
Osmosis Experiment Materials
Basically, all you need for this chemistry project are colored candies and water:
- Gummy bear candies (or other gummy candy)
- Plate or shallow bowl
The gelatin of the gummy candies acts as a semipermeable membrane . Water can enter the candy, but it's much harder for sugar and coloring to leave exit it.
What You Do
It's easy! Simply place one or more of the candies in the dish and pour in some water. Over time, water will enter the candies, swelling them. Compare the size and "squishiness" of these candies with how they looked before. Notice the colors of the gummy bears starts to appear lighter. This is because the pigment molecules (solute molecules) are being diluted by the water (solvent molecules) as the process progresses.
What do you think would happen if you used a different solvent, such as milk or honey, that already contains some solute molecules? Make a prediction, then try it and see.
How do you think osmosis in a gelatin dessert compares with osmosis in candy? Again, make a prediction and then test it!
- How to Do Chromatography with Candy and Coffee Filters
- Candy Chemistry Projects
- Exploding Mentos Drink Experiment
- How to Perform the Dancing Gummi Bear Demonstration
- How to Get Fluoride Out of Water
- Honeycomb Chemistry Candy Recipe
- Middle School Science Fair Project Ideas
- Take Your Volcano Science Project to the Next Level
- Sugar Crystal Growing Problems
- Experiment to See How Much Sugar Is in a Soda
- Make Candy Glass Icicle Decorations
- How to Make Rock Candy
- The Dancing Raisin Experiment
- How to Make a DNA Model out of Candy
- Why Is the Sky Blue?
- Make Potassium Chlorate from Bleach and Salt Substitute

- Capital Campaign
- Mission Vision
- Racial Equity
- Staff and Board
- Open Positions
- In The News
- Past Newsletters
- Annual Reports
- Community Business Initiative
- In-Kind Support
- Partners & Supporters
Osmosis and Diffusion Lab
This lab allows you to learn about two forms of passive transport: diffusion and osmosis. You will compare and contrast similarities and differences in the processes of diffusion and osmosis. Use a colorimetric test to demonstrate the movement of a solute across a semi-permeable membrane. Set up an environment likely to facilitate osmosis and gather data to determine whether or not osmosis may have occurred. Kit contains enough materials for 15 groups.
Lesson Files
- Osmosis and Diffusion Teachers Manual (.pdf)
- Osmosis and Diffusion Student Guide (.pdf)
Materials Needed for this Lesson Plan
- Osmosis and Diffusion Lab Kit
- Electronic balance
- Small funnels or pipettes
- Safety goggles
- lab apron (optional)
- Distilled or deionized water
- Paper towels
Lesson Plans
Explore the tides.
Overview: Have you ever built a sandcastle on a beach only to find it washed away a few hours later? Every 6 to 12 hours or so, the water along most coasts rises and falls in...
Build an Electromagnet
Overview: Student teams investigate the properties of electromagnets. They create their own small electromagnets and experiment with ways to change their strength to pick up...
Tree Growth Study
Overview: How can the age of a tree be determined? Is there a way to tell a good year of growth versus a bad year? Trees contain some of nature’s most accurate records of...
Investigating Shadows
Overview: In this activity, students will explore what affects the size of a shadow and compare the shadows of various opaque, transparent, and translucent objects. Part I....
The Dirty Water Project
Overview: In this hands-on activity, students investigate different methods—aeration and filtering—for removing pollutants from water. Working in teams, they design,...
Drops on a Penny Experiment
Overview: Have you ever noticed on a rainy day how water forms droplets on a window? Why doesn’t it spread out evenly over the whole surface? It has to do with...
Modeling Gravity
Overview: Why can we feel gravity pull us down towards the Earth, but not sideways towards other big objects like buildings? Why do the planets in our solar system orbit the...
Floodplain Modeling
Overview: Students explore the impact of changing river volumes and different floodplain terrain in experimental trials with table top-sized riverbed models. The models are...
Build a Waterwheel from Recycled Materials
Overview: Students observe a model waterwheel to investigate the transformations of energy involved in turning the blades of a hydro-turbine. They work as engineers to create...
Entanglement Challenge
Demonstrate the challenges for marine animals who get entangled in common debris with this 10 –15 minute activity about marine conservation. Pair this activity with a...
Animal Yoga
Stretch your way into different animal movements and poses to learn how they move, get food, and protect themselves. This 5-10 minute full-body activity for young learners...
Weaving the Web of Life
Overview: In this hands-on activity, students construct a food web with yarn to learn how food chains are interconnected. Objectives: 1. construct a food chain and explain...

Battle of the Beaks: Adaptations and Niches
Overview: In this simulation game, students learn about adaptive advantage, based on beak function, by simulating birds competing for various foods. Birds equipped with...
Modeling the Seasons
This hands-on activity demonstrates and explains how seasons is caused by the tilt of Earth on its axis as it orbits around the sun. Students model the seasons with their...
Ring and Discs Demonstration
Ready, Set, Go! A ring and disc of equal mass and diameter speed down an inclined plane. Which one wins? Not an easy prediction to make, but the victor will be clear. Results...
Fire Syringe Demonstration
This is one of the most impressive demonstrations of the heat produced when a gas is rapidly compressed and is the principle behind how a diesel engine functions. How does it...
Repairing Broken Bones: Biomedical Engineering Design Challenge
This STEM activity incorporates the engineering design process into a life or biomedical science activity. It can be used during an anatomy unit or in a health...
Modeling Moon Phases
This lesson on the phases of the moon features just one of several hands-on activities you can do with our adaptable Moon Model Kit. In this activity students will: 1. use...
Color-Changing Celery Experiment
This exciting experiment illustrates transpiration, the process of plants absorbing water through their roots. The water travels up tubes in the stems called xylem to all...
10 Activities To Try With the Magnetic Water Molecules Kit
Try out 10 exciting activities related to the properties of matter using our Magnetic Water Molecules Kit! The following topics are covered: Polarity Hydrogen...
What's Your Blood Type?
Overview Realistically simulate blood typing without the hazards of real blood. Using actual blood typing procedures, students classify four unknown samples of the simulated...
Understanding Natural Selection Through Models
Overview With this worksheet, students will explore one of the five mechanisms of evolution: natural selection. Students will analyze and interpret 3 models of natural...
HIV/AIDS Test Simulation Lab
Explore the immunological principle that antibodies bind to specific antigens. Your class will learn how ELISA – Enzyme Linked Immunoassay – is a fundamental...
Egg in a Bottle
Overview: In this classic demonstration, students will use differences in air pressure to force an egg into a bottle. This demonstration only takes 10 minutes and leaves your...
Magnetic Meiosis Model Demonstration
Teach the mechanisms of meiosis (and make it memorable!) with this simple and informative magnetic demonstration. Instead of struggling to tell which chromosome is which from...
Modeling the Effects of an Introduced Species
Overview Using a set of Food Web cards, each depicting an organism, students work in groups to model a food web for one of four ecosystems. Students are then given an...
Natural Selection: Antibiotic Resistance and Engineering the Fastest Fish
Overview Immerse your students in this engaging 3-part laboratory activity on evolution by natural selection! Your students will practice important science skills while...
Estimating Populations
Background The size of an animal population becomes newsworthy when it becomes very large (too many rats in one place) or very small (on the verge of extinction). How do...
Butterfly Wings: Using Nature to Learn About Flight
Background Have you ever seen butterflies fluttering around outside, gliding through the air and landing on flowers? While they are delicate and fragile, butterflies are...
This lab allows you to learn about two forms of passive transport: diffusion and osmosis. You will compare and contrast similarities and differences in the processes of...
Seed Identification Activity
This laboratory activity will familiarize students with basic plant anatomy and the basic characteristics and functions of plant seeds. Students will practice using...
Genetics: The Science of Heredity — Modeling DNA Structure and the Process of Replication
This lesson is the first unit of a 5 part module entitled “Genetics: The Science of Heredity” developed by ETA Cuisenaire. Modeling DNA structure and the process...
Crime Scene Investigation Lab
Innovating Science’s crime scene investigation lab is used to study forensic techniques and features an activity to solve the crime of the missing frogs from the...
Measuring Precipitation of Hurricanes
This lesson deepens students’ understanding of how and why we measure precipitation across the globe through the study of rainfall patterns caused by hurricanes. Students...
Prey vs. Predator
The action in this fast-paced activity may become intense as student “predators” attempt to capture their “prey.” What happens when different organisms, living in the...
What Is in the Food You Eat?
In this activity, students test representative food samples for the presence of certain types of matter (nutrients). This investigation allows students to discover some of...
The Science of Spherification
Forget drinking your juice. Instead, try snacking on it! Use the steps and recipes in this food science project to transform drinks into semi-solid balls that pop in your...
Turn Milk Into Plastic
“Plastic made from milk” —that certainly sounds like something made-up. If you agree, you may be surprised to learn that in the early 20th century, milk was...
Proper Hand Washing Can Stop the Spread of Disease
People used to believe that disease was caused by miasma, a poisonous vapor which carried particles of rotting materials that caused illness. People knew that eating spoiled...
How Germs Spread
People used to think that angry gods caused disease, or that a poisonous vapor that came from rotting food or bad air caused illness. It took thousands of years for people to...
7 Van De Graaff Generator Activities
A set of activities to show how the generator works and the principles behind it.
Calorimetry Lab
How does the energy content in lipids and carbohydrates differ? Energy content is the amount of heat produced by the burning of a small sample of a substance and heating...
Owl Pellet Surprise
This fun, hands-on introductory dissection is a great springboard for teaching the techniques of using a science notebook while having students engage in the...
Stream Table Investigation
Overview: Students learn about water erosion through an experimental process in which small-scale buildings are placed along a simulated riverbank to experience a range of...
Boiling by Pressure Drop
The goal of this experiment is to demonstrate that boiling is not just a function of temperature, as most people believe. Rather, it is a function of both temperature and...
How to Make Water Cycle in a Bag
https://www.mobileedproductions.com/blog/how-to-make-a-water-cycle-in-a-bag
How do Antibiotics Affect Bacteria When They are Put Together
Plan and carry out investigations: collaboratively, in a safe and ethical manner including personal impacts such as health safety, to produce data to serve as the basis...
Building a Generator
Students work individually or in pairs to follow a set of instructions and construct a mini generator which powers a Christmas light. Best done as a take-home assignment.
Conservation of Momentum with Vernier
Teacher leads a demonstration with vernier carts of different/equal mass, equipped with bumpers and magnets to demonstrate a variety of scenarios in which as both carts...
3rd Law with Vernier
After learning about the 1st law of motion, students partake in a teacher-led series of questions about 2 carts, and which cart will experience a greater force. The teacher...
Gravitational Acceleration
In 2-3 person groups, students take the mass of assorted objects, then hang them from a spring scale to find their gravitational force. Using the F=ma equation, they rewrite...
Electricity and Magnetism Stations
Egg drop lab.
Students work in teams to design a container for an egg using provided materials. Students drop their containers, then analyze factors which can minimize force on the...
How Does Volvo Keep Drivers Safe?
Students watch a series of short videos explaining how cars are designed with crumple zones, airbags, and automatic braking to prevent passenger damage in a collision....
Share Your Lesson Plan
We invite you to share your lesson plans as well so that we can continue to make this database a community resource.
- Name First Last
- Lesson Plan Name
- Description of Lesson
- Materials Borrowed for the Lesson
- Upload lesson plans, handouts, or other documents Drop files here or Accepted file types: pdf, doc, docx, xls, xlsx, ppt, pptx, pub, jpg, png.
- Phone This field is for validation purposes and should be left unchanged.
OFFICE HOURS WITH EXPERTS
Connect with a local STEM professional or subject matter expert for help with specific content questions. Below is our current roster of subject matter experts.
Monica Pasos Audubon Nature Institute Biofacts and animals
Amanda Rosenzweig Delgado Community College Microscopes and microscopy
EARTH & ENVIRONMENTAL SCIENCE
Kyle Straub Tulane Local Louisiana ecology
LIFE SCIENCE
Physical science, robotics & engineering.
Cia Blackstock Director of Programs at Electric Girls Electrical engineering
STEM Library Lab is always looking for volunteers.
Whether you are a STEM practitioner and would like to become one of our local experts, a student looking to help with operations, or a member of the community interested in contributing to our mission in any way, we are eager to connect.
Just fill out the volunteer contact form and we’ll reach out soon!
- I am a... STEM professional or academic Teacher or school staff Student Community member Other
- I am interested in volunteering... At the library, assisting staff At the library, assisting teachers At a school Other
- Anything else you'd like us to know about your background or volunteer interests?
- Comments This field is for validation purposes and should be left unchanged.
Our Location
3011 N I-10 Service Rd E Metairie LA 70002 504.517.3584
Note: we are no longer located on St Bernard Av.
Monday - Friday 2:00-5:00 p.m. And by appointment
- Nature of Inquiry Request inventory item Communities of practice Lesson plans Media inquiry Office hours with experts Microgrant opportunities Membership Sponsorship Other
- Your Inquiry
- Email This field is for validation purposes and should be left unchanged.
STEM Library Lab Membership
Thank you for your interest in becoming a member school. This form is for schools that want more information about the paid School Membership tier with additional member benefits. Free membership is always free , simply create a borrower profile here .
Please complete the form below, and we'll be in touch quickly to learn more about you and your school.
- ROLE Role Principal Assistant Principal Teacher Teacher Aide Administrative Assistant Other
- HOW DID YOU HEAR ABOUT STEM LIBRARY LAB? Referral from Colleague Web Search Social Media
- Name This field is for validation purposes and should be left unchanged.
Our monthly newsletter keeps you informed of goings-on, events, and high-interest items we stock.
- Community Member
- Name * First Last
- School Name *
- Form Name / Title *
- Form Upload * Accepted file types: pdf, doc, docx, xls, xlsx, ppt, pptx, pub, jpg, png.
- Entry Form * Accepted file types: pdf, doc, docx, xls, xlsx, ppt, pptx, pub, jpg, png.
- Artwork * Accepted file types: pdf, doc, docx, xls, xlsx, ppt, pptx, pub, jpg, png.
Application Submission
- Project Title *
- Application Upload * Drop files here or Accepted file types: pdf, doc, docx, xls, xlsx, ppt, pptx, pub, jpg, png.

Search My Blog
Using potatoes for osmosis and diffusion labs.

- Teach or illustrate multiple concepts
- Use simple consumable materials and readily available lab items
- Involve weighing, measuring and calculating
- Require the students to make a HAND-MADE graph
- Provide a perfect visual of the concepts I teach in the classroom
- Reinforce the use of lab equipment and proper laboratory skills
- Require the students to use critical thinking and problem solving skills
- Require students to closely examine the date in order to draw a conclusion

No comments:
Post a comment.

IMAGES
VIDEO
COMMENTS
Very Simple Diffusion and Osmosis Experiment. The concept of cellular transport (diffusion, osmosis, hypotonic, hypertonic, active transport, passive transport) is fundamental to a biology class. There are so many great ideas for labs that teach and explore these concepts.
It’s also fun to experiment with the diffusion of substances across a membrane, like a paper towel. This is called osmosis. Membranes like the ones around your cells are selectively permeable and let water and oxygen in and out, but keep other, larger molecules from freely entering and exiting your cells.
There are quite a few ways to easily see osmosis in action! Here’s a round-up of six labs and the pros and cons of each: 1. EGG OSMOSIS. The “naked egg” lab is very popular in biology. Students really get a kick out of seeing the eggshell dissolve! In this lab, students dissolve the shell of an egg by soaking it in vinegar (this takes ...
Osmosis Experiment: Dissolving Egg Shells With Vinegar. How does osmosis keep you healthy? Right now, as you read this, there are millions of things happening throughout your body. The food you ate just a bit ago is making its way through a watery slurry inside your stomach and small intestines.
Observing Diffusion Using Iodine and Plastic Bags. Most chapters follow the cell structure topic with one on the cell membrane and diffusion and osmosis. These concepts can be very difficult for students to understand.
Osmosis is the diffusion of water across a semipermeable membrane. Use gummy bears to demonstrate osmosis with this simple science experiment.
To understand this process you need to understand the makeup of the cell membrane and an important phenomenon known as diffusion. Diffusion is the movement of a substance from an area of high concentration to an area of low concentration due to random molecular motion.
Exercise 1: Diffusion Through a Gel. One factor that can affect the rate of diffusion is the size of the molecule. Larger molecules tend to move more slowly than smaller molecules. In this experiment, students will compare the diffusion rates of two dyes traveling through agar.
This lab allows you to learn about two forms of passive transport: diffusion and osmosis. You will compare and contrast similarities and differences in the processes of diffusion and osmosis. Use a colorimetric test to demonstrate the movement of a solute across a semi-permeable membrane.
Using Potatoes for Osmosis and Diffusion Labs. • Easy materials list! • Easy set up and clean up! •Involves calculations and graphing! Win! I love labs that: Teach or illustrate multiple concepts. Use simple consumable materials and readily available lab items. Involve weighing, measuring and calculating.